

Review sản phẩm
7 Mẹo Đơn Giản Để Quản Lý Thông Báo Trên Điện Thoại Android Của Bạn

Th5
7 Mẹo Đơn Giản Để Quản Lý Thông Báo Trên Điện Thoại Android Của Bạn
Thông báo trên điện thoại Android có thể là một công cụ hữu ích, nhưng đôi khi chúng lại trở nên quá tải và gây phiền nhiễu. Để giúp bạn kiểm soát tốt hơn, dưới đây là 7 mẹo đơn giản để quản lý thông báo trên thiết bị Android của mình.
### 1. Phân Loại Thông Báo Theo Ưu Tiên
Hãy sắp xếp thông báo theo mức độ quan trọng. Bạn có thể thiết lập để chỉ nhận thông báo từ những ứng dụng quan trọng như email công việc, tin nhắn khẩn cấp, trong khi tắt bớt những thông báo không cần thiết từ các ứng dụng giải trí.
### 2. Sử Dụng Chế Độ “Không Làm Phiền”
Khi cần tập trung hoặc không muốn bị làm phiền, bạn có thể kích hoạt chế độ “Không làm phiền”. Chế độ này cho phép bạn tắt tất cả thông báo hoặc chỉ cho phép thông báo từ những liên hệ quan trọng.
### 3. Tắt Thông Báo Từ Ứng Dụng Cụ Thể
Nếu có những ứng dụng gửi quá nhiều thông báo không cần thiết, bạn có thể tắt chúng đi. Chỉ cần vào Cài đặt > Thông báo và chọn ứng dụng mà bạn muốn tắt thông báo.
### 4. Tận Dụng Tính Năng “Thông Báo Trên Màn Hình Khóa”
Bạn có thể quyết định thông báo nào sẽ hiển thị trên màn hình khóa. Điều này giúp bạn dễ dàng xem thông báo mà không cần mở khóa điện thoại.
### 5. Sắp Xếp Thông Báo Theo Nhóm
Android cho phép bạn nhóm các thông báo từ cùng một ứng dụng lại với nhau. Điều này giúp màn hình thông báo trở nên gọn gàng và dễ quản lý hơn.
### 6. Sử Dụng Ứng Dụng Quản Lý Thông Báo
Có nhiều ứng dụng bên thứ ba giúp bạn quản lý thông báo hiệu quả hơn. Những ứng dụng này cho phép bạn tùy chỉnh, sắp xếp và thậm chí lên lịch thông báo theo nhu cầu.
### 7. Cập Nhật Hệ Điều Hành Thường Xuyên
Luôn đảm bảo rằng điện thoại của bạn đang chạy phiên bản hệ điều hành mới nhất. Các bản cập nhật thường mang đến những cải tiến về cách thức quản lý thông báo.
### Đánh Giá Sản Phẩm Và Mua Ngay Tại Queen Mobile
Nếu bạn đang tìm kiếm một chiếc điện thoại Android hoặc iPhone chất lượng với mức giá hợp lý, hãy ghé thăm Queen Mobile. Chuyên cung cấp các sản phẩm điện thoại, máy tính bảng chính hãng, Queen Mobile cam kết đem đến trải nghiệm mua sắm tuyệt vời cùng chế độ bảo hành uy tín.
#QuảnLýThôngBáo #AndroidTips #QueenMobile #ĐiệnThoạiChínhHãng #MuaSắmThôngMinh
Hãy áp dụng ngay những mẹo trên để tận hưởng trải nghiệm sử dụng điện thoại Android một cách thoải mái và hiệu quả nhất!
Giới thiệu 7 simple tips to manage your Android phone’s notifications
: 7 simple tips to manage your Android phone’s notifications
Hãy viết lại bài viết dài kèm hashtag về việc đánh giá sản phẩm và mua ngay tại Queen Mobile bằng tiếng VIệt: 7 simple tips to manage your Android phone’s notifications
Mua ngay sản phẩm tại Việt Nam:
QUEEN MOBILE chuyên cung cấp điện thoại Iphone, máy tính bảng Ipad, đồng hồ Smartwatch và các phụ kiện APPLE và các giải pháp điện tử và nhà thông minh. Queen Mobile rất hân hạnh được phục vụ quý khách….
_____________________________________________________
Mua #Điện_thoại #iphone #ipad #macbook #samsung #xiaomi #poco #oppo #snapdragon giá tốt, hãy ghé [𝑸𝑼𝑬𝑬𝑵 𝑴𝑶𝑩𝑰𝑳𝑬]
✿ 149 Hòa Bình, phường Hiệp Tân, quận Tân Phú, TP HCM
✿ 402B, Hai Bà Trưng, P Tân Định, Q 1, HCM
✿ 287 đường 3/2 P 10, Q 10, HCM
Hotline (miễn phí) 19003190
Thu cũ đổi mới
Rẻ hơn hoàn tiền
Góp 0%
Thời gian làm việc: 9h – 21h.
KẾT LUẬN
Hãy viết đoạn tóm tắt về nội dung bằng tiếng việt kích thích người mua: 7 simple tips to manage your Android phone’s notifications
It’s no secret that Android’s handling of notifications is light-years ahead of the competition (looking at you, iOS). But it doesn’t matter how well your amazing Android phone handles notifications if you’re bombarded by hundreds of them all day. Notification overload is a real thing as apps fight for your attention. Android comes with built-in ways to customize your notifications the way you want. Follow these steps to create the perfect notification environment for your peace of mind.
Turn off app notifications
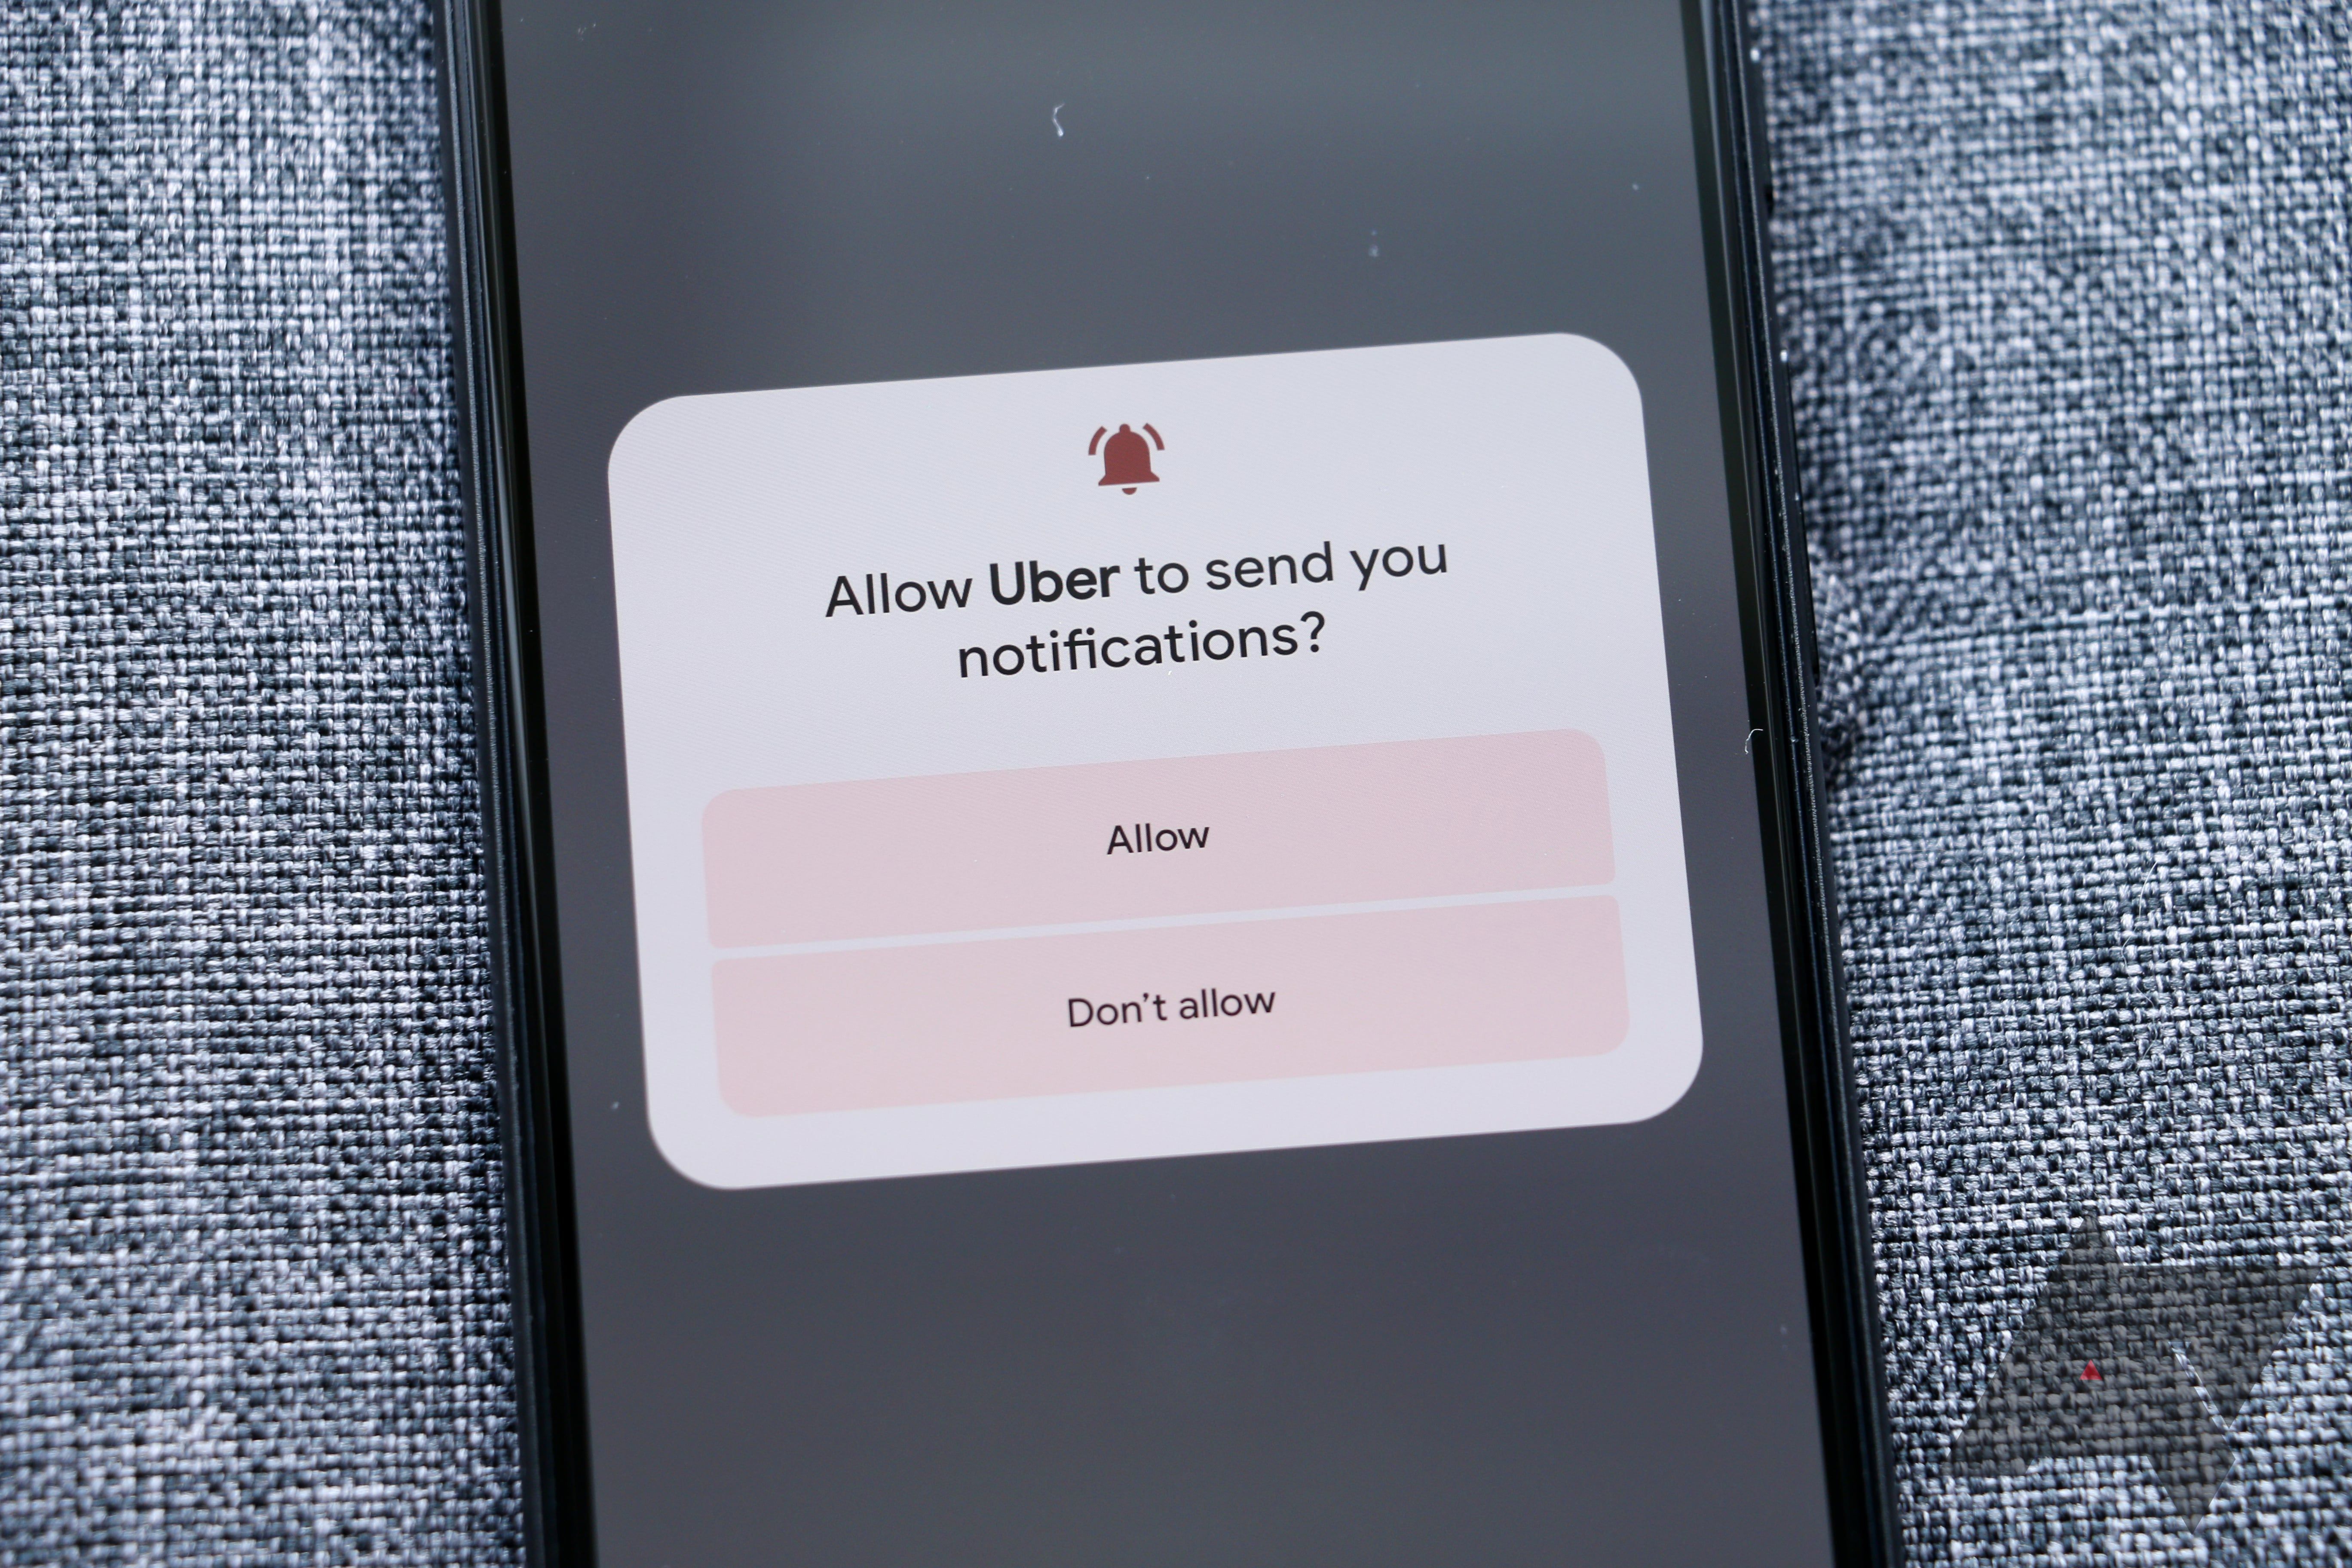
You don’t need to receive notifications from all the apps installed on your phone. One of the best Android 13 features requires users to approve notifications delivery on a per-app basis. This change will be enforced starting mid-to-late 2023. Even so, once you grant an app the necessary permission, there’s no guarantee it won’t send you multiple unwanted notifications every day.
If notifications from such apps aren’t essential, turn them off. For example, turn off notifications from all the games installed on your phone if they aren’t crucial.
Follow the below steps to revoke the notification permission from an Android app:
- Open Settings.
- Navigate to Apps.
- Select the app from which you no longer want to receive notifications.
- Tap Notifications. On Samsung phones, this option is located under the Privacy category.
- Turn off the Show notifications toggle.
You can continue using an app after turning off its notifications without any loss in functionality.
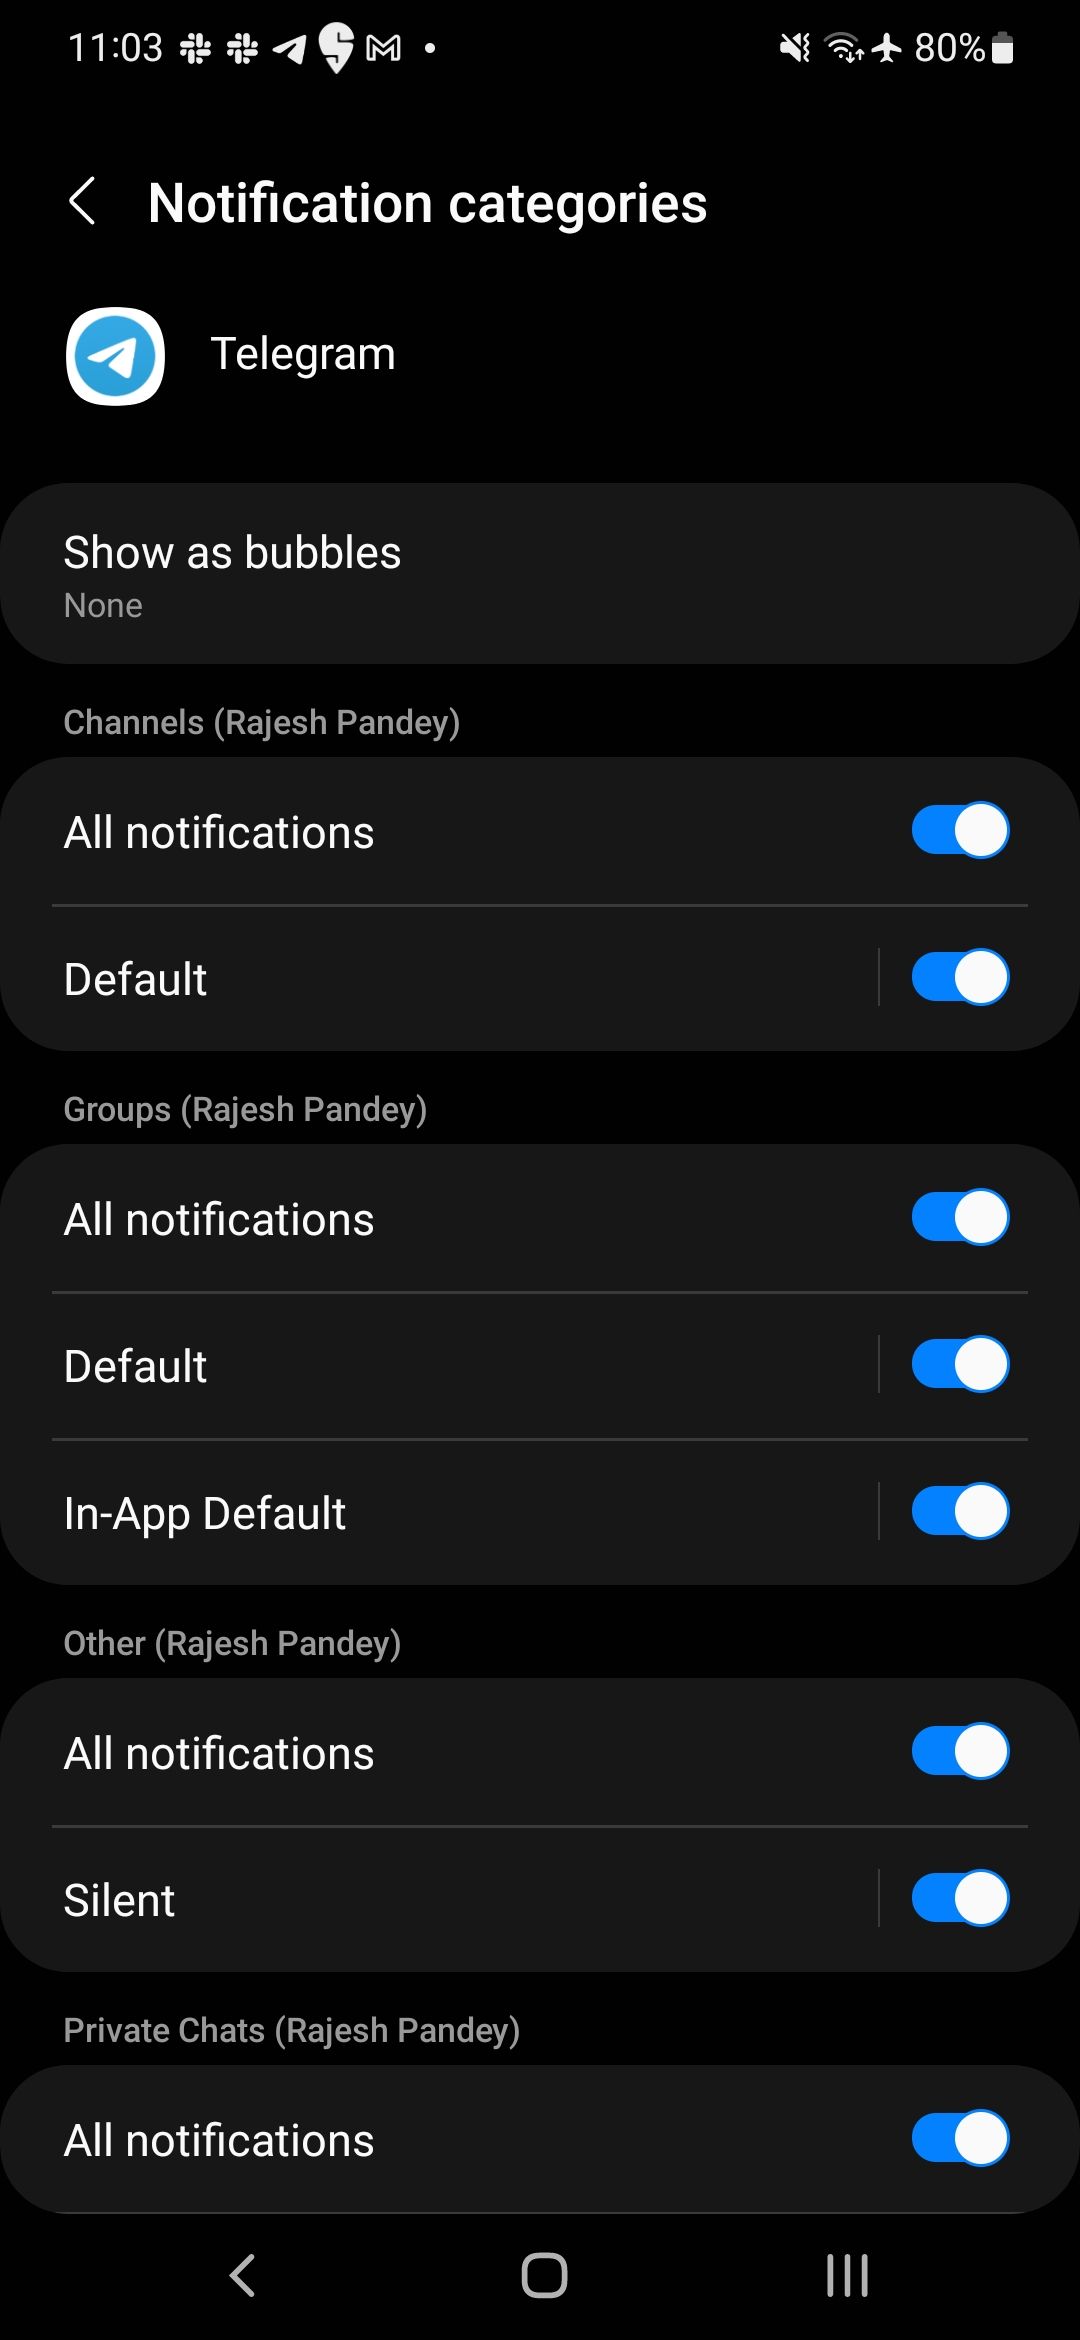
Use notification channels
It’s not always possible to entirely deactivate notifications from an app. Periodically, they may send important updates that you can’t miss. For example, turning off notifications from food delivery apps is not an option, as you won’t get order updates until the app is opened. The problem is that such apps can spam you with irrelevant notifications daily. Similarly, you may be unable to turn off app notifications from banking apps, even if they show at least one notification promoting their services daily.
This is where Android’s excellent notification channels come in handy. It lets you block app notifications based on categories. So, you can turn off all marketing and promotional notifications from food delivery apps on your phone while still getting order updates.
- Open Settings.
- Navigate to Apps.
- Tap the app from which you want to turn off unwanted notifications.
- Tap Notifications. You’ll see the different notification categories.
- Turn off the categories from which you don’t want to receive the notifications.
- Tap a notification category to customize it further.
Limit notifications on your smartwatch
If you use one of the best Android smartwatches or a wearable with your Android phone, set it up properly. You don’t want notifications from every app on your phone to arrive on your watch. That leads to the wearable buzzing constantly, which can be distracting. Instead, only allow notifications from a handful of important apps to appear on your smartwatch.
Shutting down notifications on a Samsung Galaxy Watch 5 is straightforward. Open Samsung’s Galaxy Wearable app on your phone to customize the notifications. Here’s how:
- Open the Galaxy Wearable app.
- Select Watch settings.
- Tap Notifications.
- Select More from the Most recent on phone or watch section.
- Select the apps from which you’d like to receive notifications on your watch.

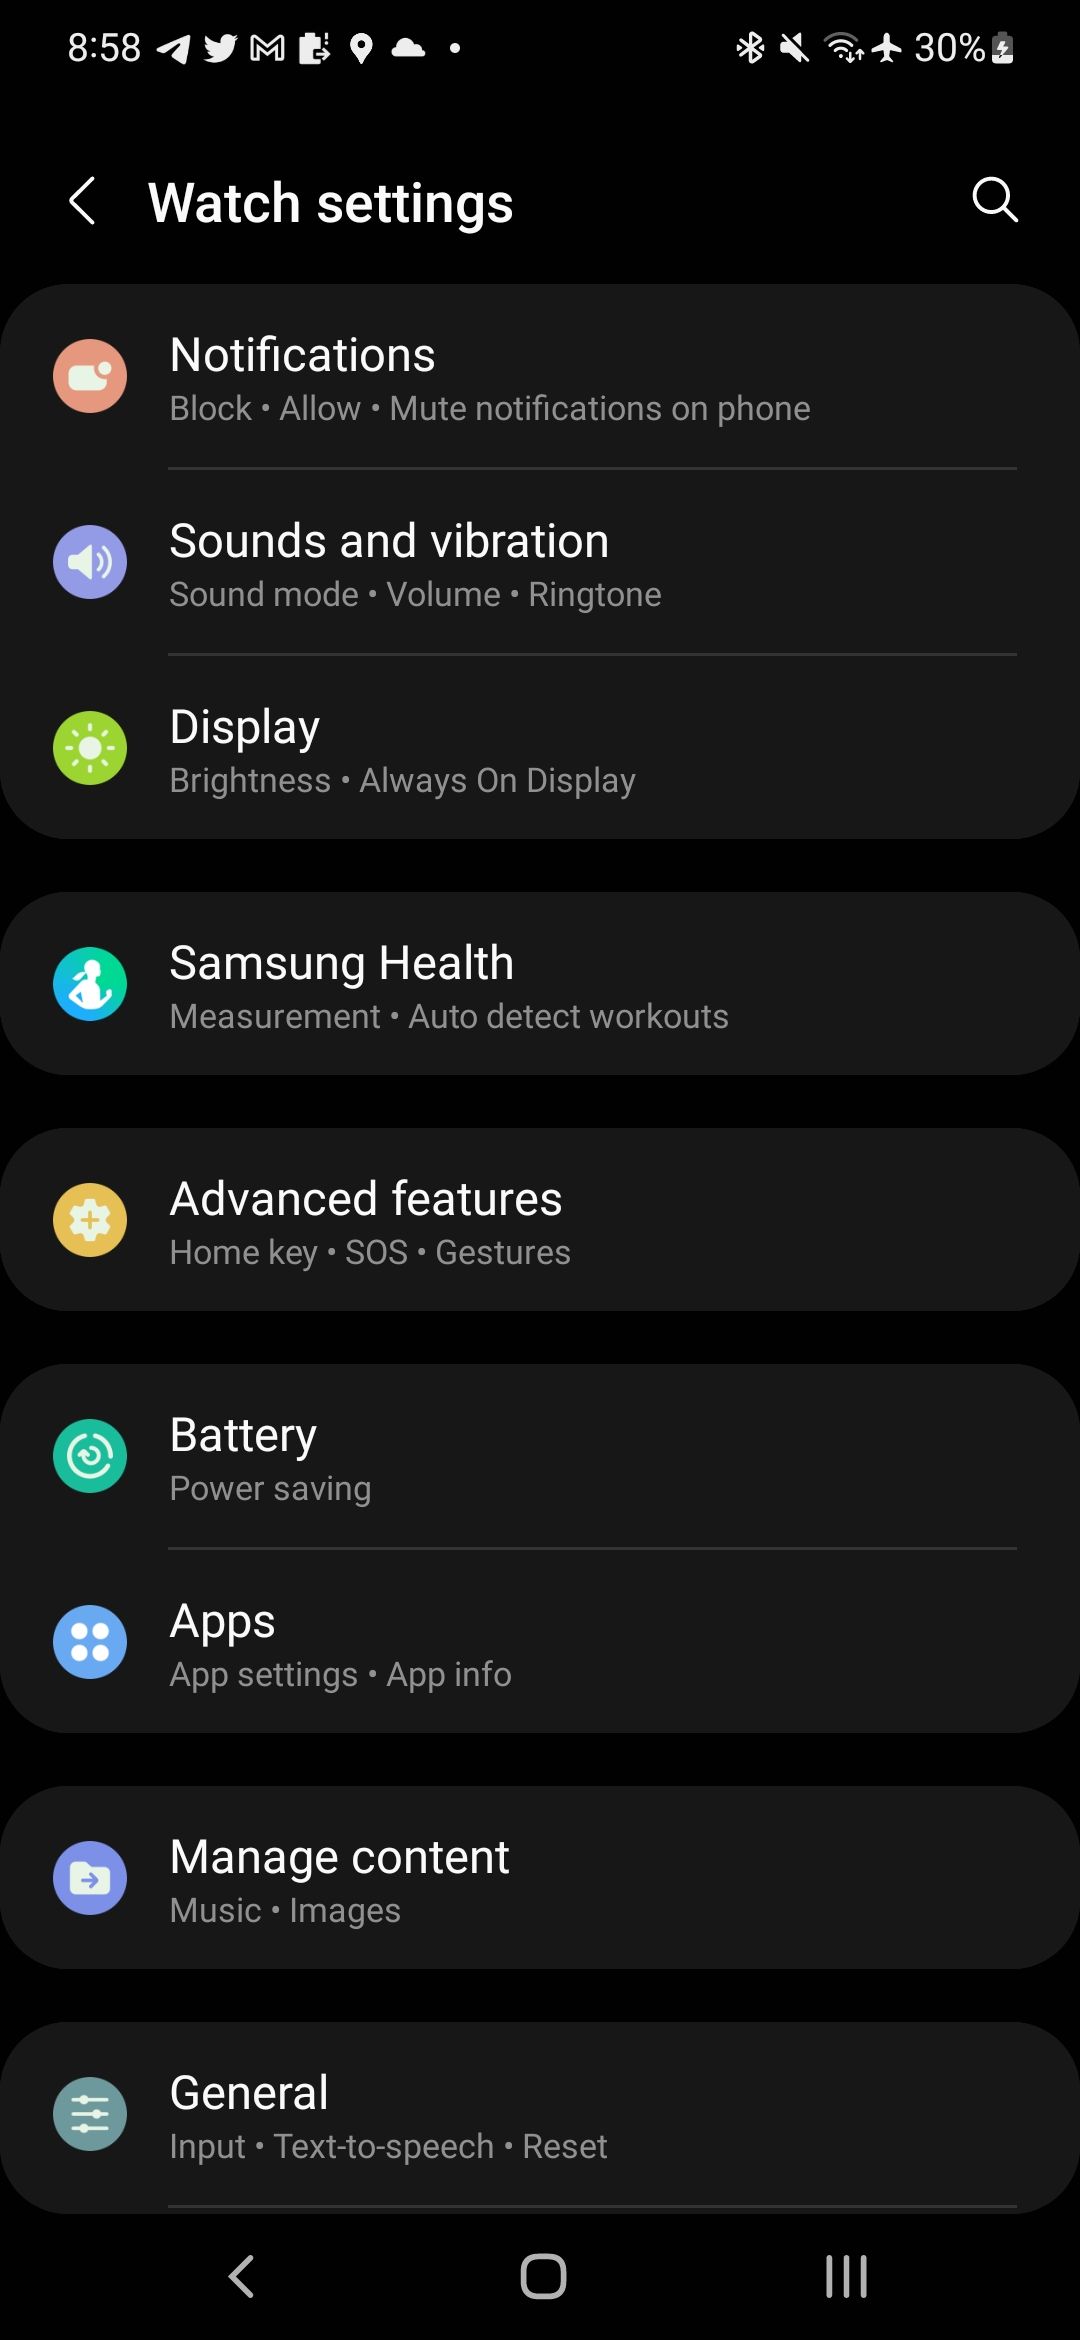

Likewise, you’ll need to use Google’s Wear OS app for Wear OS-based smartwatches.
Only select those apps whose notifications are important and require your urgent attention.
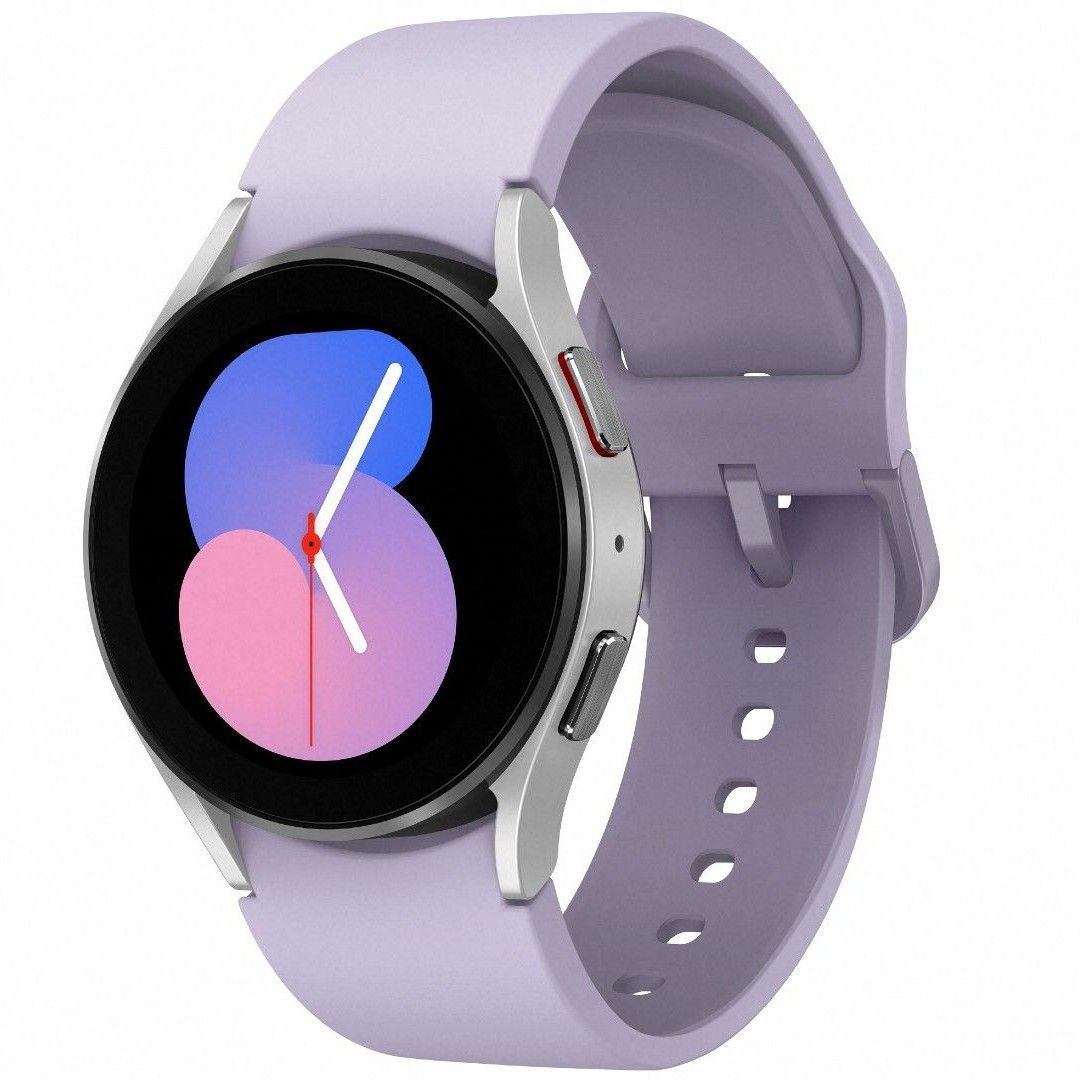
Source: Samsung
Samsung Galaxy Watch 5
The Samsung Galaxy Watch 5 is a refined upgrade to the phenomenal Watch 4. Sapphire Glass makes Samsung’s newest wearable more durable, and its larger battery makes it easier to get through the day without charging.
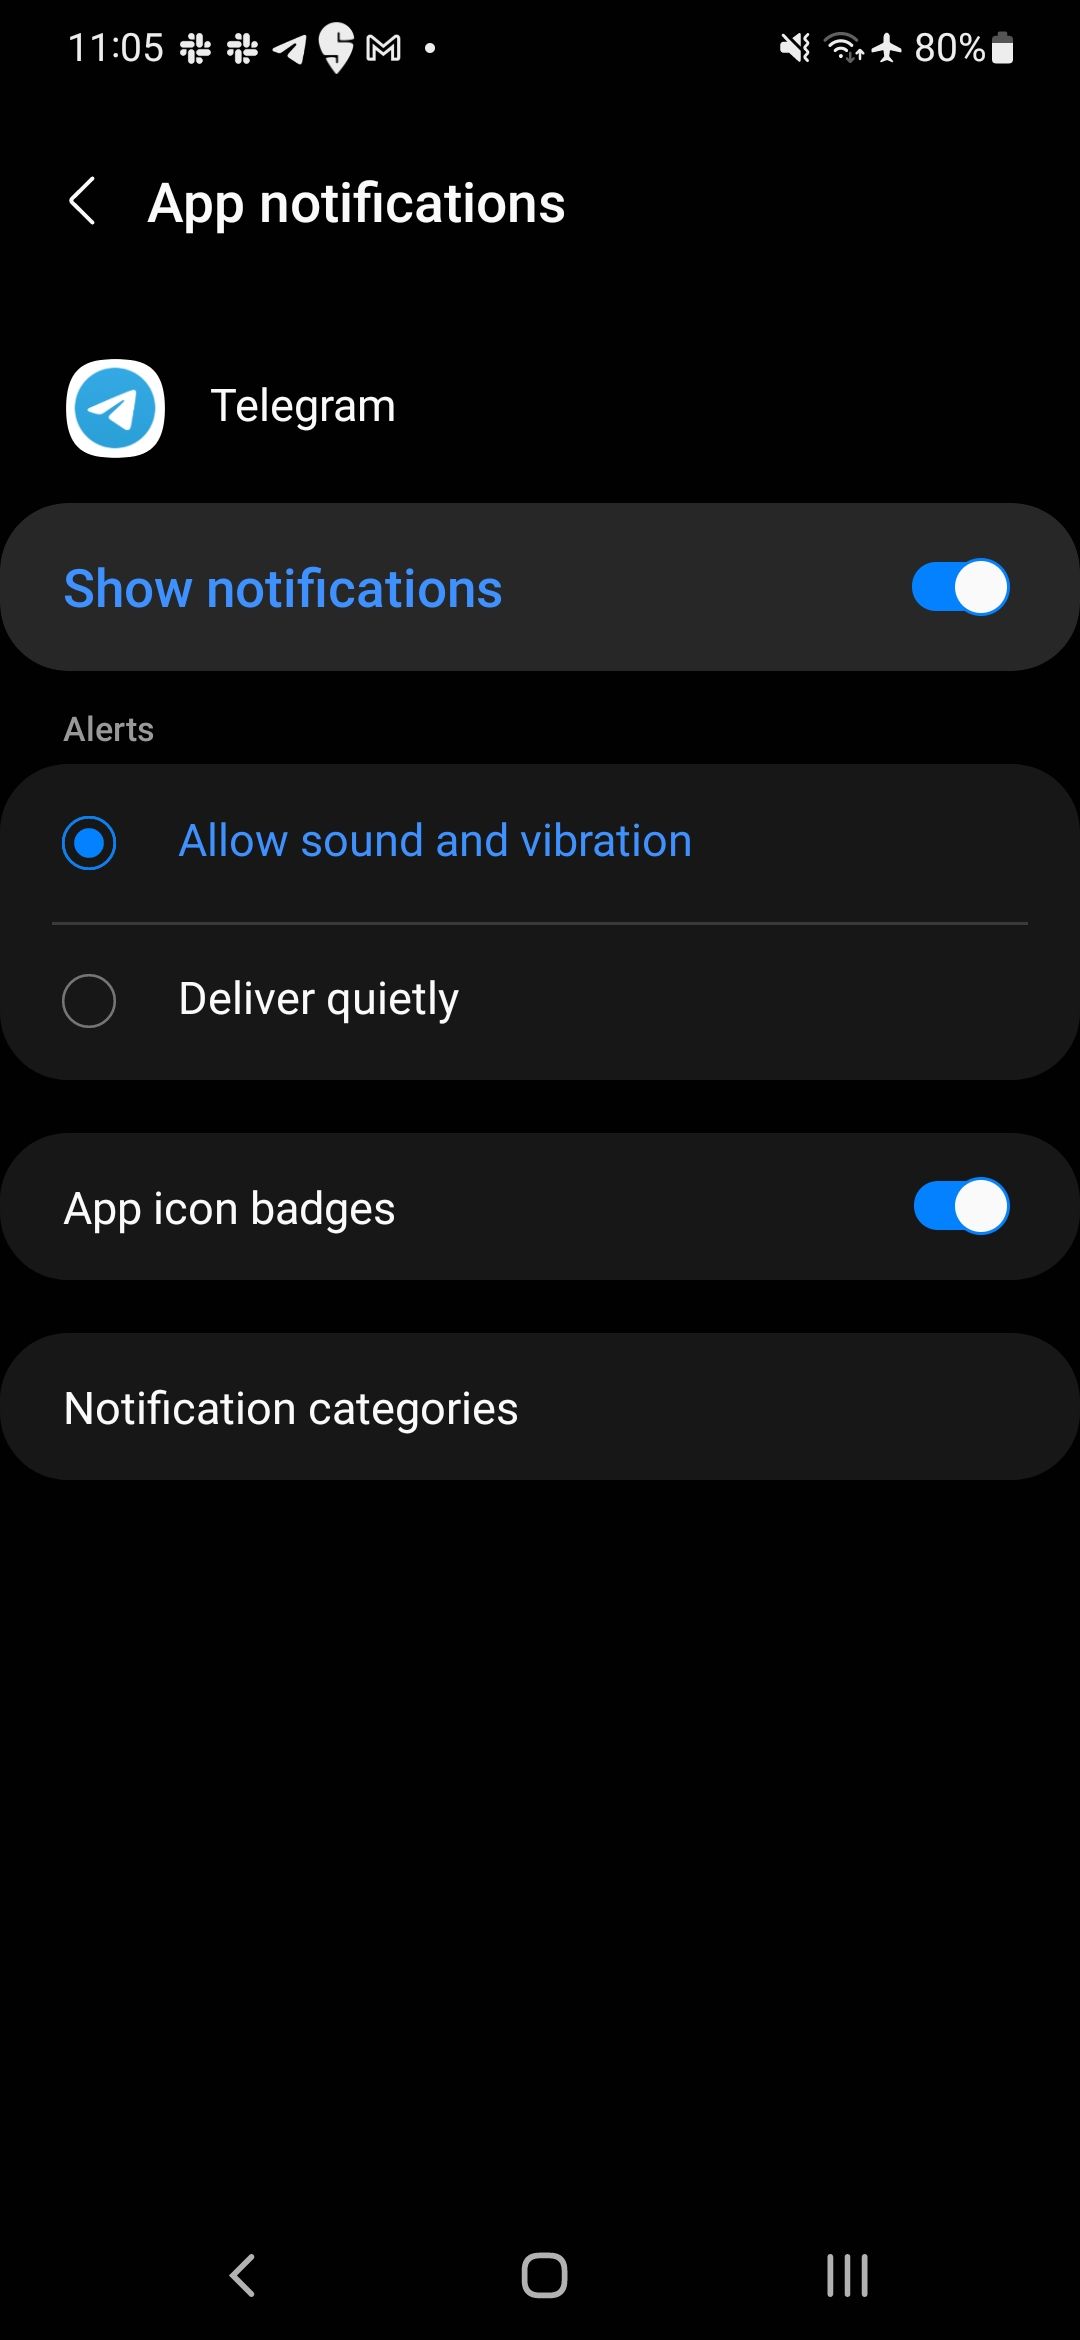
Deliver notifications silently
Not all notifications require your immediate attention. Some apps can deliver their notifications silently, without your phone buzzing or playing the notification sound. You can check such notifications at your own pace the next time you pick up your phone. You can set banking apps to deliver notifications quietly, as they don’t require immediate attention.
The simplest way to ensure an app delivers its notifications silently is by long pressing its notification and selecting Deliver silently. Alternatively, follow the steps below:
- Open Settings.
- Navigate to Apps.
- Select the app that you want to deliver notifications silently.
- Tap Notifications.
- Select Deliver quietly. On Samsung phones, this option is located under the Alerts category.

Set up Do Not Disturb
The Do Not Disturb option has been around for a few years in Android. Over the years, it has become more powerful, with the ability to set different schedules that can be triggered based on time. You can also specify contacts that can bypass the Do Not Disturb mode.
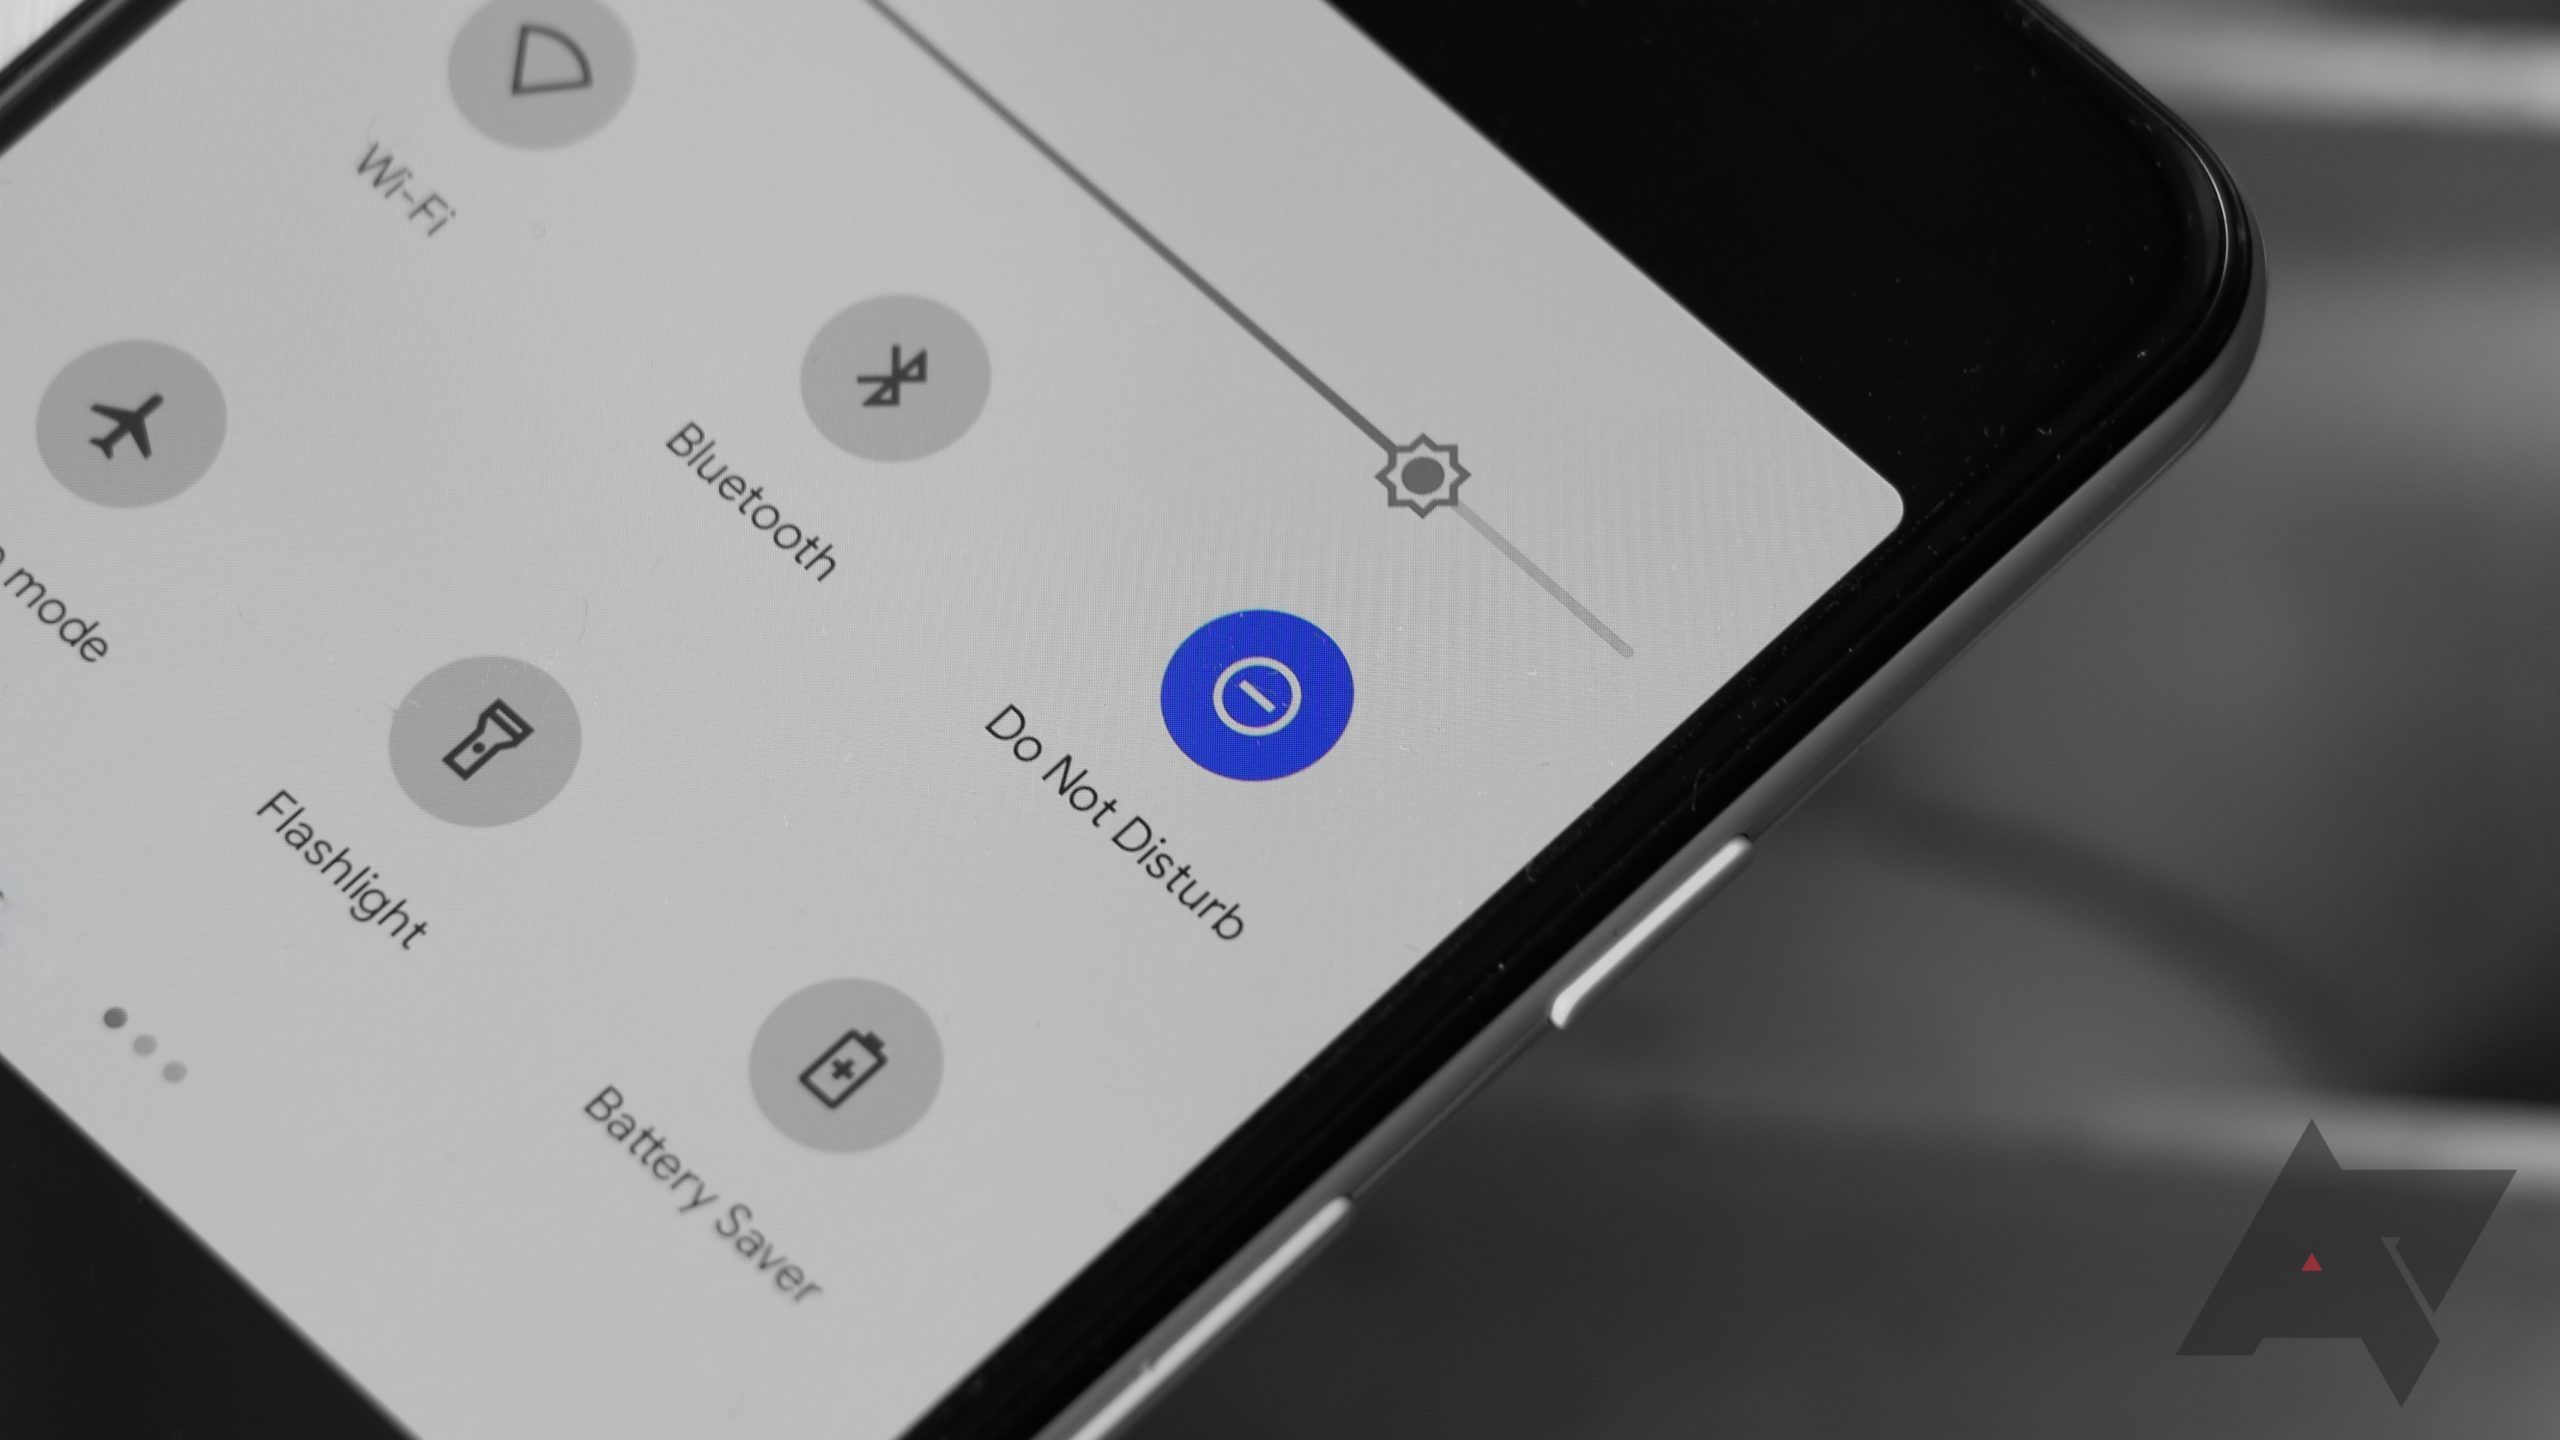
Setting up different Do Not Disturb profiles the first time is a time-consuming process. You need to select the contacts and apps from which you want to receive notifications, set the time, and more. However, after that initial effort, you’ll notice a dramatic reduction in the number of notifications you receive.
Here are some examples:
- If you want peace and quiet while sleeping, trigger Do Not Disturb automatically to mute all incoming notifications except those from family members and repeat callers.
- Schedule Do Not Disturb when you’re working to hide notifications from all non-work apps and friends.
- When on vacation, create a Do Not Disturb schedule to mute all notifications except those from your friends.
If you are ready to put in the effort, follow our guide on how to use Do Not Disturb on Android to learn how to set up different schedules and trigger them based on time or calendar events. Consider setting up Bedtime mode on Android if you want to mute all notifications when you sleep.
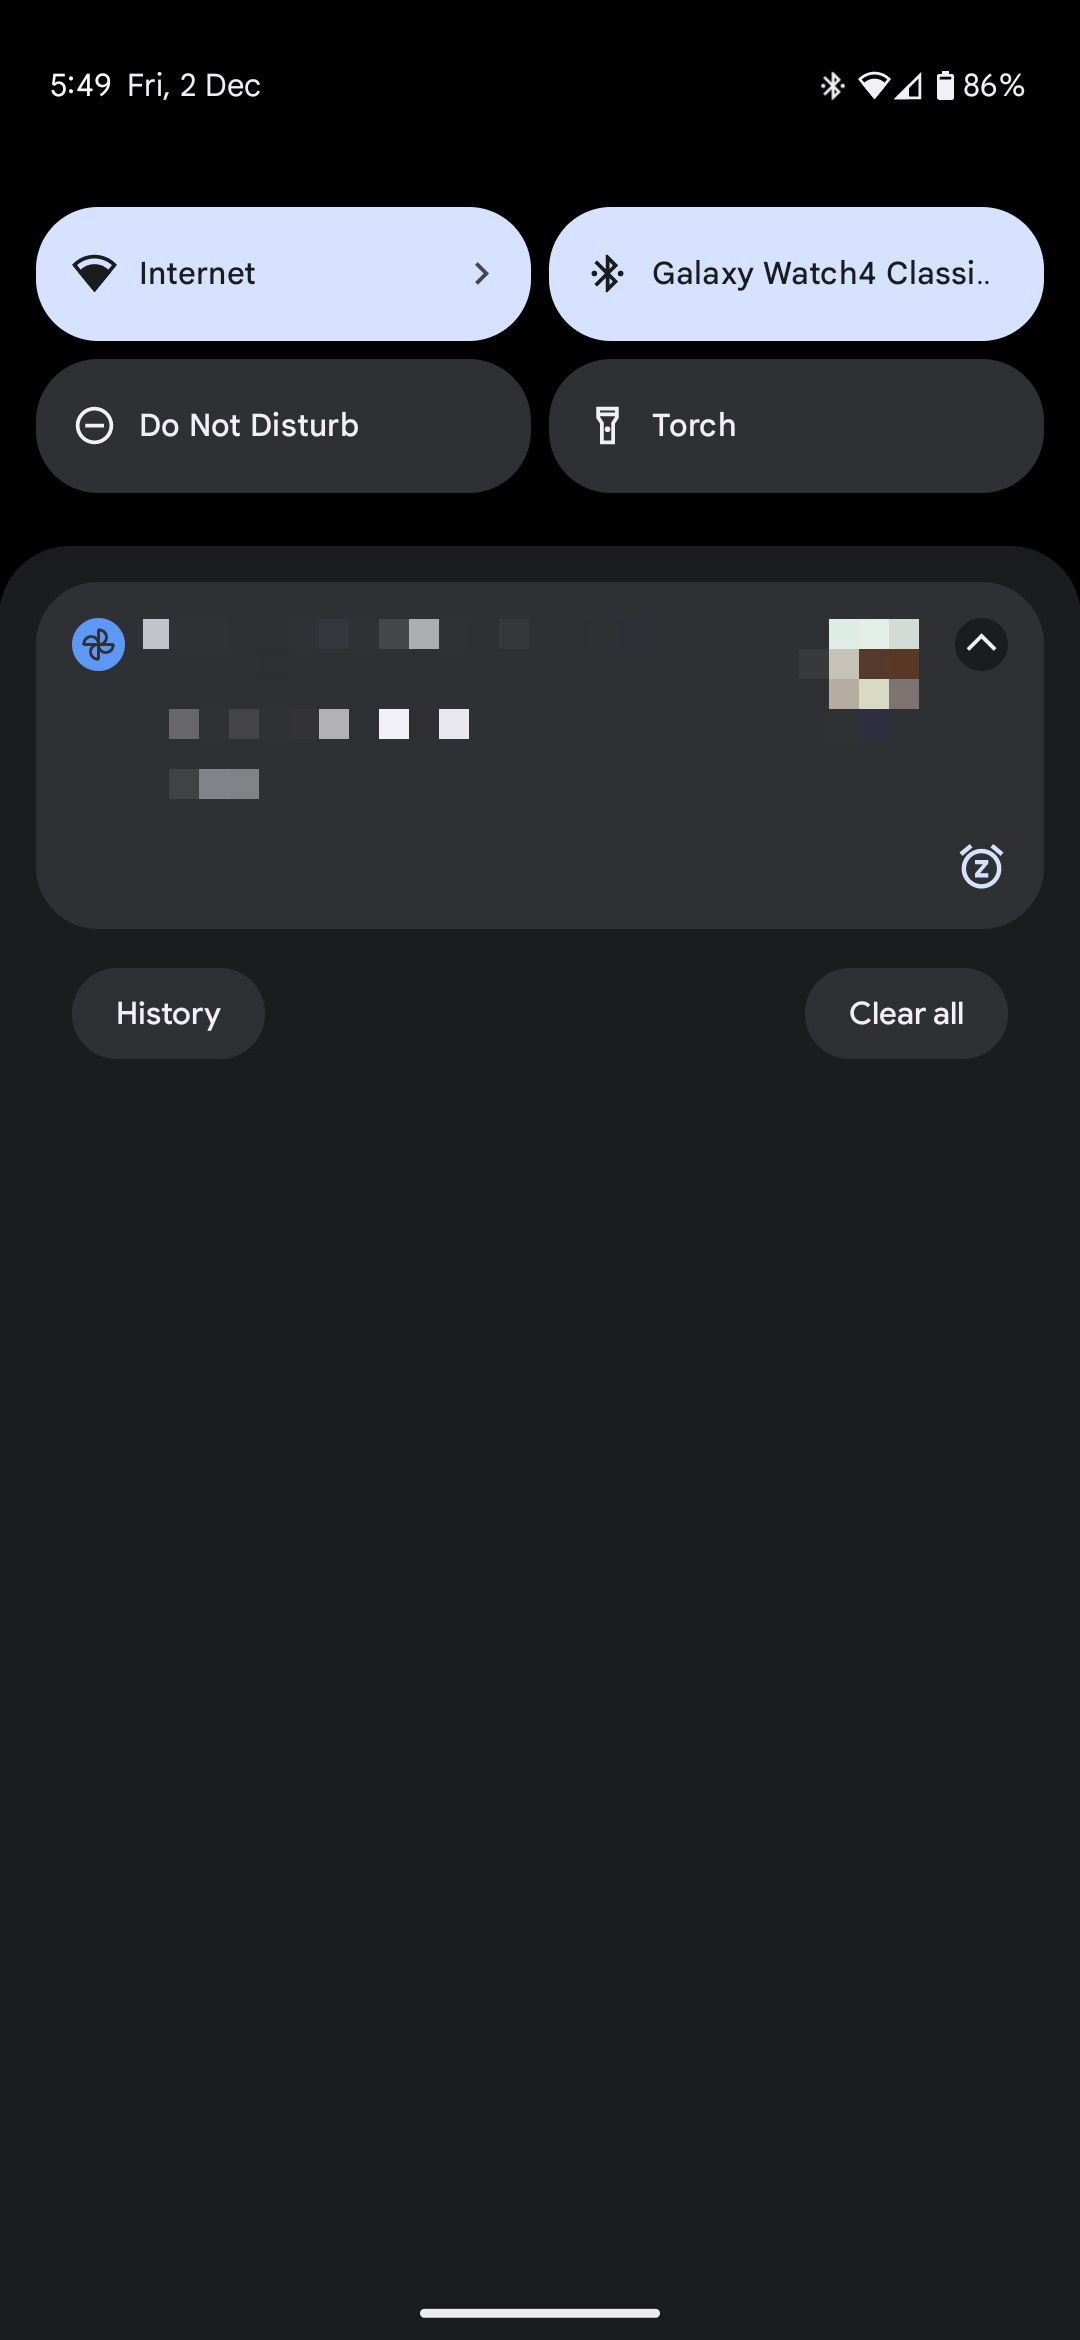
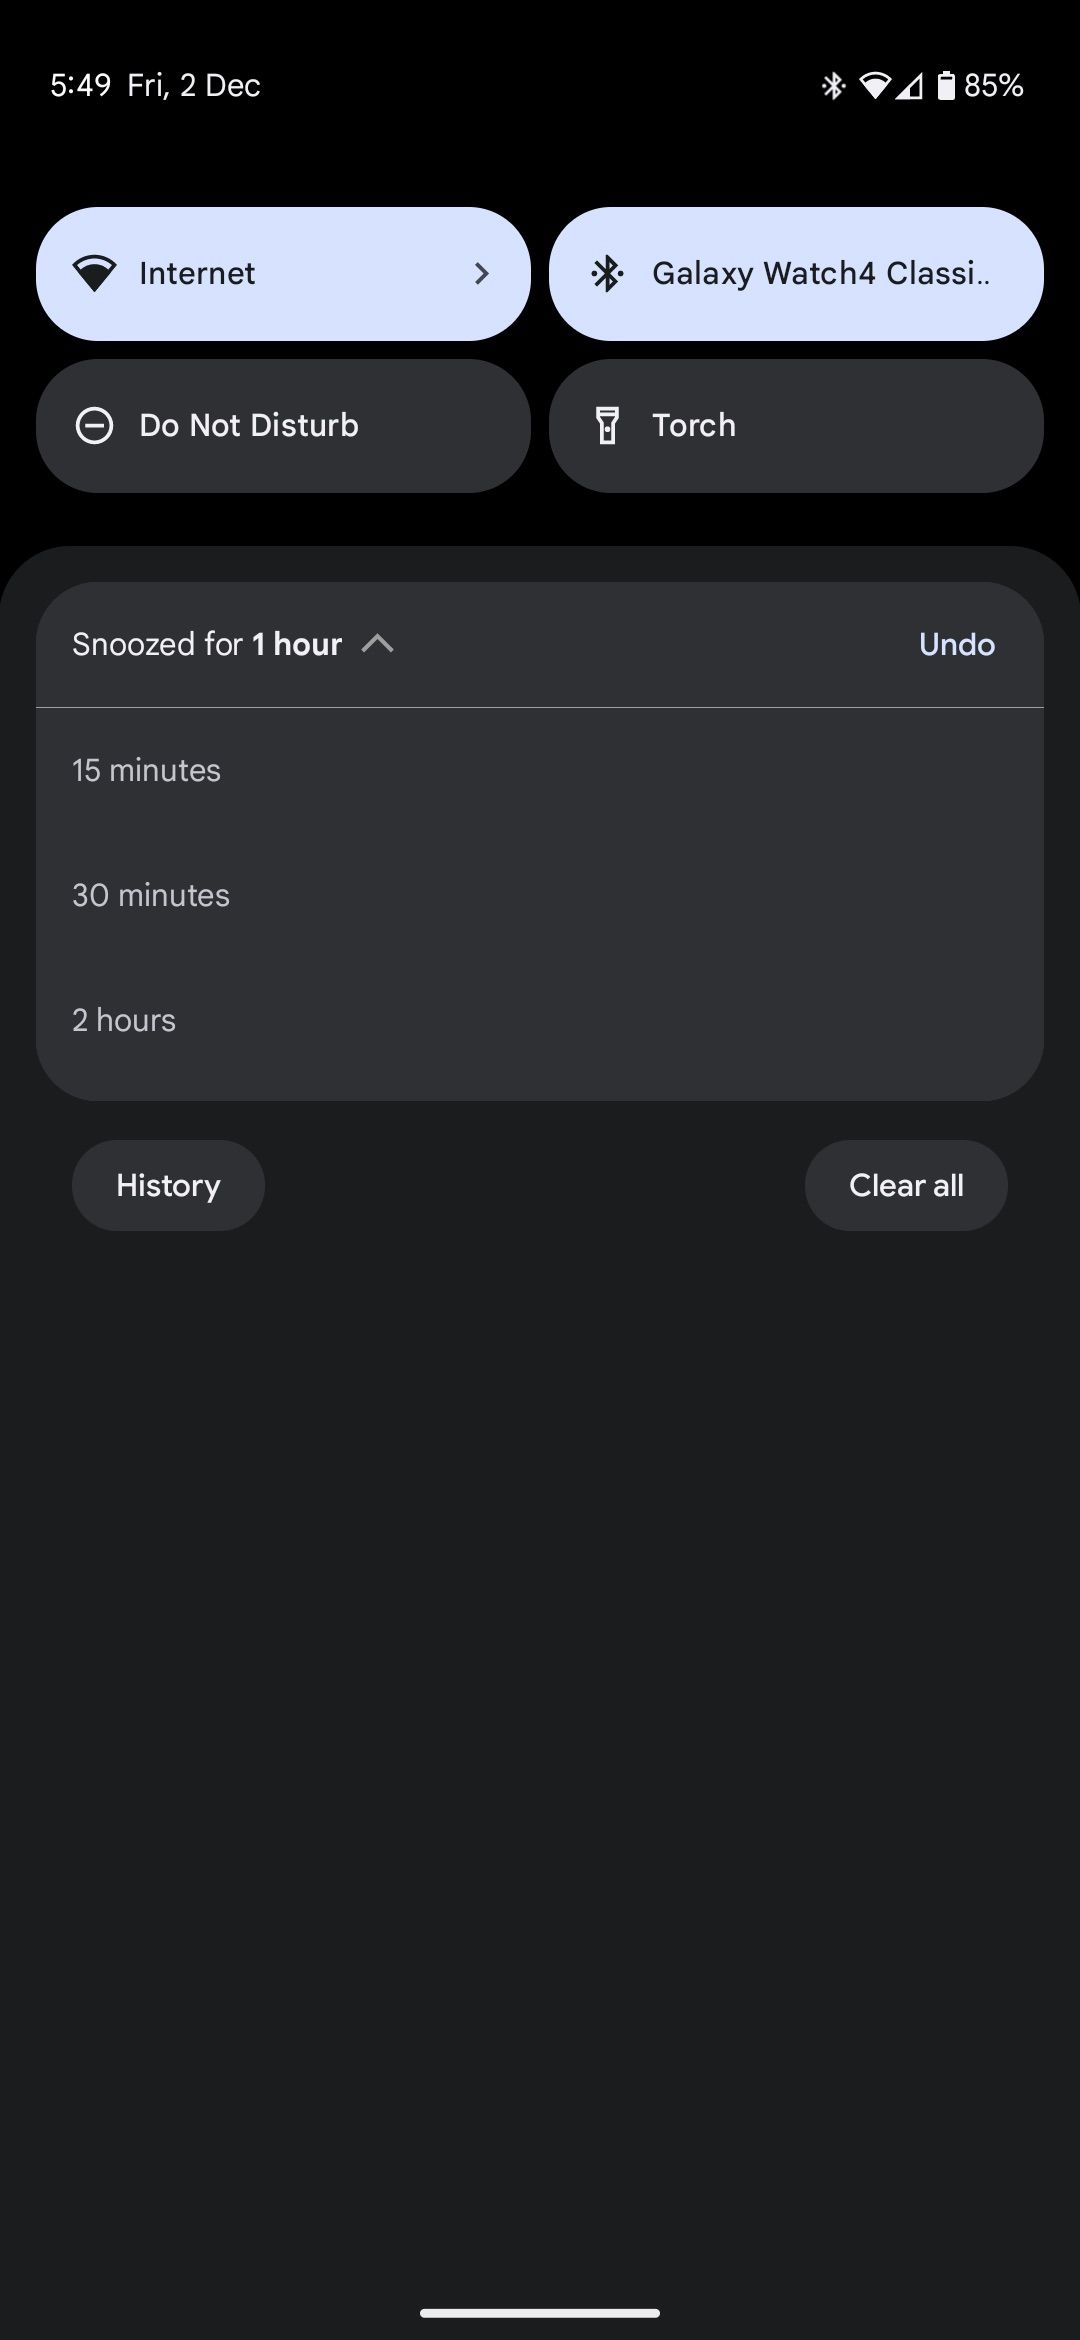
Snooze notifications
You may not want to act on all notifications immediately, but you may want to get back to them later. For example, when you’re in a meeting or your day is about over, and you get a message from your friend or family, you can snooze that notification. It then reappears later when you can take action on it.
- Expand a notification.
- Tap the snooze icon you see in the lower-right corner of the notification.
- By default, a notification is snoozed for an hour.
- If that’s too long (or short), tap the down arrow you see and select a more appropriate duration.
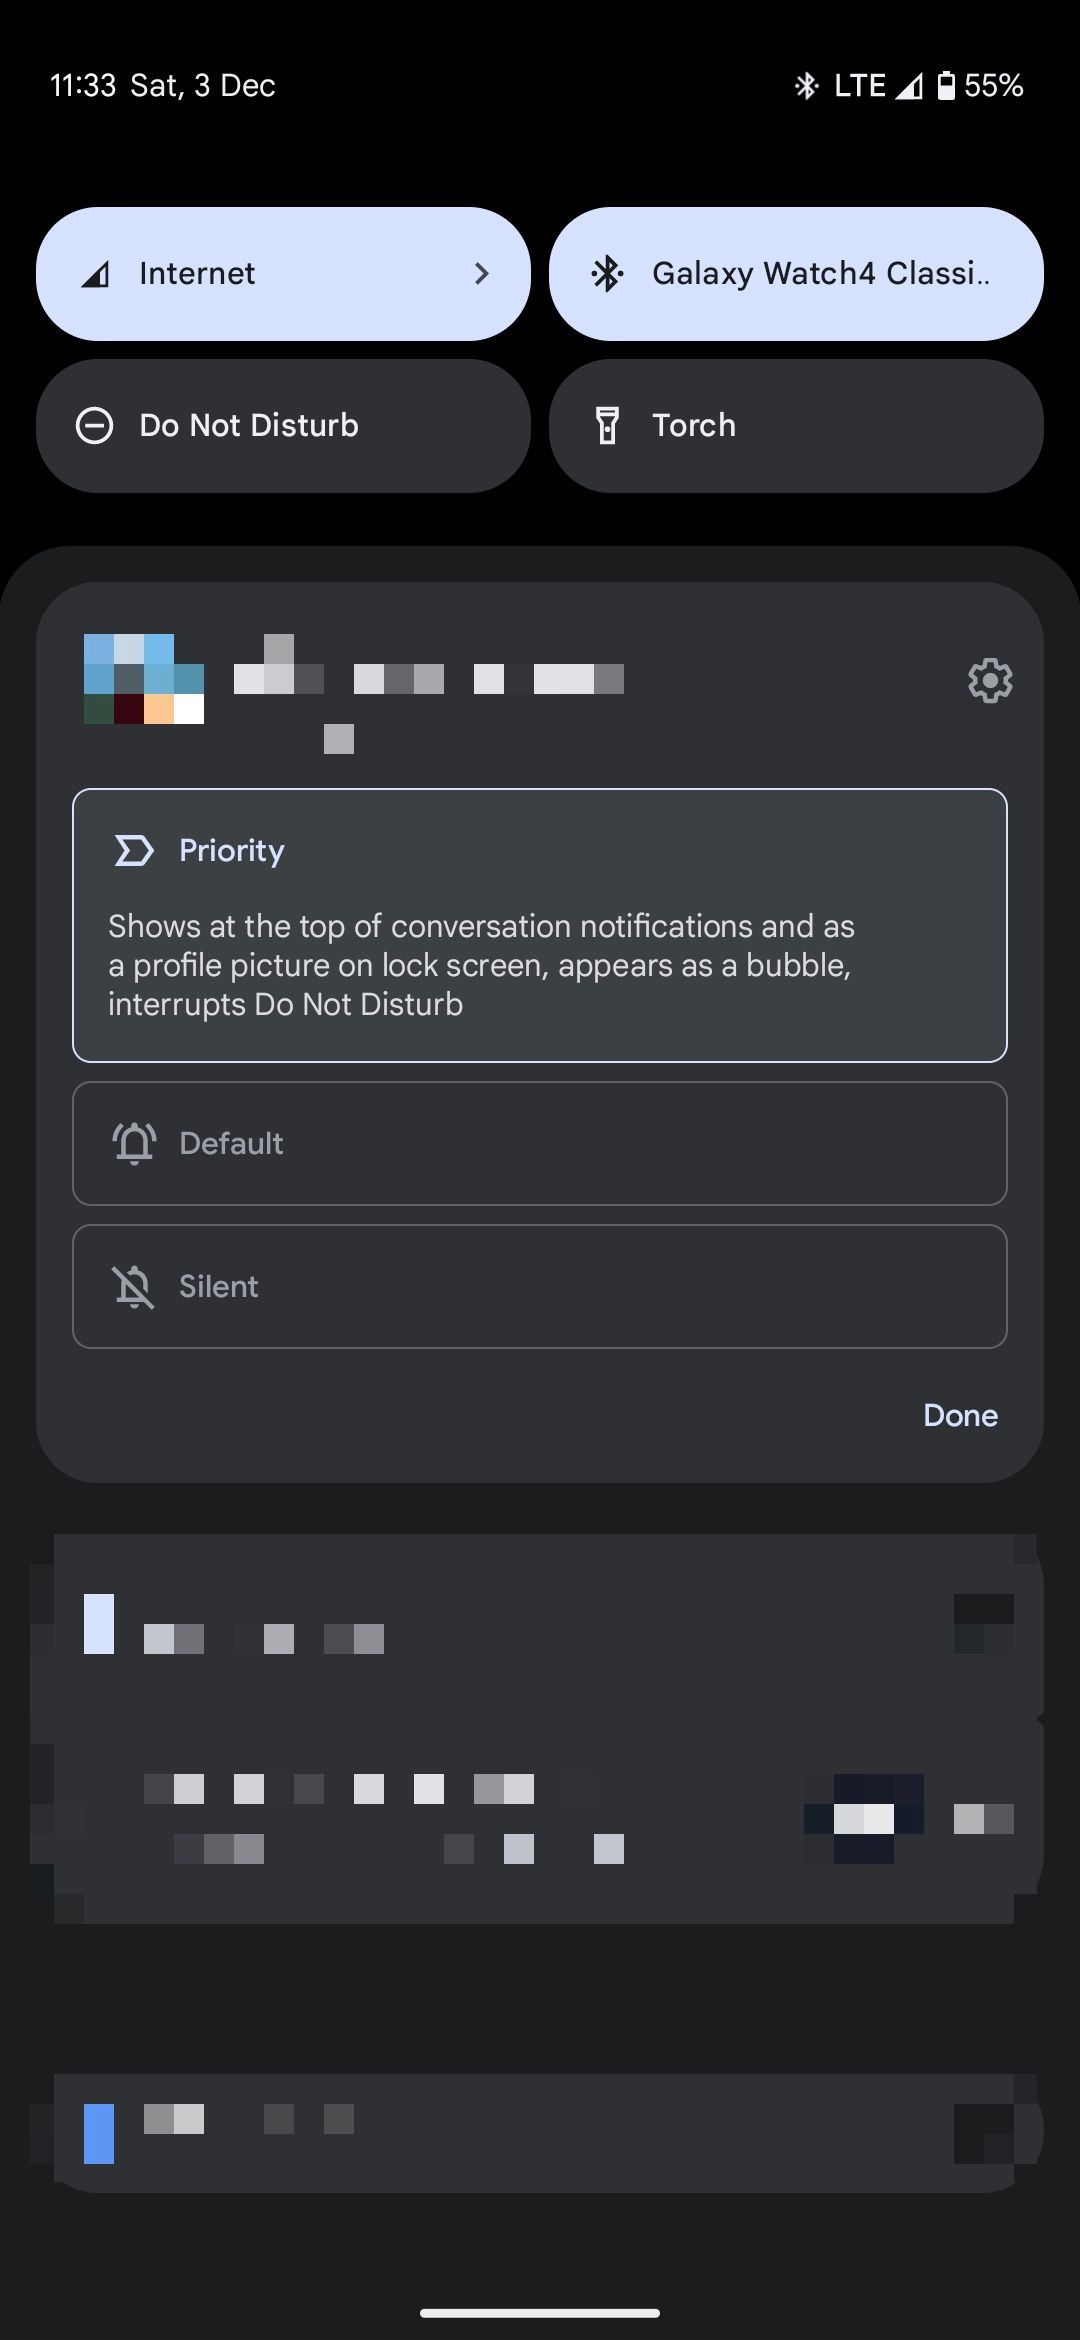
Mark chats as priority conversations
Not all notifications require your immediate attention. Similarly, some conversations and notifications are a higher priority than others, say those from your spouse or family member. You can mark such chats as a priority so that they appear at the top of conversation notifications, interrupt Do Not Disturb, and show up as a bubble when your phone is unlocked.
Keep a check on notifications
Once you’re done customizing your notifications, learn how to check notification history on your Android phone if you accidentally dismiss an important notification and want to go through it again.
Notification overload is a real issue when hundreds of apps are installed on your device. It robs you of your time and attention and can ultimately harm your mental health. Plus, the important notifications you need can get buried under the ads from games and promotional messages from food delivery apps. Android offers many ways to control your phone, and notification management is one of the OS’ most powerful features.
Xem chi tiết và đăng kýXem chi tiết và đăng ký

Khám phá thêm từ Phụ Kiện Đỉnh
Đăng ký để nhận các bài đăng mới nhất được gửi đến email của bạn.

