

Review sản phẩm
Cách Tạo Khảo Sát Google và Thu Thập Phản Hồi Chỉ Trong Vài Giây – Hướng Dẫn Chi Tiết

Th5
Cách Tạo Khảo Sát Google và Thu Thập Phản Hồi Chỉ Trong Vài Giây – Hướng Dẫn Chi Tiết
#KhảoSátGoogle #ThuThậpDữLiệu #CôngCụHữuÍch
Khảo sát Google (Google Forms) là một công cụ đơn giản nhưng mạnh mẽ, giúp bạn dễ dàng tạo bảng câu hỏi và thu thập phản hồi từ người tham gia một cách nhanh chóng. Dưới đây là hướng dẫn chi tiết từng bước để bạn có thể tạo một khảo sát chuyên nghiệp chỉ trong vài phút:
### Bước 1: Truy cập Google Forms
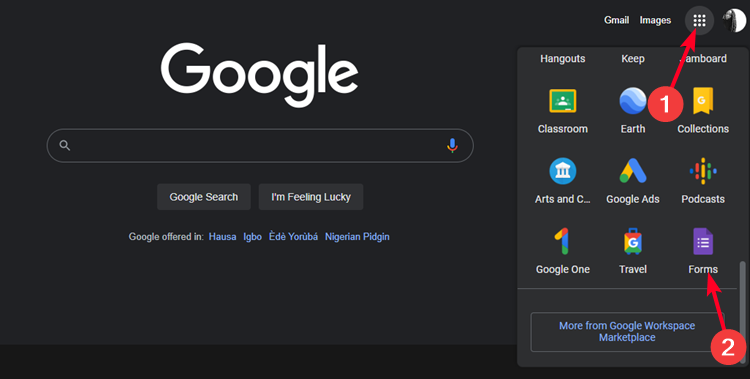
Để bắt đầu, hãy đăng nhập vào tài khoản Google của bạn và truy cập [Google Forms](https://forms.google.com). Bạn có thể tìm thấy nó trong menu ứng dụng Google (biểu tượng chấm trên cùng bên phải) hoặc tìm kiếm trực tiếp trên Google.
### Bước 2: Tạo khảo sát mới
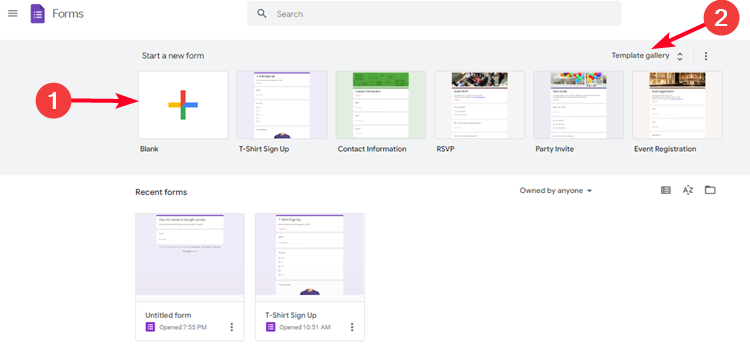
Nhấp vào nút “+ Trống” để tạo một khảo sát mới. Bạn cũng có thể chọn từ các mẫu có sẵn nếu muốn tiết kiệm thời gian.
### Bước 3: Thiết kế khảo sát
– Tiêu đề và mô tả: Đặt tiêu đề rõ ràng và thêm mô tả ngắn gọn để giải thích mục đích của khảo sát.
– Thêm câu hỏi: Chọn loại câu hỏi phù hợp (trắc nghiệm, văn bản, thang điểm, v.v.) và nhập nội dung câu hỏi. Bạn có thể thêm nhiều phần (sections) để chia nhỏ khảo sát.
– Tùy chỉnh: Sử dụng các tùy chọn như bắt buộc trả lời, thêm hình ảnh hoặc video để làm khảo sát sinh động hơn.
### Bước 4: Chia sẻ khảo sát
Sau khi hoàn thiện, nhấp vào nút “Gửi” để chia sẻ khảo sát. Bạn có thể gửi qua email, chia sẻ link trực tiếp, hoặc nhúng vào website.
### Bước 5: Thu thập và phân tích phản hồi
Mọi phản hồi sẽ được tự động lưu vào Google Sheets, giúp bạn dễ dàng theo dõi, phân tích và xuất dữ liệu.
—
Đánh Giá Sản Phẩm và Mua Ngay Tại QUEEN MOBILE – Địa Chỉ Uy Tín Cho Các Tín Đồ Công Nghệ
#QueenMobile #ĐiệnThoạiIphone #ĐánhGiáSảnPhẩm
Nếu bạn đang tìm kiếm một địa chỉ uy tín để mua điện thoại iPhone và các thiết bị công nghệ cao cấp, QUEEN MOBILE là sự lựa chọn hàng đầu tại Việt Nam. Với cam kết mang đến những sản phẩm chính hãng, chất lượng cùng dịch vụ chuyên nghiệp, Queen Mobile đã xây dựng được niềm tin vững chắc trong lòng khách hàng.
### Tại Sao Nên Chọn QUEEN MOBILE?
1. Sản Phẩm Chính Hãng: Tất cả sản phẩm tại Queen Mobile đều được nhập khẩu chính hãng, đảm bảo chất lượng và độ bền.
2. Giá Cạnh Tranh: Queen Mobile mang đến mức giá hợp lý cùng nhiều chương trình khuyến mãi hấp dẫn.
3. Chính Sách Bảo Hành Tốt: Khách hàng được hưởng chính sách bảo hành lâu dài và hỗ trợ kỹ thuật 24/7.
4. Dịch Vụ Chuyên Nghiệp: Đội ngũ nhân viên tận tâm, sẵn sàng tư vấn và giải đáp mọi thắc mắc của khách hàng.
### Cách Đánh Giá Sản Phẩm Trước Khi Mua
Để đảm bảo chọn đúng sản phẩm phù hợp, bạn có thể:
– Xem Đánh Giá Từ Khách Hàng: Tham khảo các phản hồi và đánh giá từ người dùng trước đó.
– So Sánh Thông Số Kỹ Thuật: Kiểm tra kỹ các thông số như dung lượng, hiệu năng, và tính năng nổi bật.
– Thử Nghiệm Trực Tiếp: Nếu có cơ hội, hãy trải nghiệm sản phẩm trực tiếp tại cửa hàng để cảm nhận rõ hơn.
### Mua Hàng Ngay Tại QUEEN MOBILE
Để sở hữu những sản phẩm công nghệ cao cấp với giá tốt nhất, hãy truy cập ngay website của Queen Mobile hoặc ghé thăm cửa hàng trực tiếp. Đừng bỏ lỡ các chương trình ưu đãi đặc biệt dành cho khách hàng mới!
—
#CôngNghệ #MuaSắmThôngMinh #iPhoneChínhHãng
Giới thiệu How to create a Google Survey and collect responses in seconds
: How to create a Google Survey and collect responses in seconds
Hãy viết lại bài viết dài kèm hashtag về việc đánh giá sản phẩm và mua ngay tại Queen Mobile bằng tiếng VIệt: How to create a Google Survey and collect responses in seconds
Mua ngay sản phẩm tại Việt Nam:
QUEEN MOBILE chuyên cung cấp điện thoại Iphone, máy tính bảng Ipad, đồng hồ Smartwatch và các phụ kiện APPLE và các giải pháp điện tử và nhà thông minh. Queen Mobile rất hân hạnh được phục vụ quý khách….
_____________________________________________________
Mua #Điện_thoại #iphone #ipad #macbook #samsung #xiaomi #poco #oppo #snapdragon giá tốt, hãy ghé [𝑸𝑼𝑬𝑬𝑵 𝑴𝑶𝑩𝑰𝑳𝑬]
✿ 149 Hòa Bình, phường Hiệp Tân, quận Tân Phú, TP HCM
✿ 402B, Hai Bà Trưng, P Tân Định, Q 1, HCM
✿ 287 đường 3/2 P 10, Q 10, HCM
Hotline (miễn phí) 19003190
Thu cũ đổi mới
Rẻ hơn hoàn tiền
Góp 0%
Thời gian làm việc: 9h – 21h.
KẾT LUẬN
Hãy viết đoạn tóm tắt về nội dung bằng tiếng việt kích thích người mua: How to create a Google Survey and collect responses in seconds
Whether you need to get customer feedback or brainstorm ideas for hanging out, Google Forms is a handy tool for gathering people’s opinions about anything. It lets you create custom questions in minutes, including multiple-choice, short-answer, and checkbox questions, to build a survey anyone would want to complete.
You can share your survey using your smartphone, PC, or a budget Android tablet. Google Forms can also be embedded on your website for better engagement. And after the responses start rolling in, you don’t have to sort through them manually. Google Forms integrates with Google Sheets and other Workspace apps, so you can easily view and download responses on your device.
What is Google Forms?
Google Forms is an online survey and questionnaire application in the Google Workspace alongside productivity tools like Google Docs, Google Slides, and more. You can create various questions on your Android device or computer devices, from multiple-choice to open-ended or close-ended questions.
After completing your survey, you can share it with third parties by email, copying the link, embedding it on your website, or forwarding it to Facebook and Twitter.
What types of surveys can you make with Google Forms?
You can create customer orders, job applications, product or service evaluations, and event booking forms with Google Forms. You can also make fun quizzes to test people’s knowledge or get people’s opinions on everyday matters.
Below are the different types of questions you can ask with Google Forms:
- Short answer questions: Limits people to give responses that are no more than a few words. The response can be a link to their profiles, their names, or a short sentence.
- Paragraph: Gives people the freedom to express their answers in one or more paragraphs.
- Multiple-choice questions: Allows people to choose one answer from a group of choices.
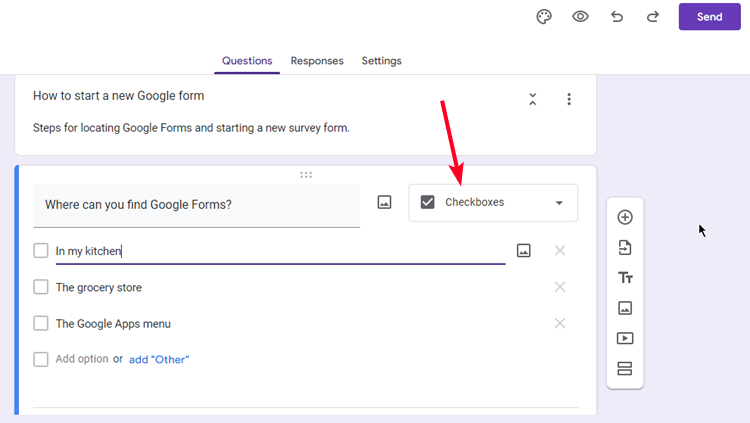
- Checkboxes: Allows people to choose or tick more than one answer.
- Drop-down questions: Allows people to choose only one answer from a list of many that appear in drop-down format.
- Linear scale: Allows people to quantify or rate their answers with numbers, for example, on a scale of 1 to 5.
- Multiple-choice grids: You can structure your question into rows and columns. Respondents must select one answer per row and column. You can create a minimum of two rows.
- Checkbox grid: Allows people to choose multiple answers for each row in a grid.
How to create a Google survey on your computer
Google Forms is free, and your respondents don’t need a Google account to access your survey, except for you. A Google account is crucial to creating a survey as it allows you to access Google apps like Forms, Docs, Sheets, and more. An internet connection is also necessary since Google Forms is a web-based application.
Start a new Google form
- If you haven’t already, create a Google account or sign in to an existing one. You’ll see your profile icon when you’re signed in to your account.
- Tap the Google apps button beside your profile icon and scroll up until you see Forms. Tap it, and the page redirects you to Google Forms.
- To create a new survey from scratch, click Blank.
- To use the pre-existing survey formats, click the Template gallery. The templates give you inspiration on how to design yours. You can add or edit elements to them until you have your desired survey.
Add and edit questions in Google Forms
- After creating a new form, give it a name and description. You can bold, italicize, or underline both if you prefer.
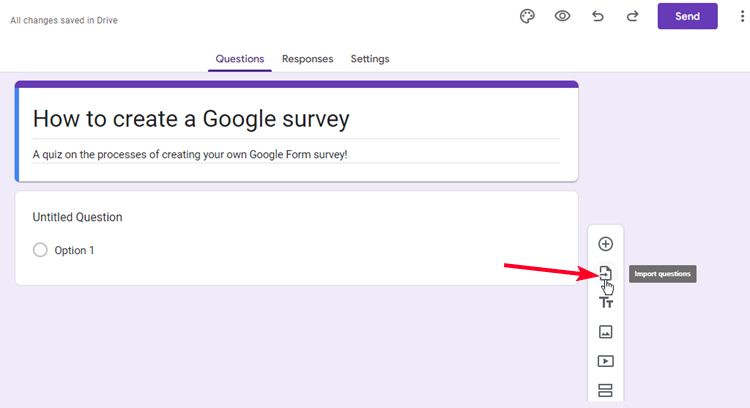
- By default, Google Forms inserts a question tab for you. Click the + icon to add a new question tab.
- You can also import questions from a previous template you created. Click the paper icon with the arrow running through it.
- To edit a question and choose how it appears, click the drop-down menu beside it.
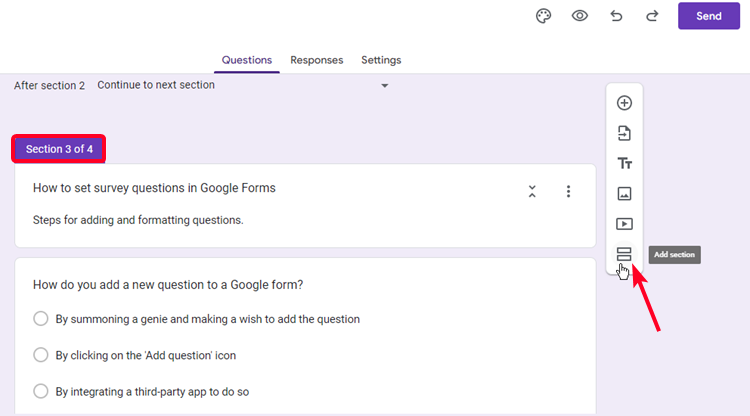
- Click Add section to break up your questions into different segments.

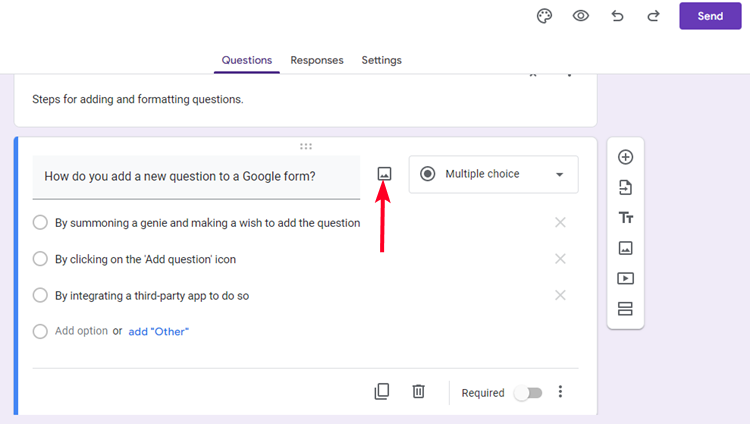
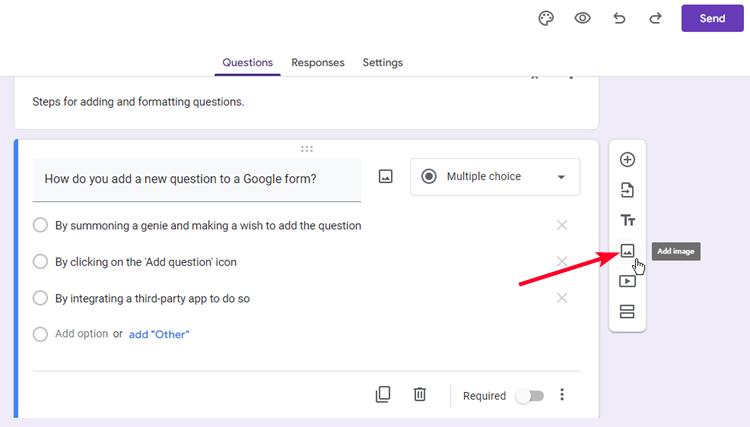
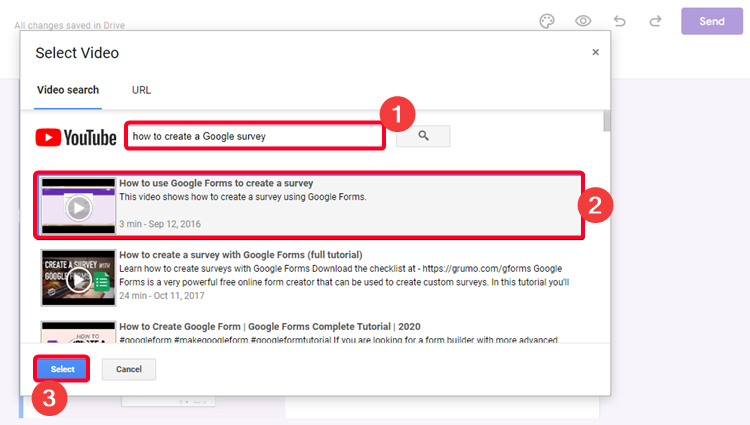
Add media elements to your Google survey
You can insert pictures and YouTube videos to spice up your survey. Pictures can exist within a question tab or separately in a different tab. You can also insert videos into your survey form, but not inside a question tab. You must add the video before or after the question in its own tab. Additionally, you can’t insert non-YouTube videos into Google Forms.
- To insert a picture into a question tab, click the image icon.
- If you’d rather have the picture existing on its own, click Add image from the right side of your screen.
- To add a video, click the video icon. You can search for and add YouTube videos from Google Forms without downloading them on your device. If you have the link to a video you want to add, paste the link into the URL tab.
Reorder questions and sections in Google Forms
You might make a mistake in the arrangement of your questions. Clicking and dragging the questions to their rightful spots resolves the issue. You can also move a question out of one section and into another.
- To switch the positions of your questions, hover your mouse cursor on a question tab.
- You’ll see the drag icon. Dag the tab to where you want it.
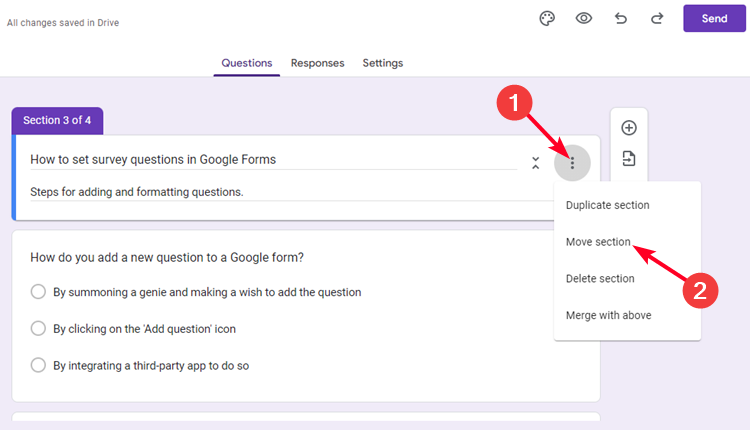
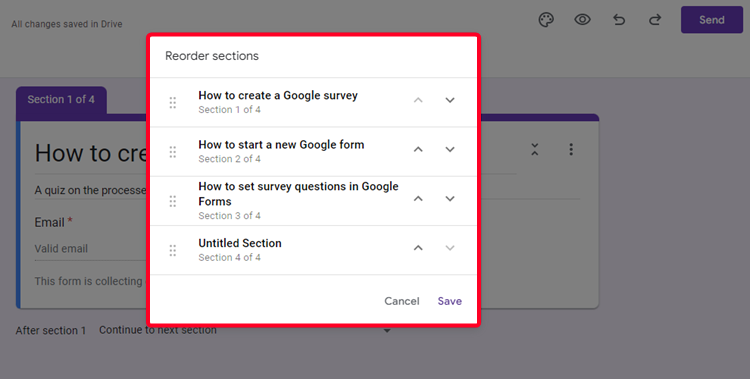
- To switch the position of a section, click the three-dots icon and select Move section. A new menu pops up.
- Use the arrow keys beside the sections to switch their positions, and click Save to effect the changes.
Share your Google survey form
You can share your Google survey via email to multiple addresses at once, which saves you the trouble of doing it one by one. You can also share your survey link on Facebook and Twitter. To send it on other platforms like WhatsApp and Telegram, copy the survey link from Google Forms and paste it there, as there isn’t an option to send it directly.
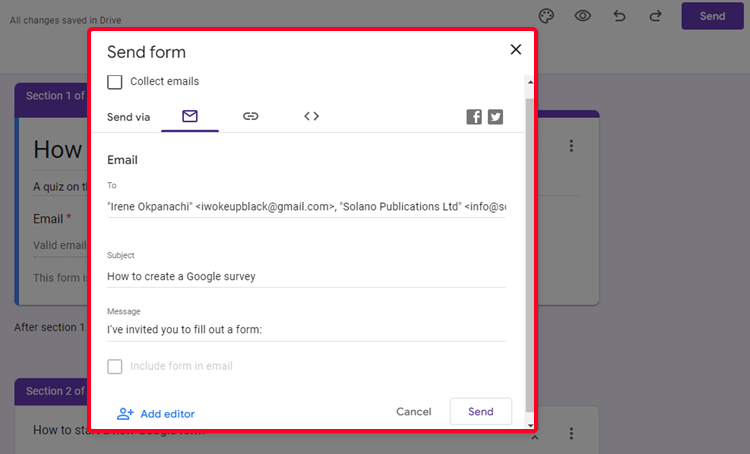
- Click Send, and a new menu appears.
- To share your survey via email, enter the recipient’s address and click Send. Google Forms automatically separates multiple email addresses with a comma, so don’t worry about mixing them up.
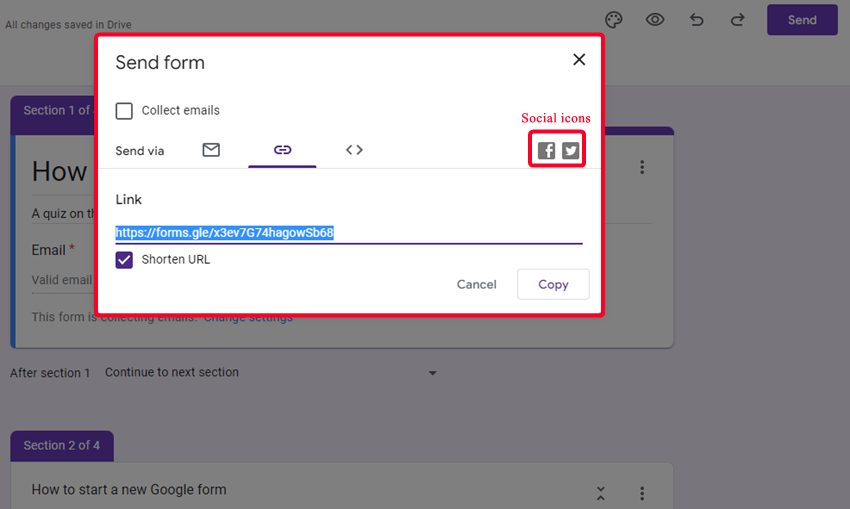
- To share the survey link, click the link tab and highlight the URL. Press Ctrl + C to copy it or click Copy, then paste it where you want to send it.
- Use the social icons to share your survey link on Facebook and Twitter.
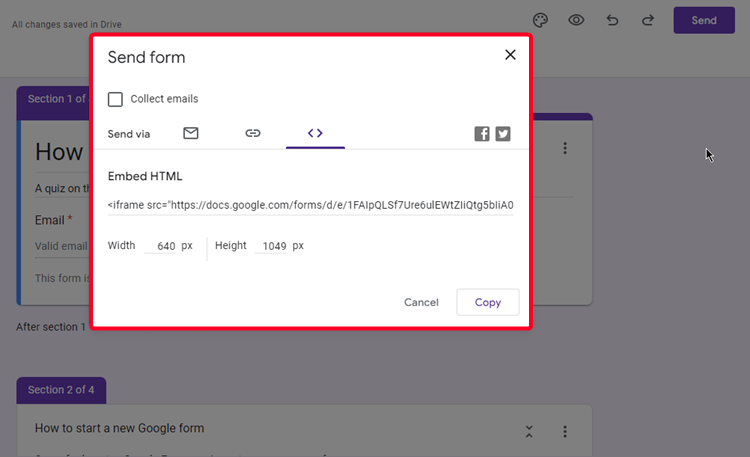
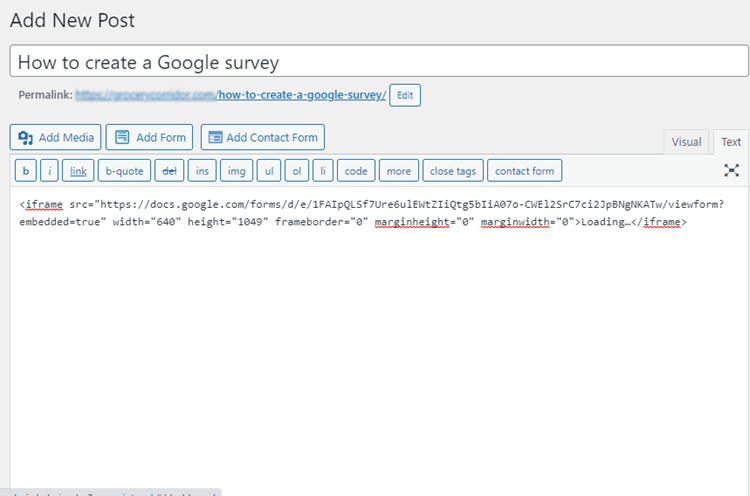
- To embed the survey into your website, click the <> icon and copy the HTML. You can resize the width and height so that the survey ad doesn’t take up too much space on your site.
- Go to the backend of your website and access the Text editor. It’s the part of your website that lets you edit content with codes.
- Paste the HTML in your site’s Text editor, then preview the page. You’ll see how your survey will look when you publish or update the page.
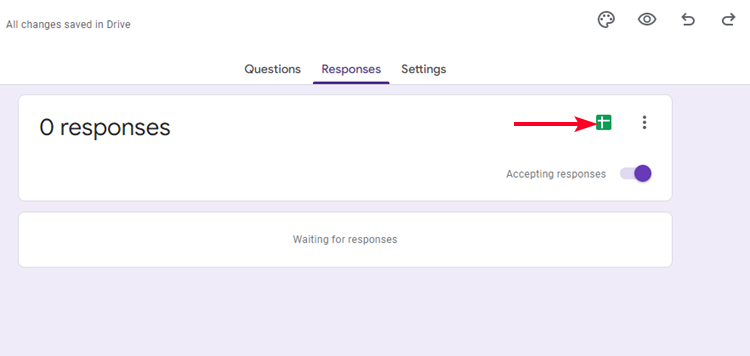
View survey responses on Google Forms
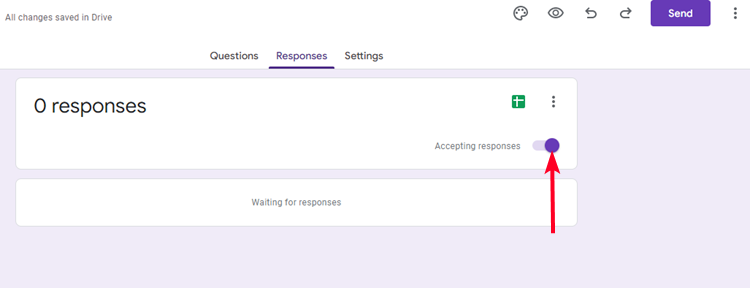
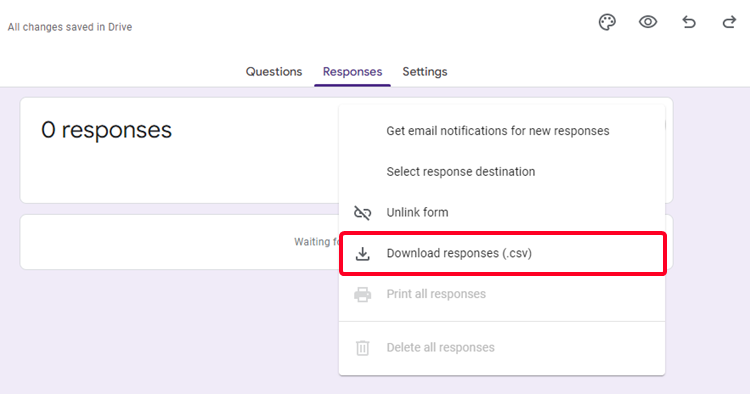
Any response you receive automatically enters the Responses menu. You can download the answers as a .csv file to your computer or view them in the Google Sheets application.
- To view your survey answers, go to the Responses menu.
- To stop receiving responses, tap the toggle switch. You can activate your survey to accept more responses after deactivating it.
- To download responses on your device, tap the three-dots icon and click Download responses (.csv).
- To view responses in Google Sheets, tap the Sheets icon.
How to create a Google survey on your phone
There isn’t an official Google Forms app. You’ll create a form using your web browser. The good news is that the Google Forms website is optimized for mobile viewing. So you can generate a new survey on your phone, although you need to sign in to your account. You may experience difficulties viewing the full website features. You can resolve that issue by switching your browser view to the Desktop site or rotating your screen to landscape view.
Create new forms and add questions
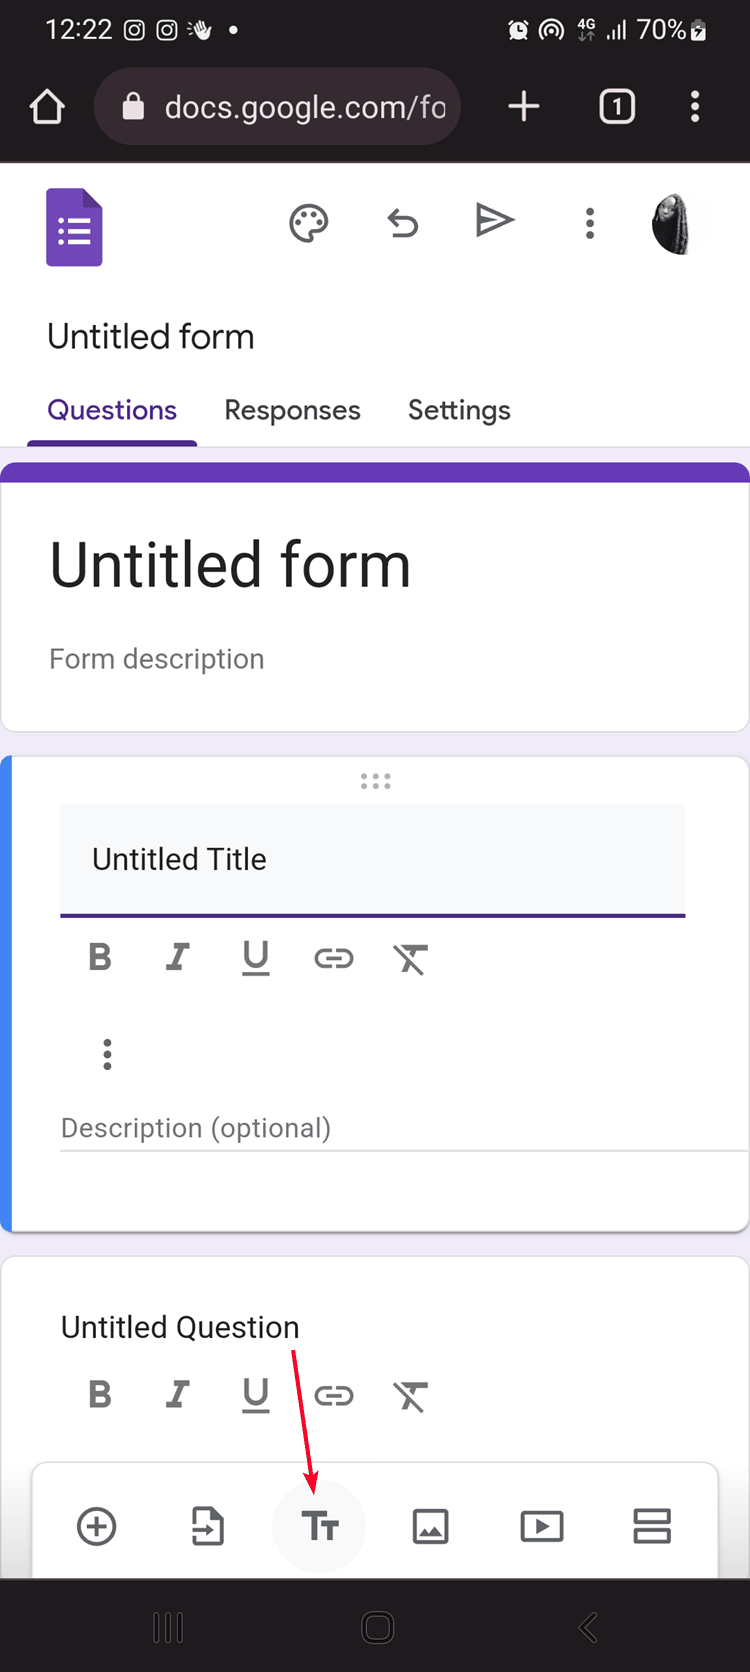
- Open your browser and go to forms.google.com. The URL automatically creates a new form for you.
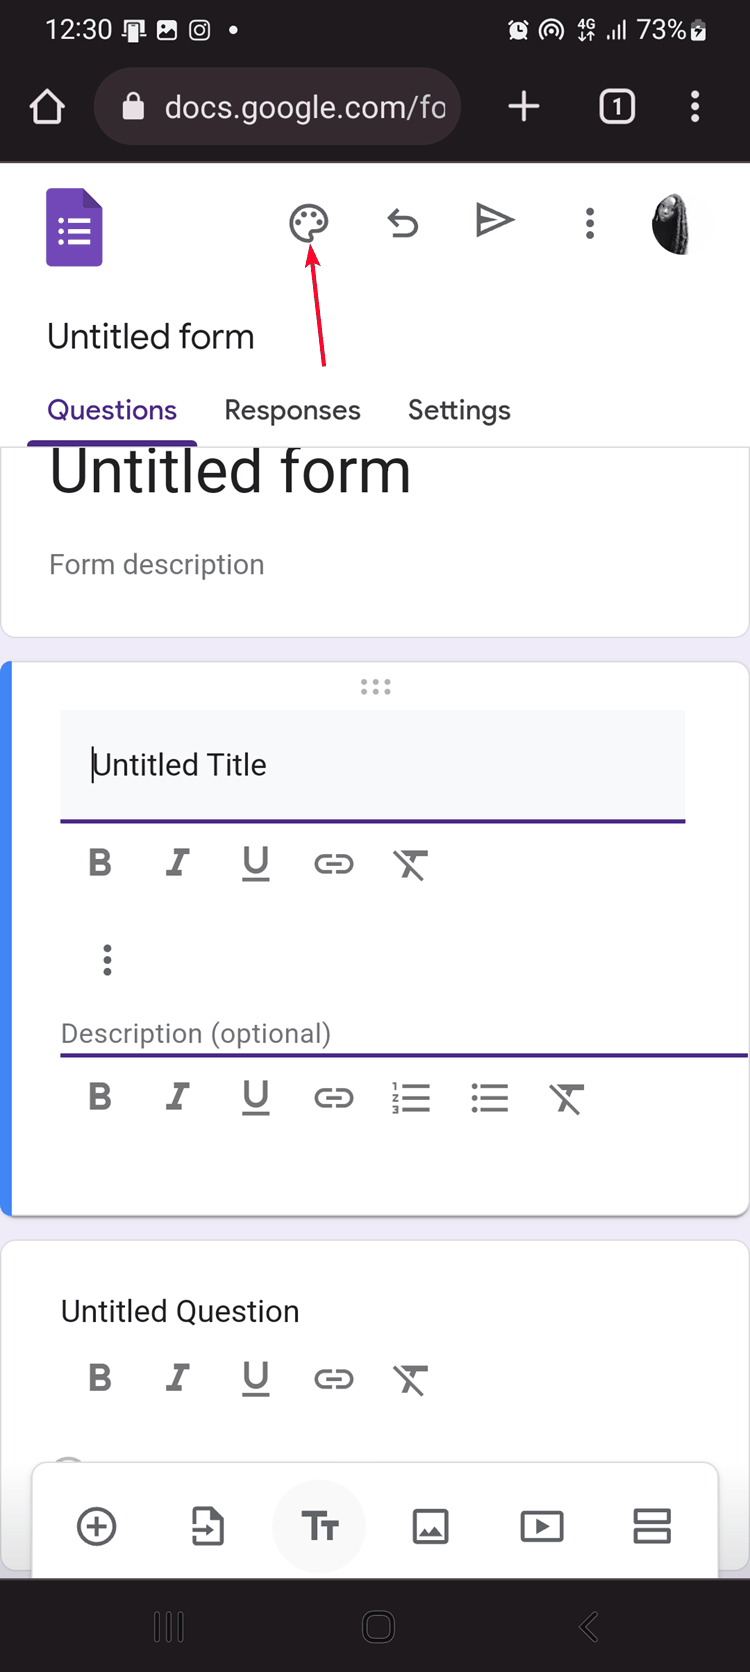
- Tap Tt to insert new titles and descriptions to your form at any point.
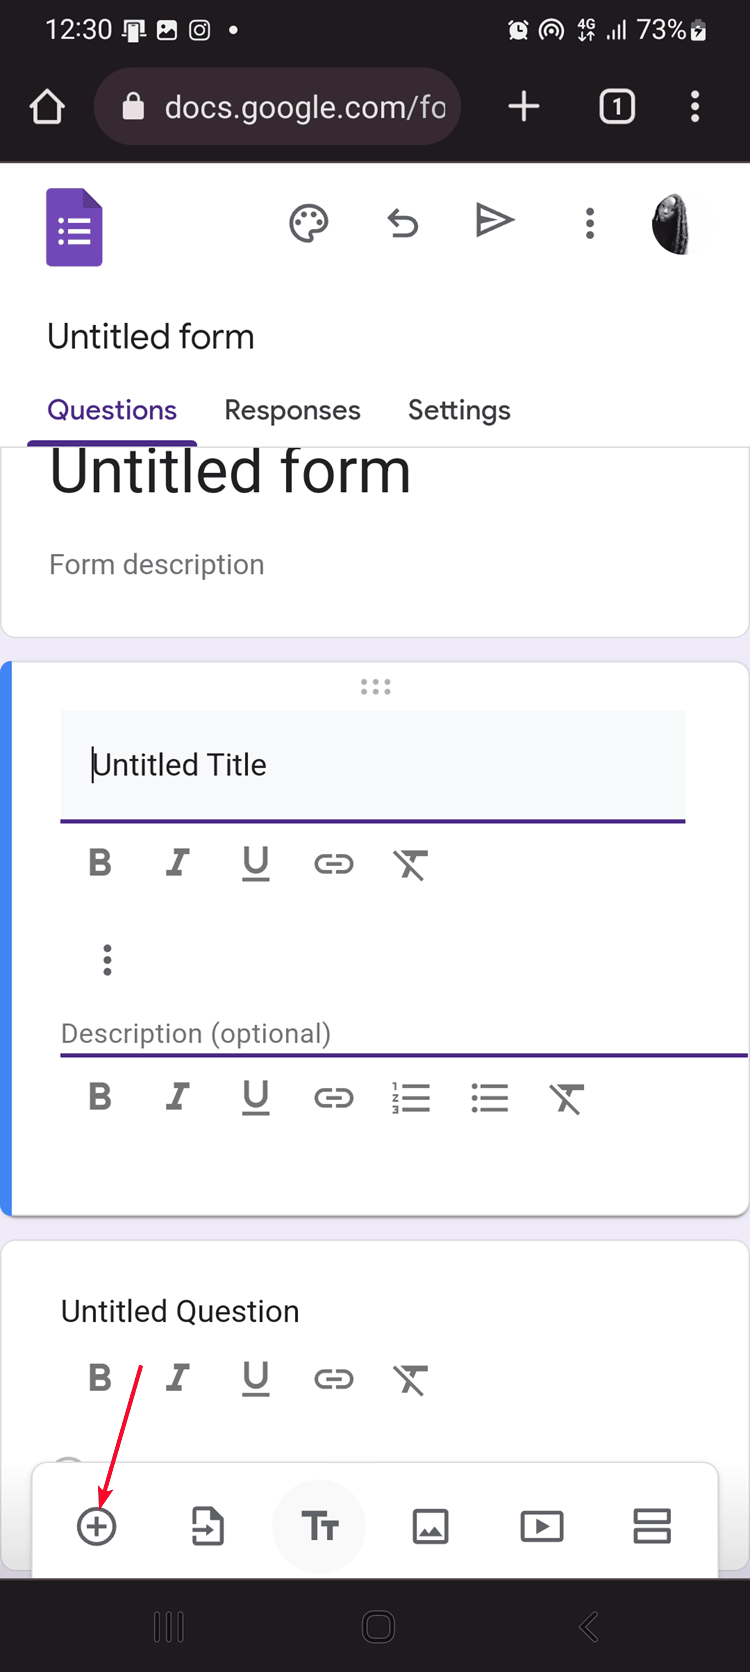
- To add a question to your form, tap the + icon. You can use the drop-down menu to select the types of questions you want, for example, multiple-choice or short answers.
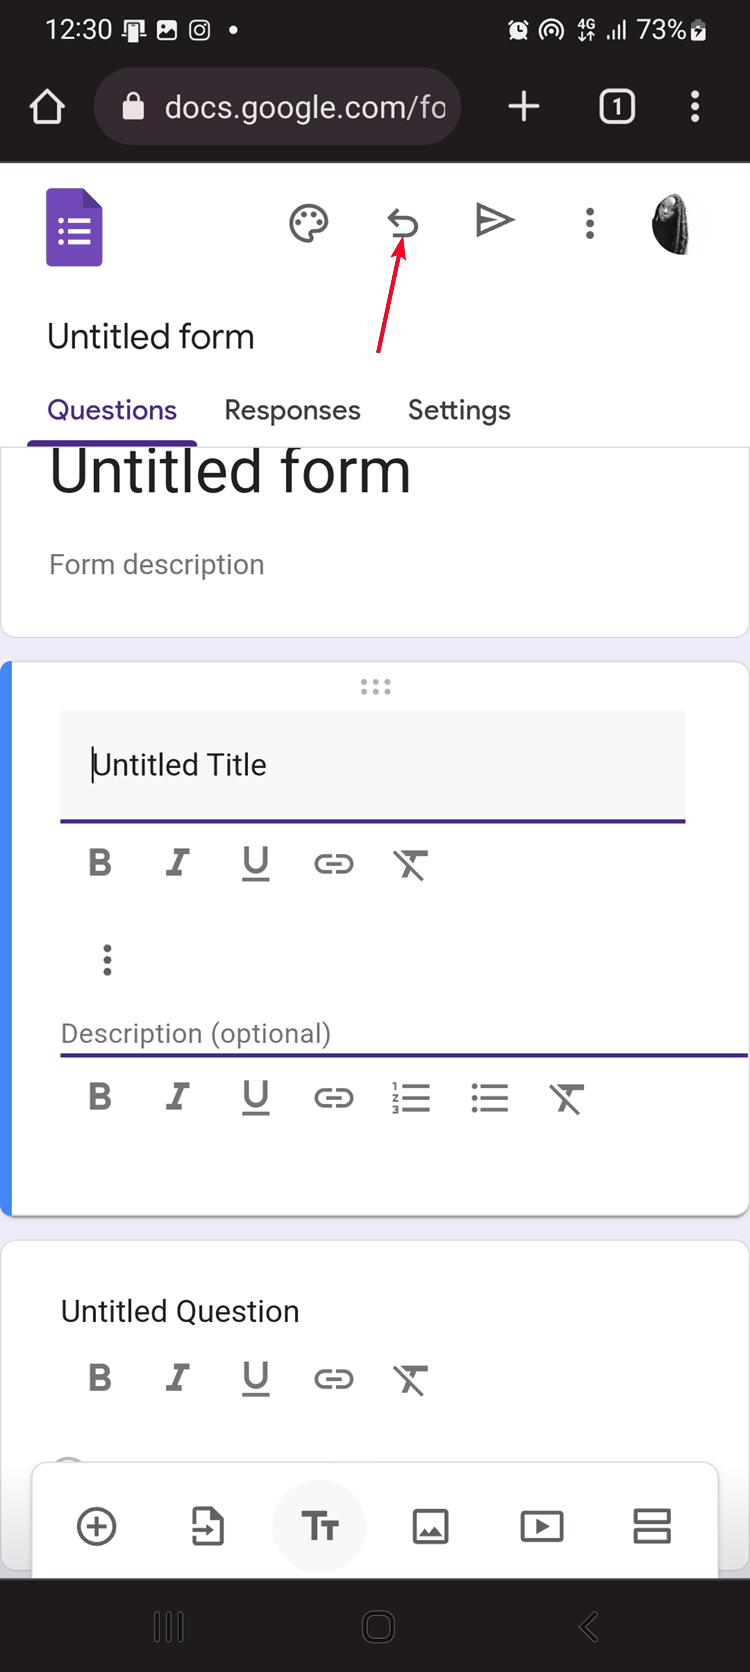
- To undo any edits you make, tap the arrow icon.
- To change the theme and style of your form, tap the color palette icon.
Add images and videos
- To add pictures, tap the image icon. Then tap Browse to upload a picture from your phone’s gallery. You can also insert pictures via URLs, take a new picture with your camera, or insert them from Google Drive or Google Photos.
- To add videos, tap the video icon and search for a YouTube video or insert one via its URL.
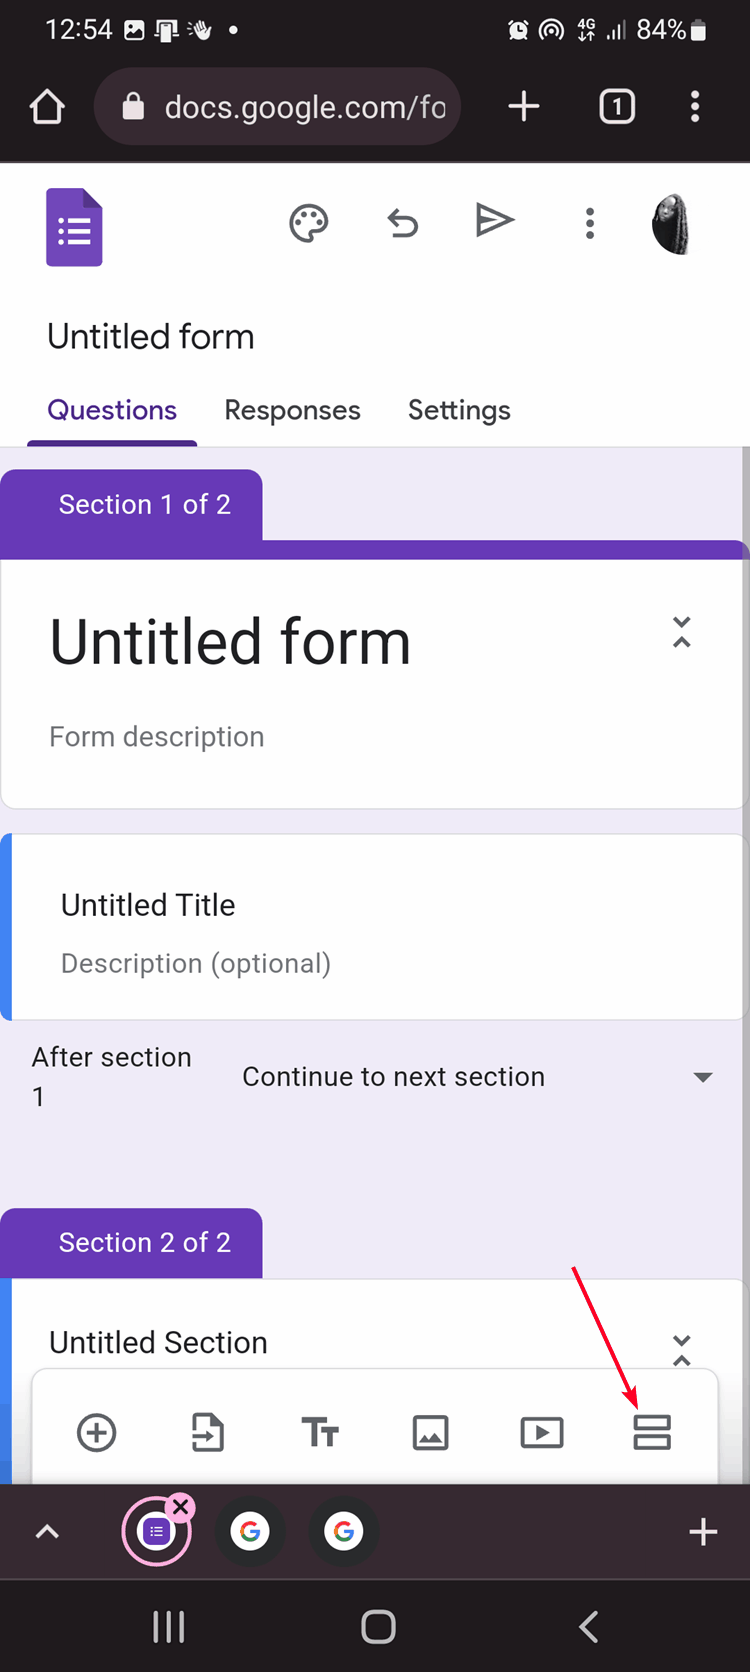
Add and reorder sections
- Tap the page break icon to split your form into sections.
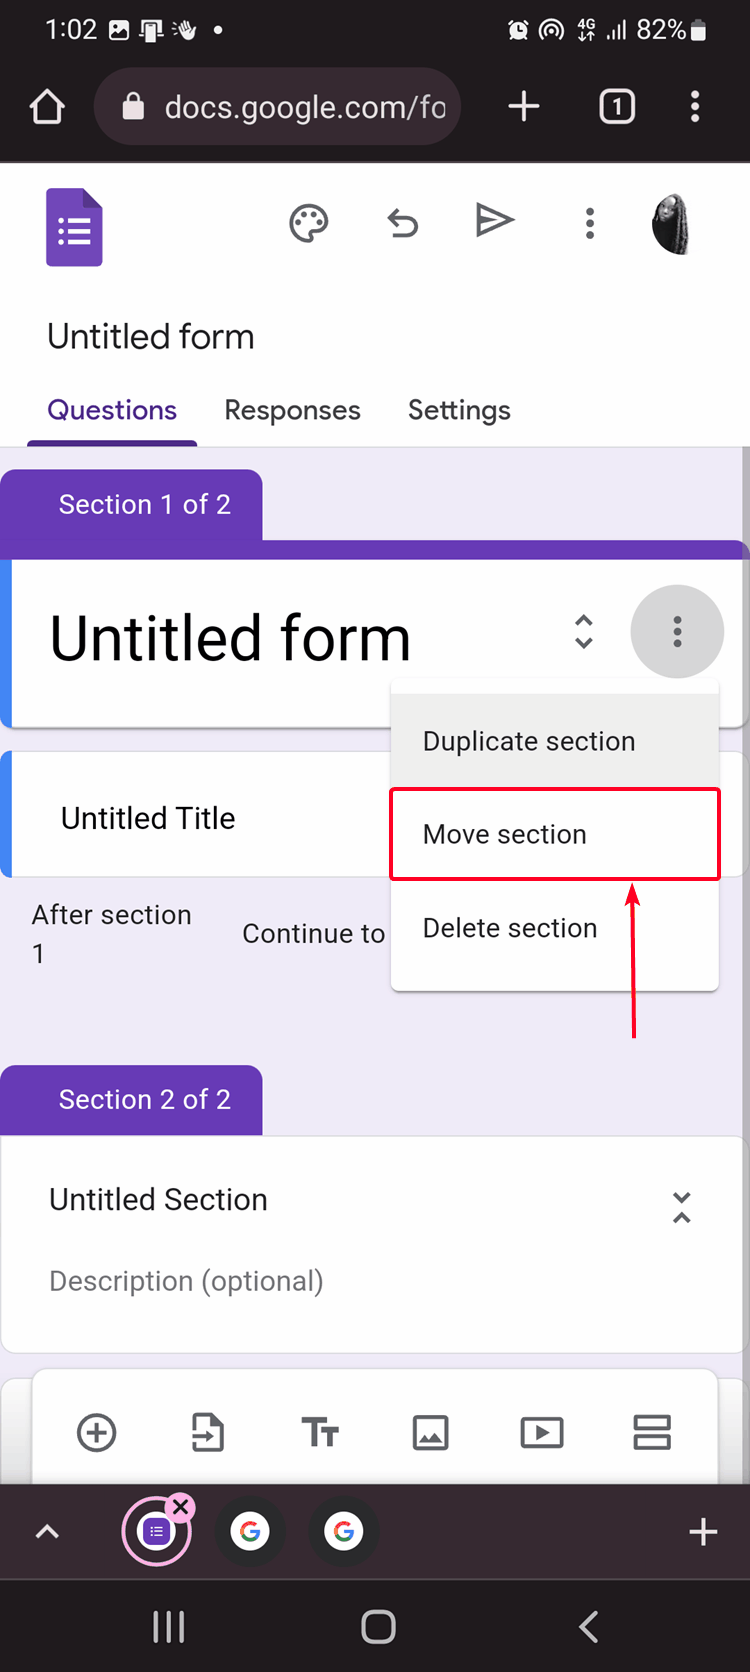
- To reorder sections, tap the three-dots icon and select the Move section.
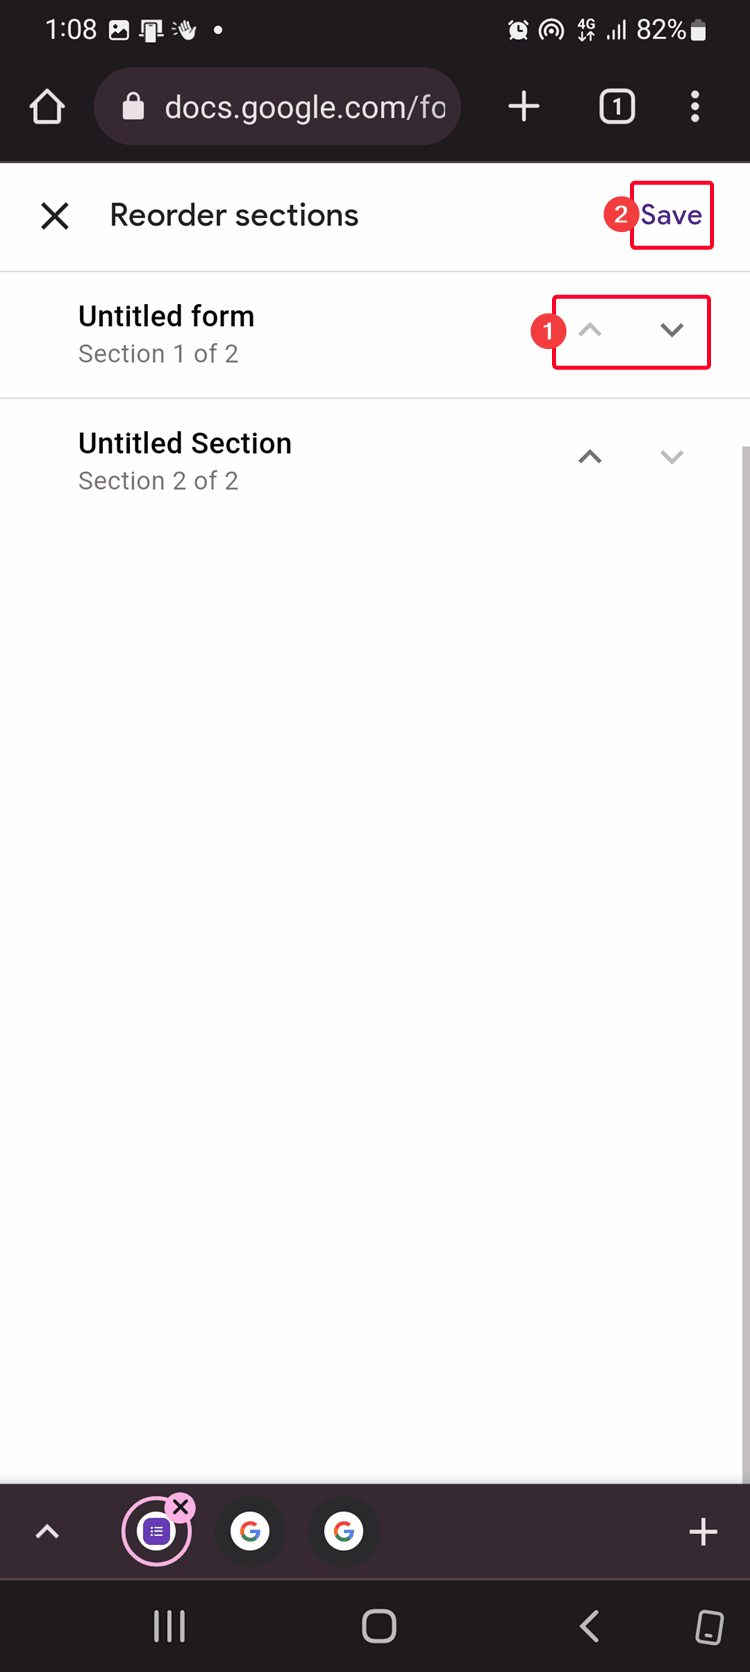
- In the new menu that appears, use the arrows to arrange sections. Tap Save when you’re done.
- To reorder questions, tap and hold the drag icon, then move the question to where you want it.

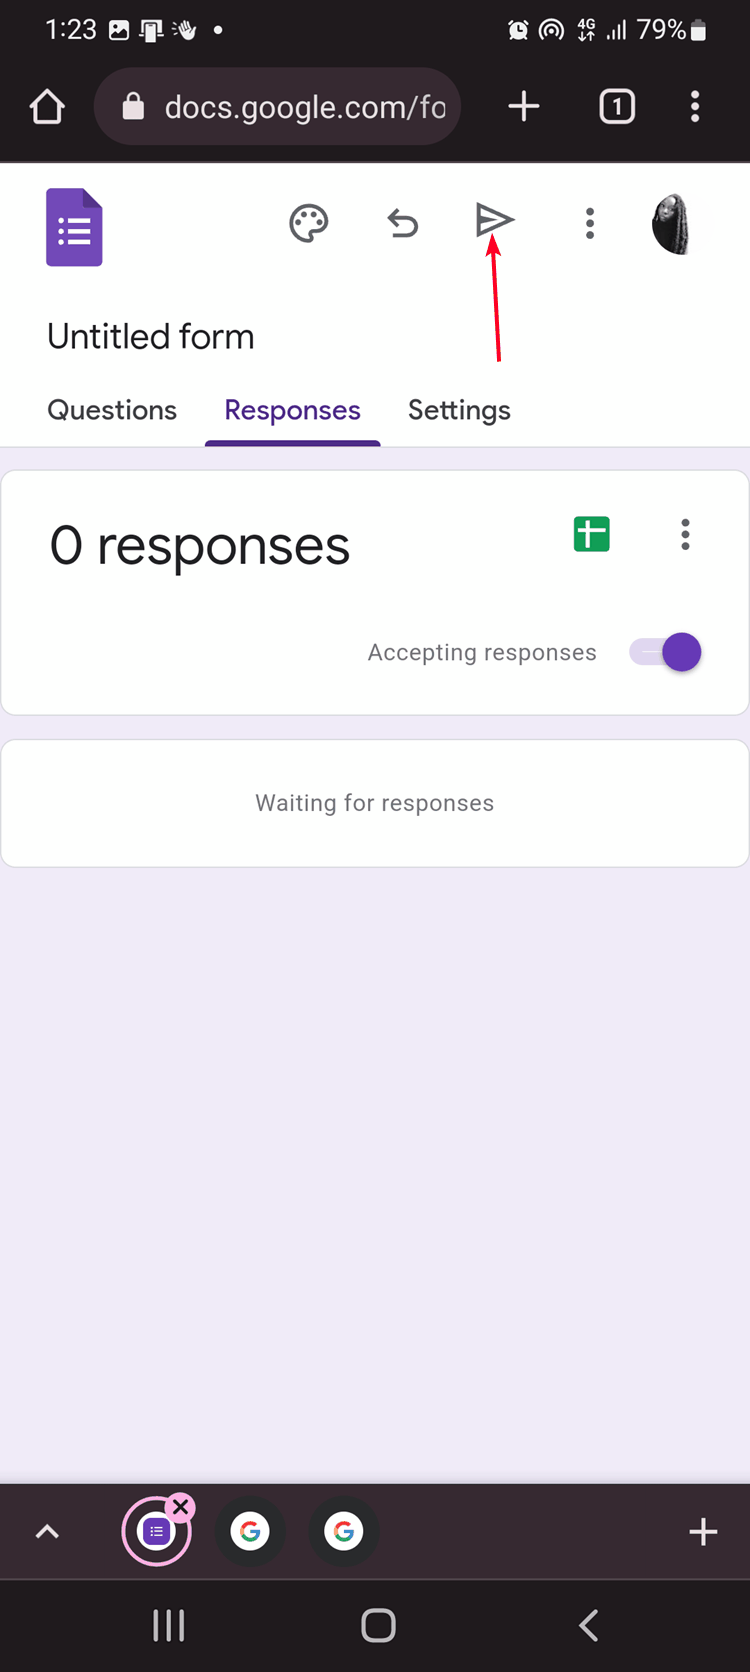
View responses and share your survey
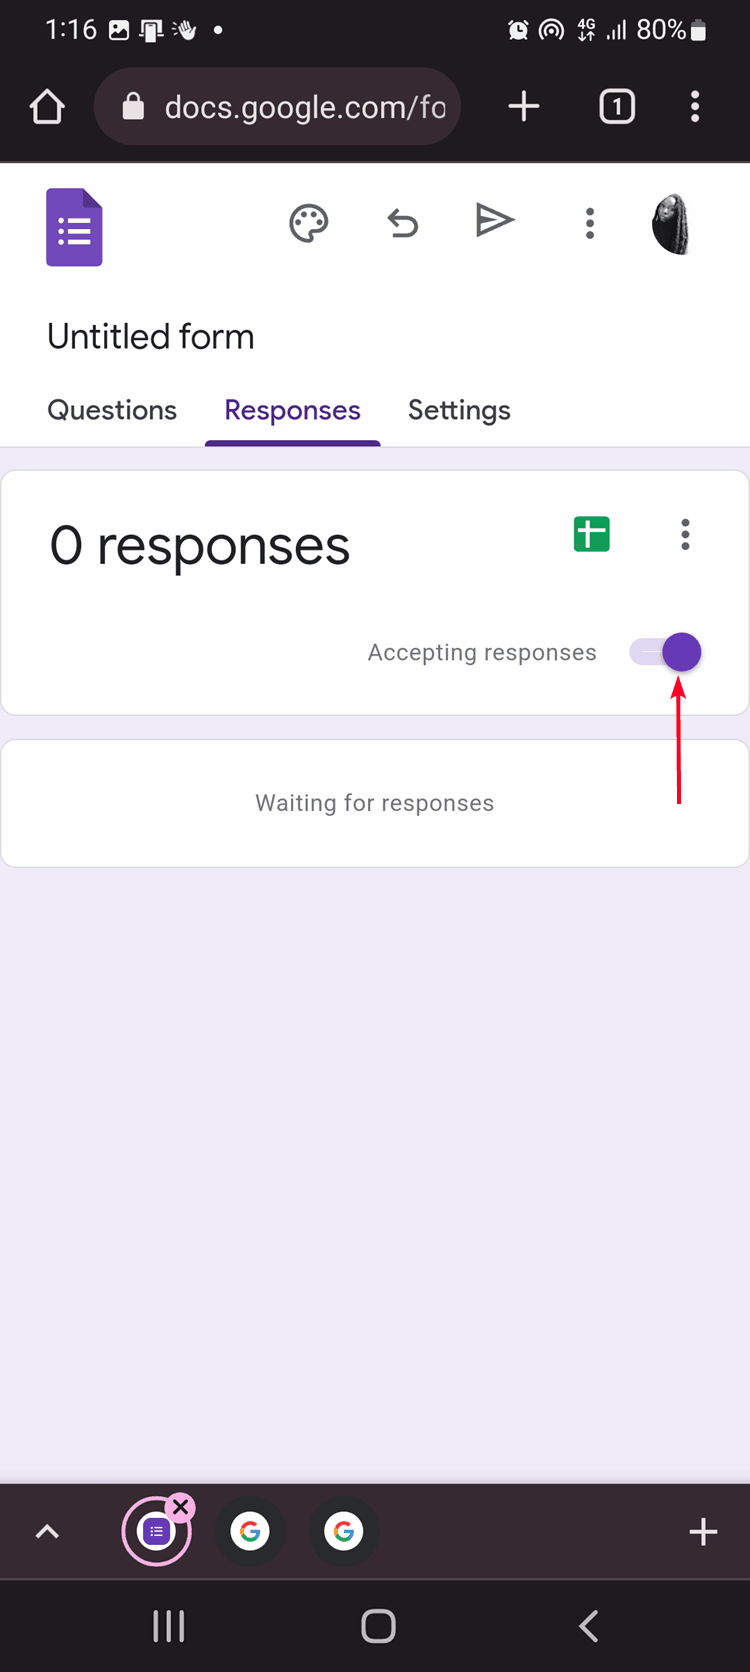
- Tap the Responses tab to view the answers you received for your survey.
- To stop receiving responses, tap the toggle switch beside Accepting responses.
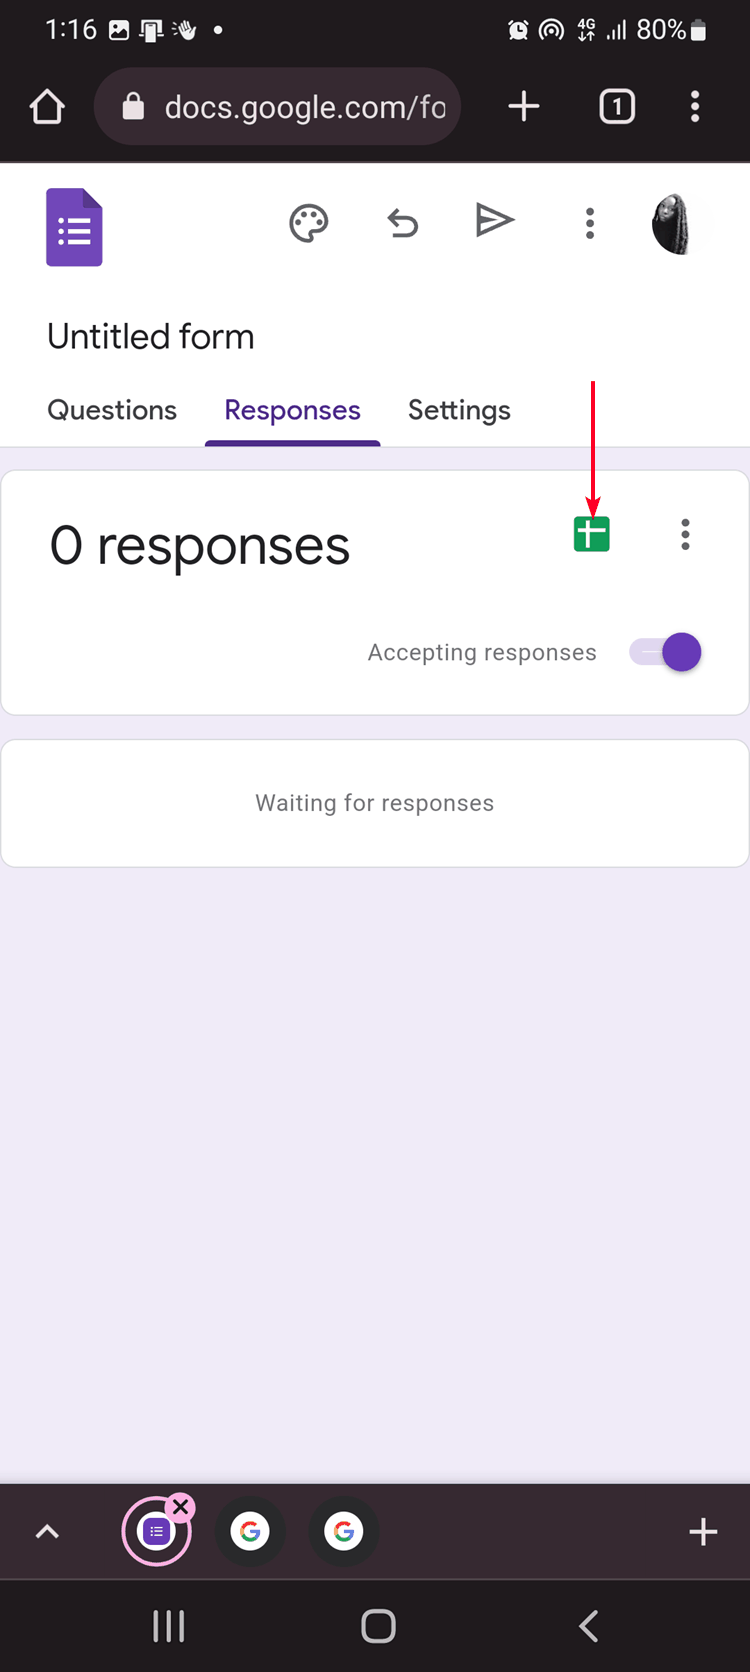
- Tap the Google Sheets icon to view the responses in a spreadsheet. If the app is installed, Google Forms automatically opens it for you.
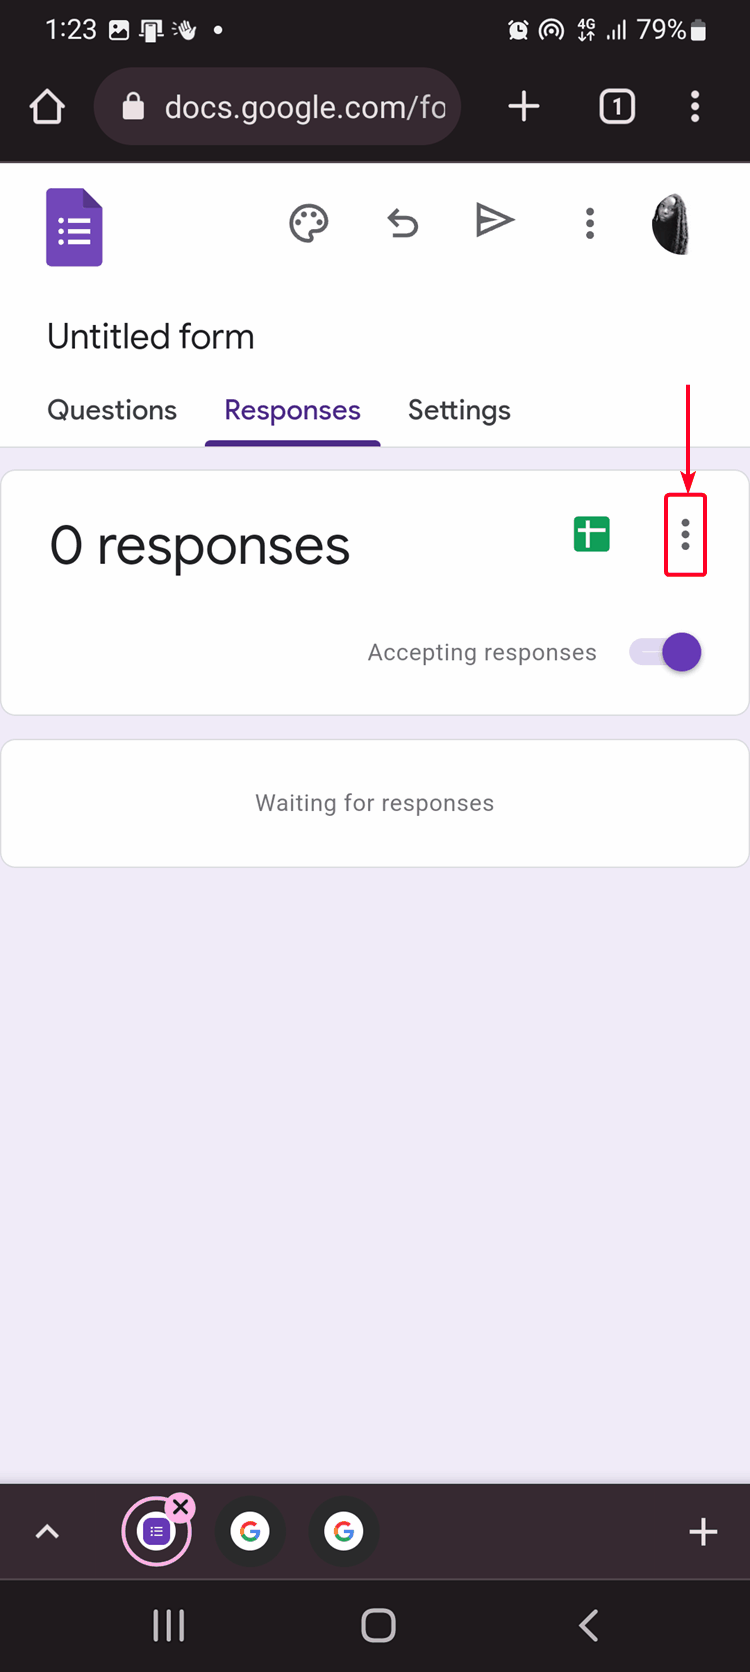
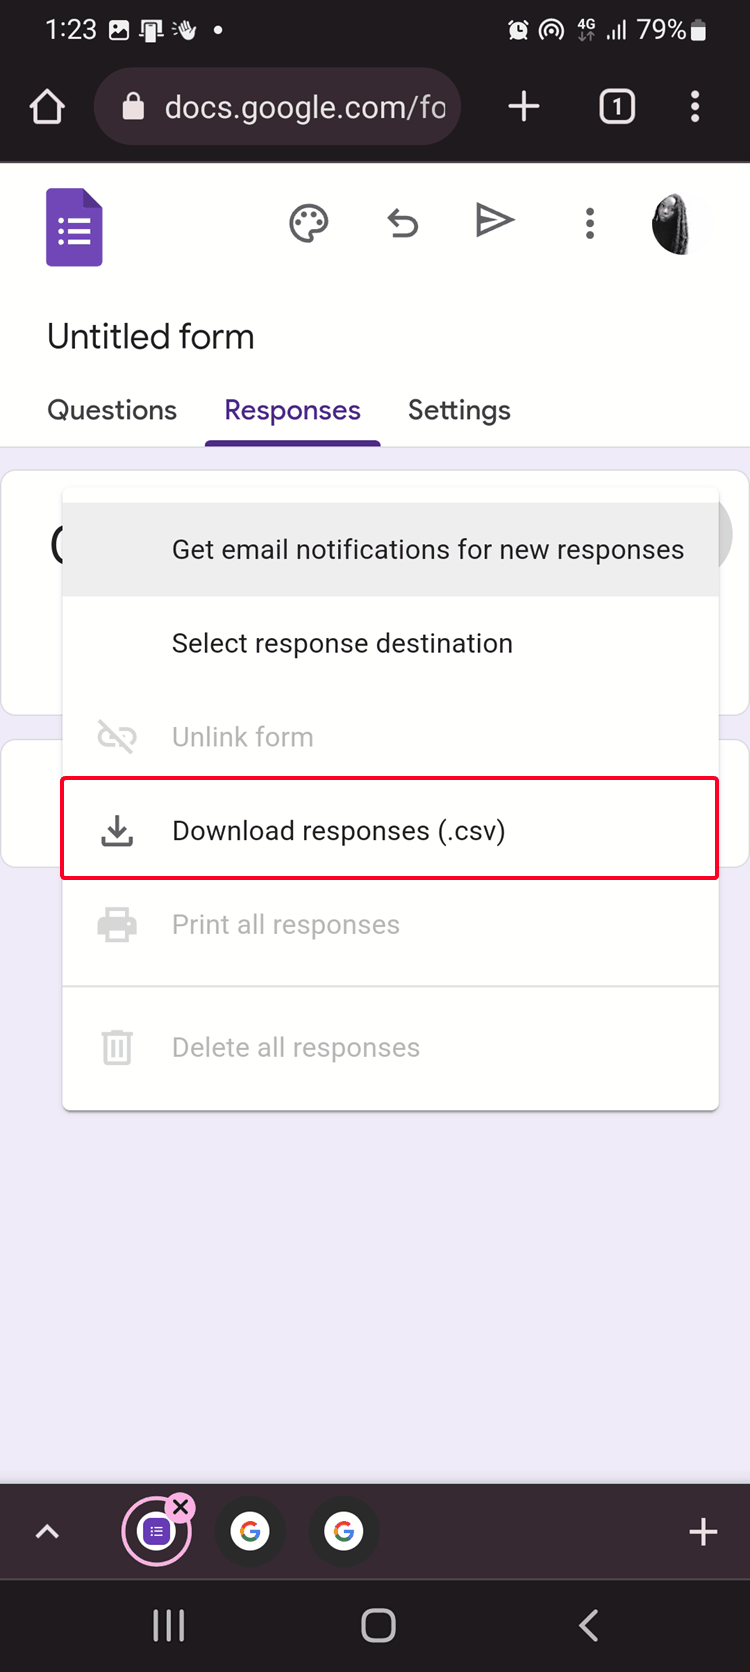
- To download the responses, tap the three-dots icon and select Download responses (.csv).
- Tap the paper plane icon, and select how you’d like to share your survey. You can share it by sending an email, copying the URL, embedding it on your website, or sharing it on Twitter and Facebook.
Collect feedback the fast and easy way
Google Forms eliminates the need to message people individually to get their opinions. It also automatically organizes responses into a spreadsheet, so you don’t have to waste time typing them in. You can share the survey on popular messaging apps like WhatsApp and Telegram or invite your coworkers to collaborate using the Google Workspace suite.

Khám phá thêm từ Phụ Kiện Đỉnh
Đăng ký để nhận các bài đăng mới nhất được gửi đến email của bạn.

