

Review sản phẩm
Dọn Sạch Hòm Thư Gmail: Hướng Dẫn Xóa và Chặn Tất Cả Email Quảng Cáo

Th5
## Dọn Sạch Hòm Thư Gmail: Hướng Dẫn Xóa và Chặn Tất Cả Email Quảng Cáo
Mệt mỏi vì hòm thư Gmail ngập tràn email quảng cáo? Bạn muốn lấy lại không gian thư mục và tập trung vào những email quan trọng? Bài viết này sẽ hướng dẫn bạn từng bước cách xóa và chặn tất cả các email quảng cáo, giúp bạn sở hữu một hòm thư Gmail gọn gàng và hiệu quả hơn bao giờ hết. Chúng tôi sẽ chia sẻ những mẹo nhỏ nhưng vô cùng hữu ích để bạn kiểm soát hoàn toàn lượng email nhận được. Không chỉ đơn giản là xóa, chúng ta còn tìm hiểu cách ngăn chặn những email quảng cáo này xuất hiện trở lại, mang đến cho bạn trải nghiệm thư điện tử chuyên nghiệp và thoải mái hơn.
Bước 1: Xóa các email quảng cáo hiện có:
* Tìm kiếm và xóa từng email: Đây là cách đơn giản nhất nhưng tốn nhiều thời gian, đặc biệt nếu bạn có rất nhiều email quảng cáo. Bạn có thể sử dụng tính năng tìm kiếm nâng cao của Gmail để lọc ra các email chứa từ khóa thường gặp trong email quảng cáo (ví dụ: “khuyến mãi”, “giảm giá”, “sale”).
* Sử dụng tính năng lọc (Filter): Gmail cho phép bạn tạo các bộ lọc để tự động xóa hoặc đánh dấu các email quảng cáo. Bạn có thể thiết lập bộ lọc dựa trên người gửi, chủ đề, hoặc từ khóa trong nội dung email. Điều này sẽ giúp bạn tự động loại bỏ email quảng cáo một cách hiệu quả.
Bước 2: Chặn các email quảng cáo trong tương lai:
* Báo cáo thư rác (Spam): Đây là cách đơn giản nhất để báo cho Gmail biết email đó là thư rác. Gmail sẽ tự động học hỏi và giảm thiểu việc bạn nhận được các email tương tự trong tương lai.
* Hủy đăng ký (Unsubscribe): Hầu hết các email quảng cáo đều có nút “Unsubscribe” hoặc “Hủy đăng ký” ở cuối email. Hãy nhấp vào nút này để hủy đăng ký nhận email từ người gửi đó. Lưu ý rằng một số email có thể yêu cầu bạn xác nhận việc hủy đăng ký.
* Quản lý cài đặt quảng cáo của Google: Google cho phép bạn quản lý các cài đặt quảng cáo của mình để kiểm soát mức độ cá nhân hóa và tần suất nhận email quảng cáo. Bạn có thể truy cập vào cài đặt này thông qua tài khoản Google của mình.
Bước 3: Tối ưu hóa hòm thư Gmail:
* Sử dụng nhãn (Labels): Tạo các nhãn riêng để phân loại các email quan trọng và không quan trọng, giúp bạn dễ dàng quản lý và tìm kiếm email.
* Tận dụng các tính năng của Gmail: Khám phá các tính năng khác của Gmail như “Snooze” (Tạm hoãn) để tạm thời ẩn email và xử lý chúng sau, hoặc “Important” (Quan trọng) để ưu tiên các email cần được xử lý ngay.
Bằng cách áp dụng các bước trên, bạn sẽ có một hòm thư Gmail sạch sẽ, ngăn nắp và hiệu quả hơn, tiết kiệm thời gian và tăng năng suất công việc. Hãy bắt đầu dọn dẹp hòm thư của bạn ngay hôm nay!
#Gmail #Email #QuảngCáo #Spam #TốiƯuHóa #HòmThư #HướngDẫn #MẹoVặt #SảnXuất #NăngSuất #QuảnLýEmail #Google
Giới thiệu How to delete and stop all promotions in Gmail
: How to delete and stop all promotions in Gmail
Hãy viết lại bài viết dài kèm hashtag về việc đánh giá sản phẩm và mua ngay tại Queen Mobile bằng tiếng VIệt: How to delete and stop all promotions in Gmail
Mua ngay sản phẩm tại Việt Nam:
QUEEN MOBILE chuyên cung cấp điện thoại Iphone, máy tính bảng Ipad, đồng hồ Smartwatch và các phụ kiện APPLE và các giải pháp điện tử và nhà thông minh. Queen Mobile rất hân hạnh được phục vụ quý khách….
_____________________________________________________
Mua #Điện_thoại #iphone #ipad #macbook #samsung #xiaomi #poco #oppo #snapdragon giá tốt, hãy ghé [𝑸𝑼𝑬𝑬𝑵 𝑴𝑶𝑩𝑰𝑳𝑬]
✿ 149 Hòa Bình, phường Hiệp Tân, quận Tân Phú, TP HCM
✿ 402B, Hai Bà Trưng, P Tân Định, Q 1, HCM
✿ 287 đường 3/2 P 10, Q 10, HCM
Hotline (miễn phí) 19003190
Thu cũ đổi mới
Rẻ hơn hoàn tiền
Góp 0%
Thời gian làm việc: 9h – 21h.
KẾT LUẬN
Hãy viết đoạn tóm tắt về nội dung bằng tiếng việt kích thích người mua: How to delete and stop all promotions in Gmail
Emails have become the de facto mailbox of the web. But much like sorting through the stuffed promotional flyers and pamphlets in your mailbox, your inbox has a similar issue. Junk mail often congests your inbox, chipping away at your Google Drive storage. Gone are the days when you could ignore this problem, as most Google accounts will eat up that 15GB of storage in no time.
However, you don’t have to worry about playing janitor for your email address without help. Google makes removing all unwanted marketing emails and promotions reasonably easy. Whether managing a Gmail account on the web, a working Chromebook, or via the app, you can access the tools from your Gmail inbox to banish unwanted promotional emails for good. So, to help you get started, we created a handy guide to walk you through how to delete those pesky promotional emails that keep filling up your inbox.
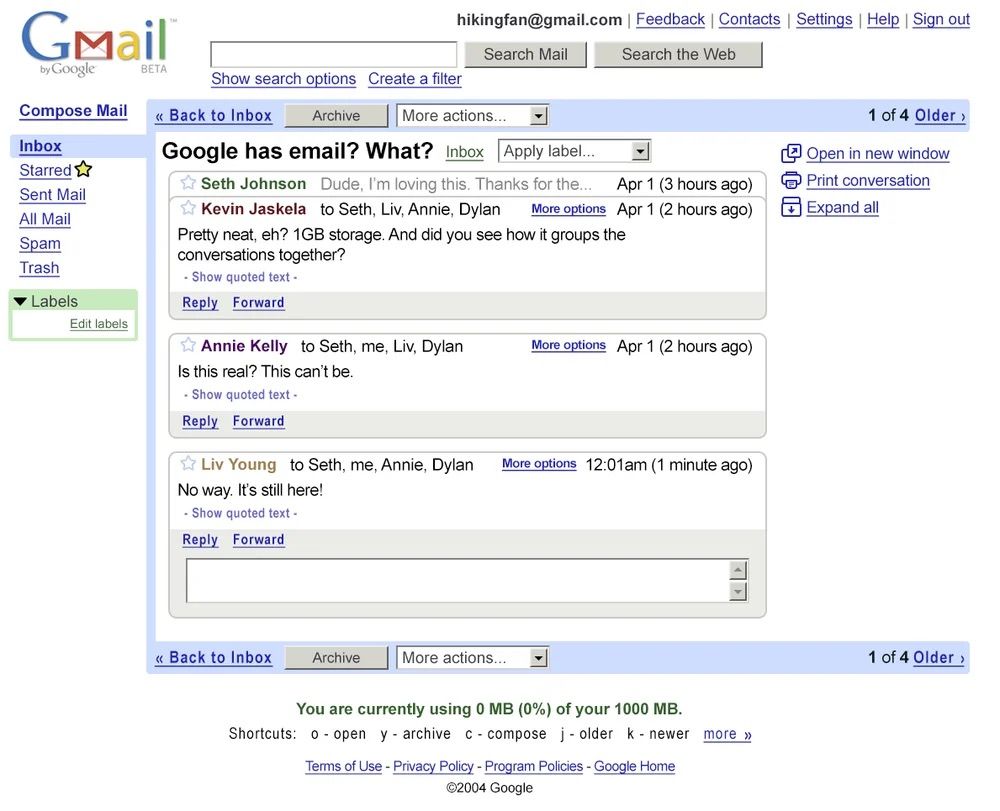
Source: Google
When Gmail launched on April 1, 2004, emails were lumped into a single inbox. As email increased in popularity and spam became more common, users found that important emails were buried by marketing emails and newsletters. In May 2013, Google announced an updated Gmail with auto-sorted tabs to reign in this inbox chaos. The newly-released tabbed inbox joined keyboard shortcuts to make Gmail more efficient for power users.
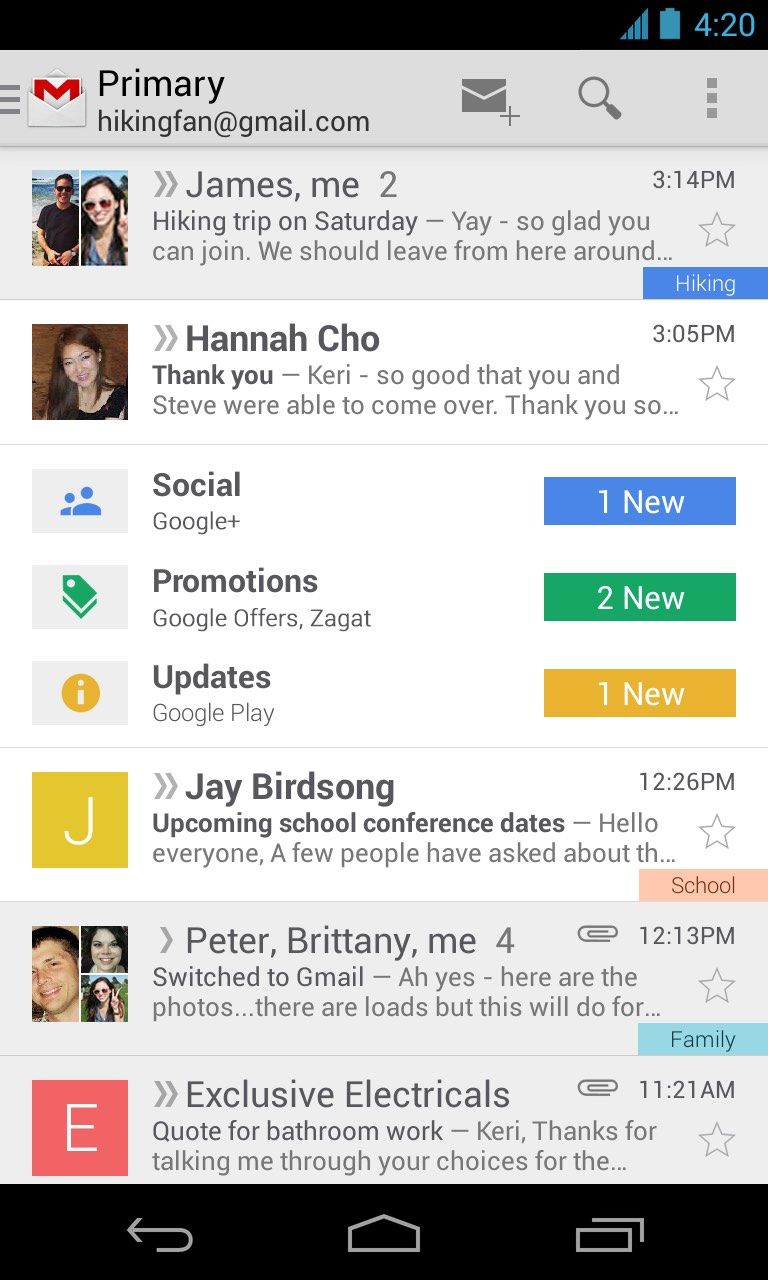
Though Google’s tabbed inbox segregates promotional emails into its own tab, those emails still pile up. You can hide the Promotions tab if you prefer to see marketing emails in the Primary Inbox. You can delete those emails to free up some Google Drive storage. Gmail filters can automate this, so you never have to see a promotion again. Every marketing email can be tracked down and handled with a few easy steps.
Aside from deleting specific emails, you may want to remove the Gmail Promotions tab. Doing so will land those marketing emails in the inbox, giving you a visual of the emails you don’t want. This can be accomplished in a few simple steps.
Remove the Gmail Promotions tab using your web browser
- Open Gmail in your web browser.
- Open the Gmail Settings menu by tapping the cog icon in the page’s upper-right corner. The Quick settings menu appears.
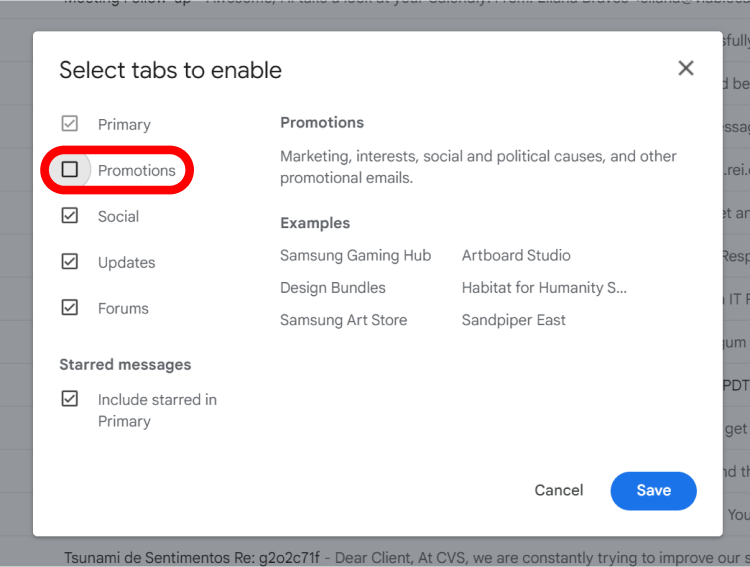
- In the Inbox type section, click the Customize option.
- Clear the checkbox to the left of Promotions in the Select tabs to enable pop-up menu.
- Click the blue Save button in the lower-right corner.

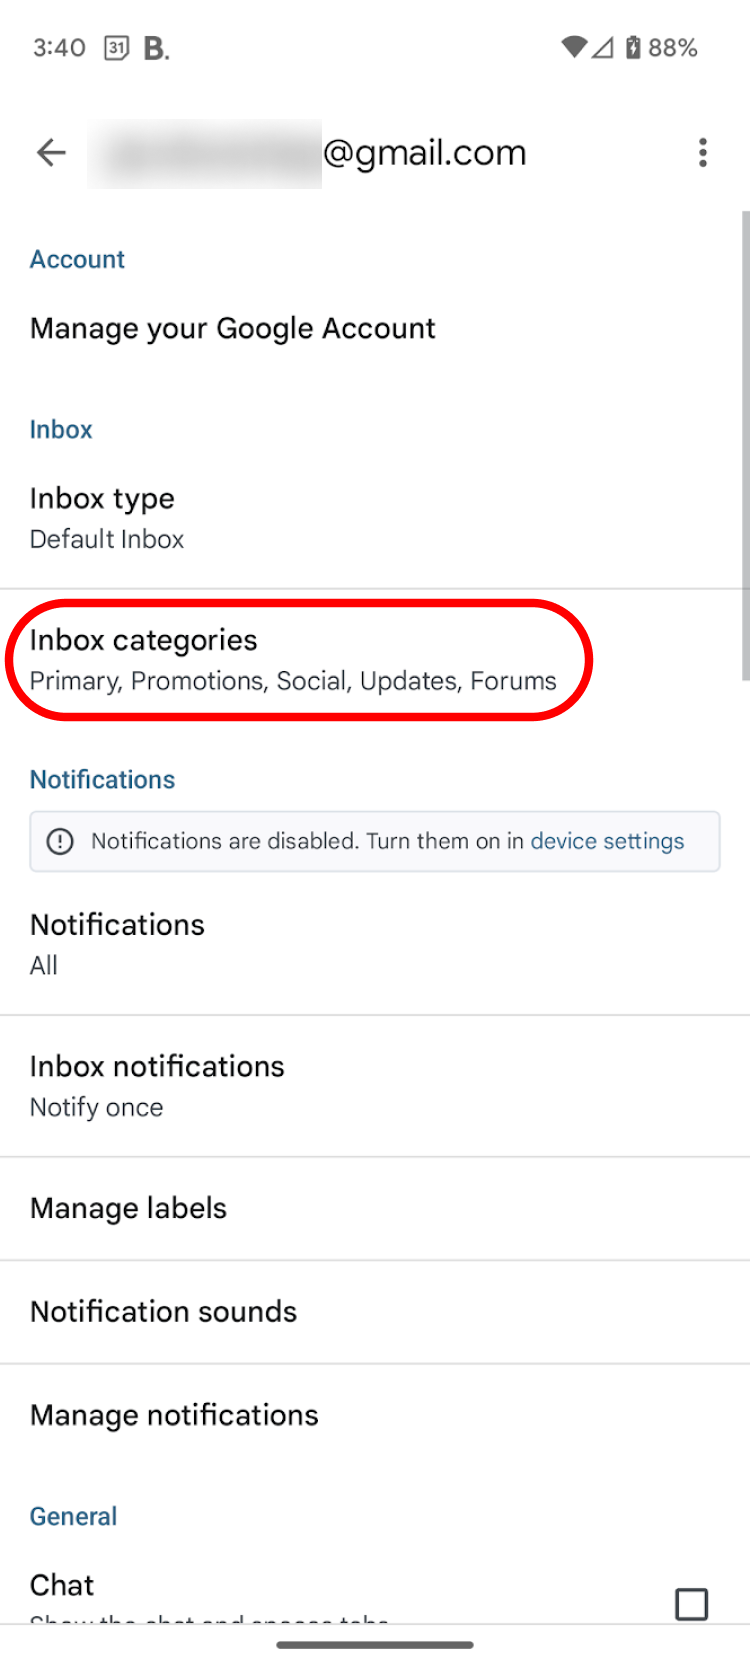
Remove the Gmail Promotions tab using the mobile app
Although we use the Gmail app for Android in this tutorial, the steps are the same in the iOS app.
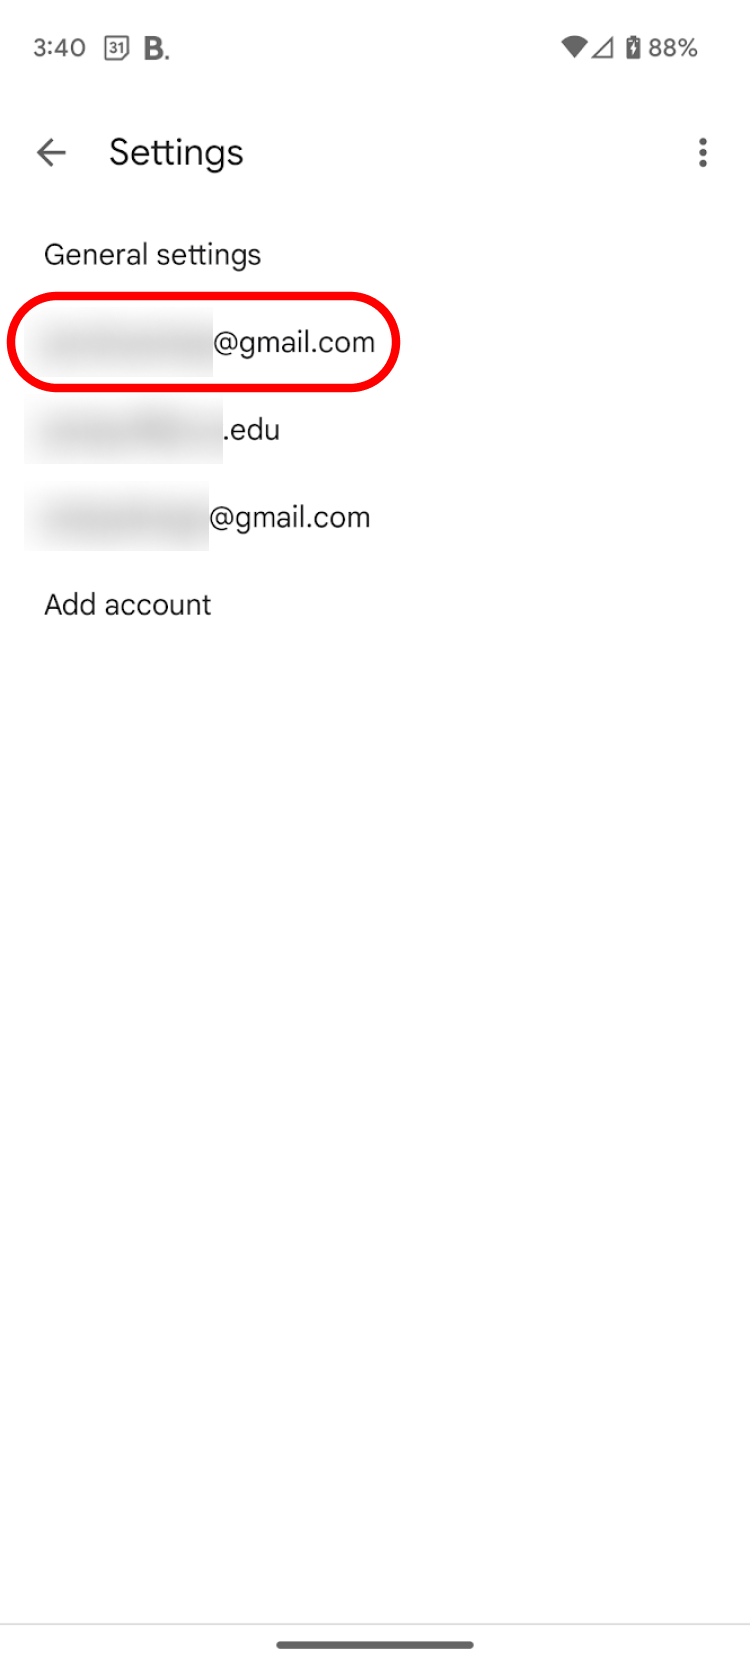
- Tap the hamburger menu icon located in the upper-left corner of the Gmail app.
- Select Settings and choose the account from which you want to remove the Promotions category.
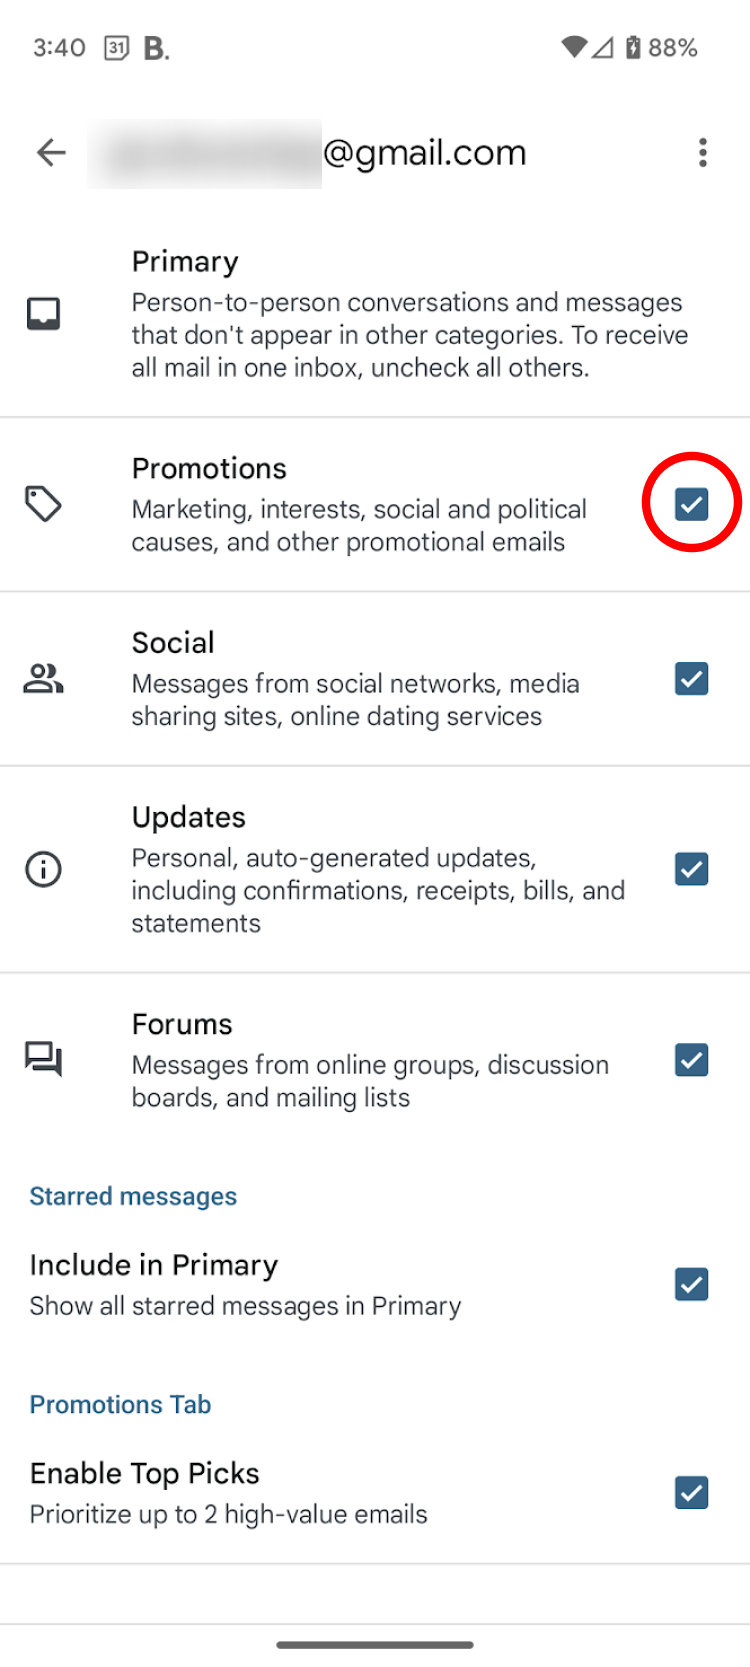
- Tap Inbox categories.
- Clear the Promotions checkbox.
Promotions eat into your Google Drive storage space. Gmail makes it easy to get rid of them all at once or mass delete emails if your inbox has become overwhelming. Here’s how to do the former.
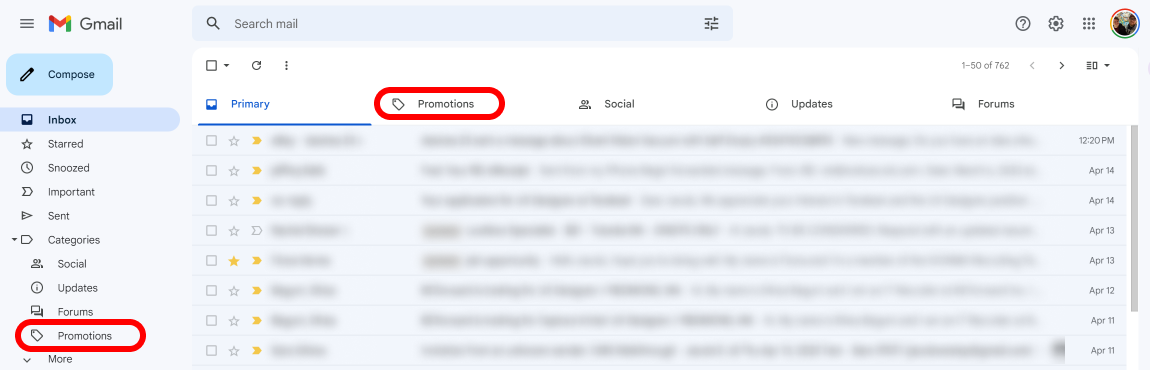
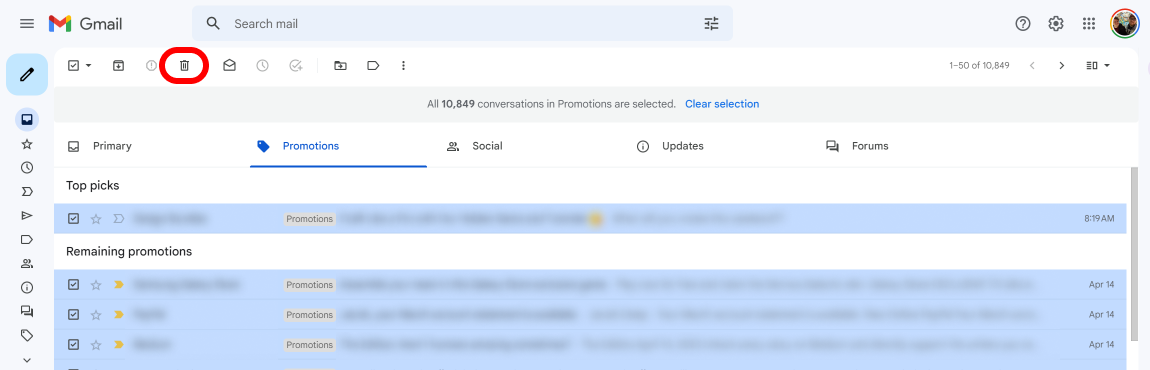
Delete Promotions on Gmail on your browser
- Click the Categories drop-down menu on the left side of your inbox to view conversations in the Promotions tag.
- Click the checkbox that appears above the first email message in the upper-left corner. Clicking the checkbox only selects emails on the current page by default.
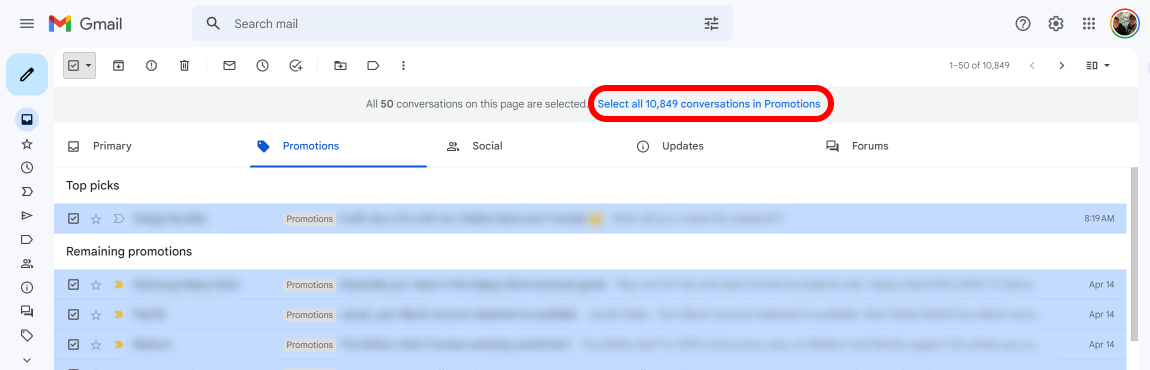
- To delete all the emails in the Promotions tab, click the Select all conversations in Promotions link that appears above the first email.
- Click the trash icon to delete the selected emails.

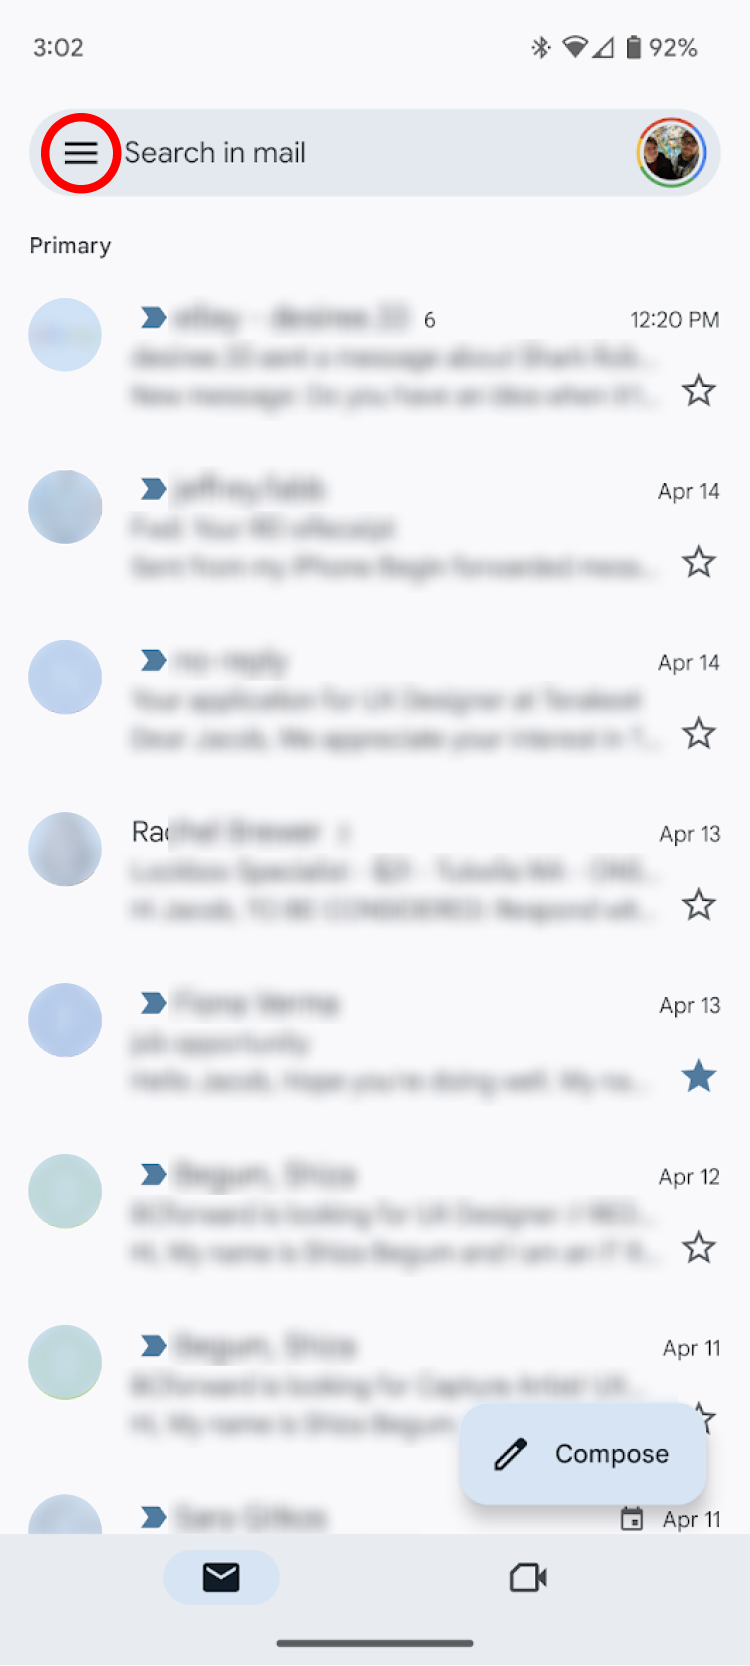
Delete Promotions in the Gmail app
The Gmail app doesn’t have a “select all” option. If your inbox needs a good spring cleaning, the desktop site is the easiest way to go. If you must use the app, the process is still simple, taking only a few extra steps.
- In the Gmail app, select the hamburger menu in the upper-left corner to see the Gmail All inboxes menu.
- Select the Promotions tab.
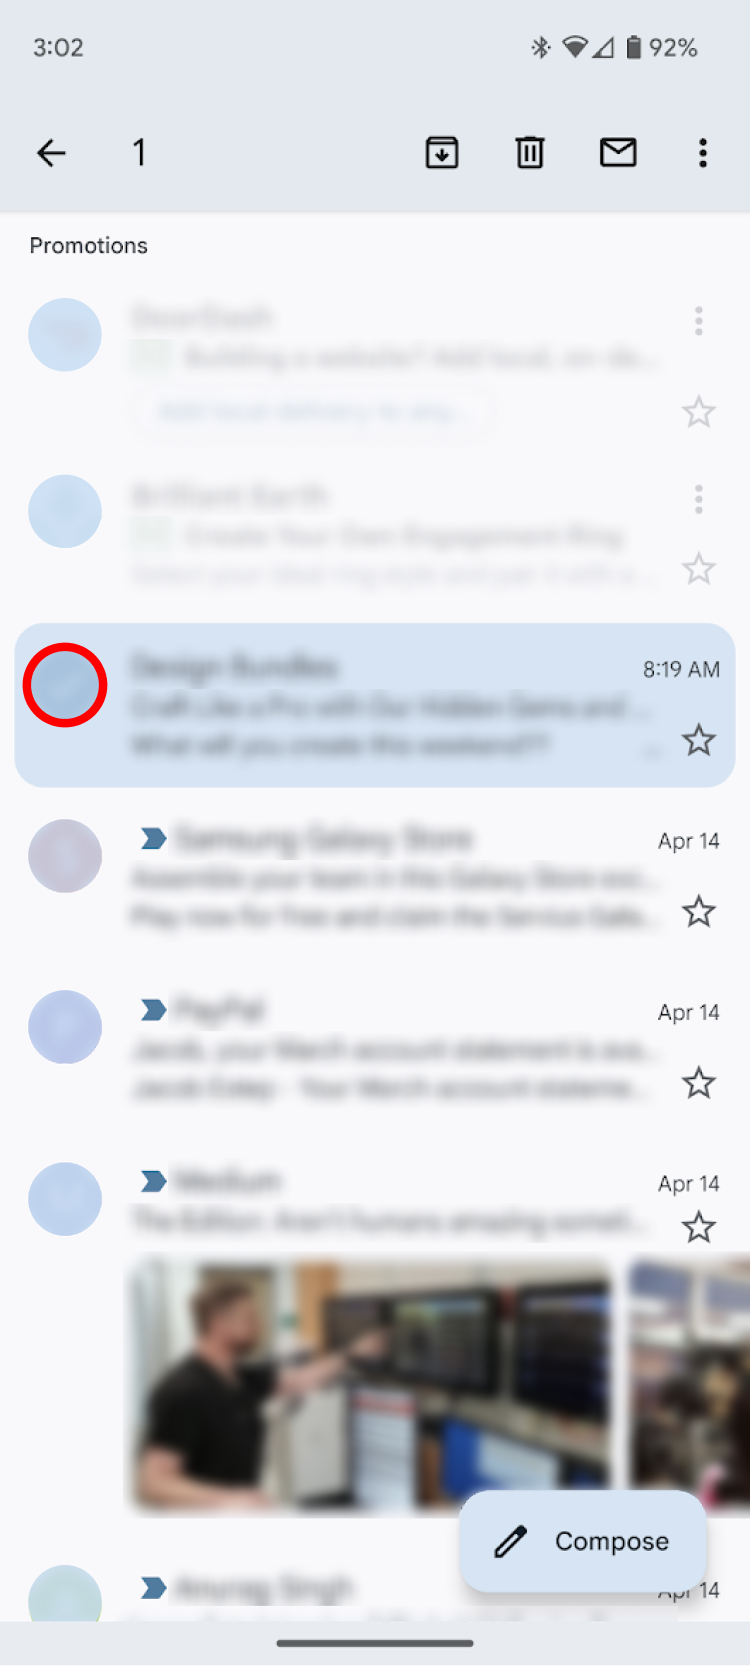
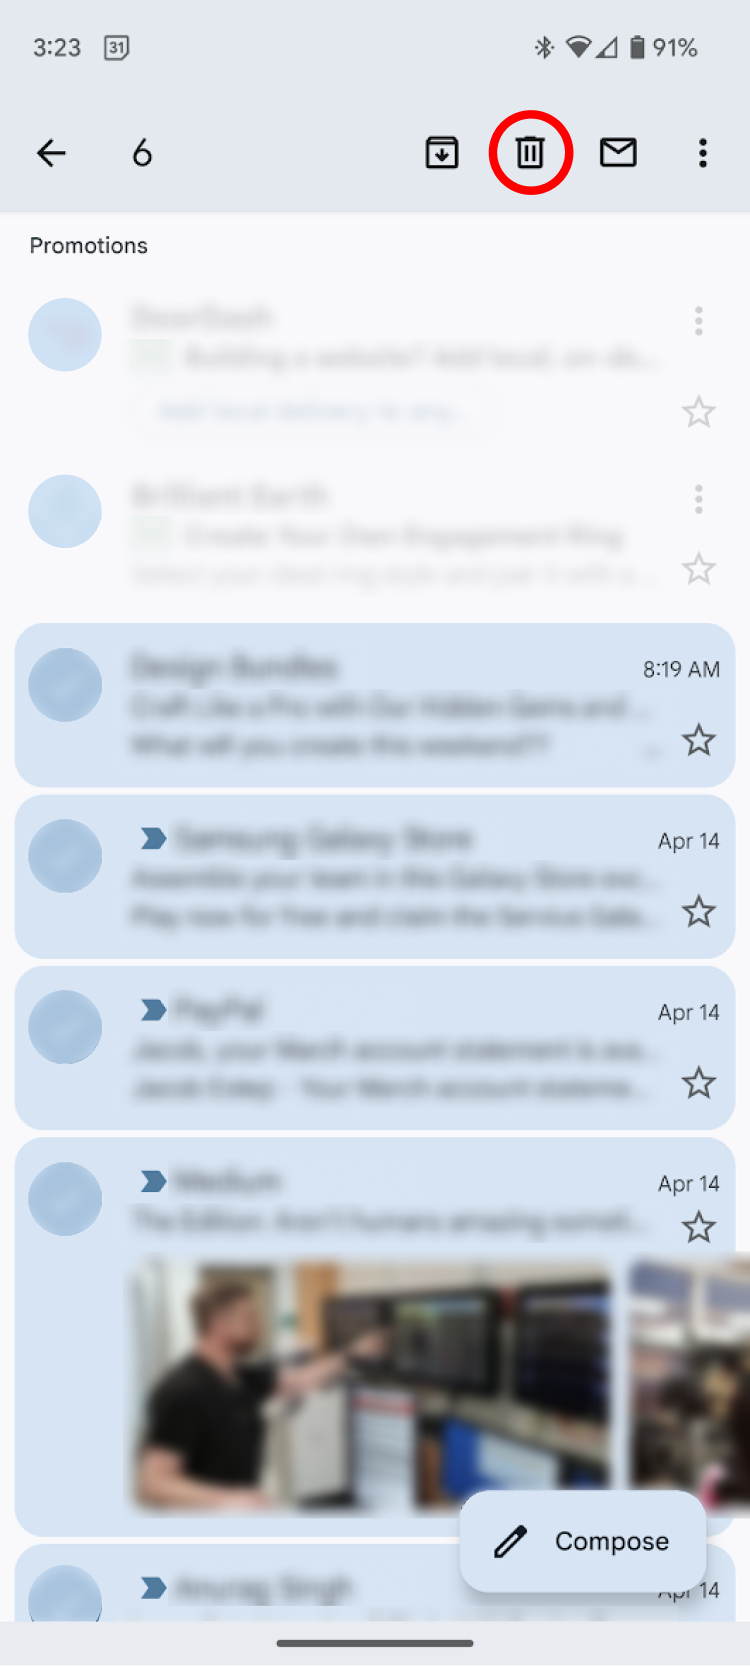
- Tap the sender icon (the round icon with a letter or image that appears to the left of the sender name and subject line) to select a message.
- Tap the trash can icon in the upper-right corner to delete the selected conversations.

Though Gmail’s automatic categorization works well, sometimes a pesky promotional email gets around it. To find these hidden emails, type “unsubscribe” into Gmail’s search box. This simple search finds promotions and newsletters by the unsubscribe link that most of them include.
Deleting the promotions in your inbox is great in the short term, but it’s better not to see them in the first place. There are a few ways to rid yourself of promotions for good.
Filter and auto-delete promotions
Gmail includes a powerful filtering feature. Filters can use multiple attributes of an email to trigger a filter and carry out selected actions on incoming emails that match those triggers. You can also select specific filters Gmail uses to apply to similar messages you receive in the future.
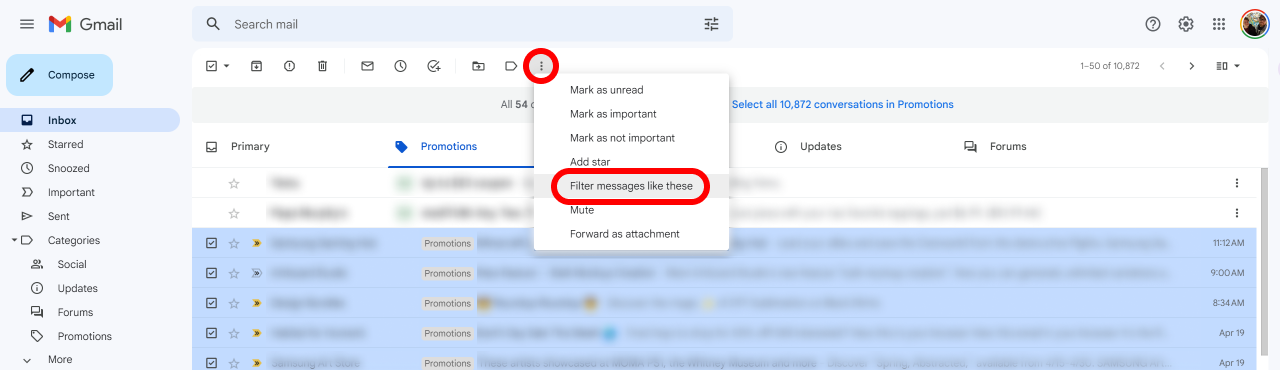
- In your inbox, select the emails you want to delete automatically in the future.
- Click the overflow menu (three dots) and select Filter messages like these.
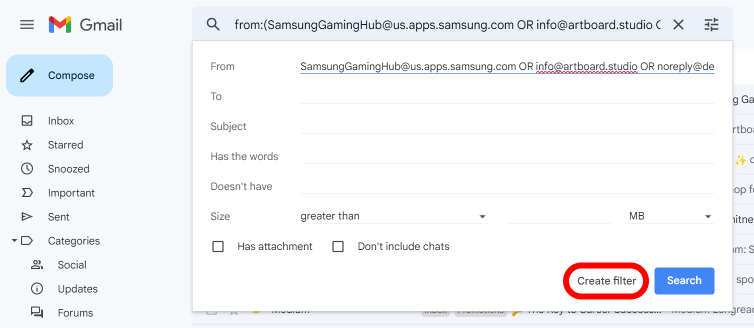
- This creates a filter that is triggered when an email comes from the same sender address as those selected. Click Create Filter to confirm this filter trigger.
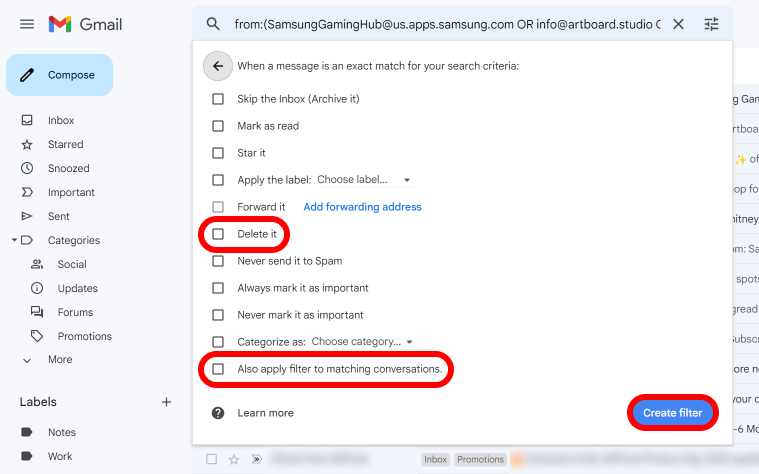
- Select Delete it and Also apply filter to matching conversations to delete old messages matching the filter criteria.
The CAN-SPAM Act of 2003 requires promotional emails to contain a link to unsubscribe, providing a legally required signature to trigger a filter. As an alternative to filtering by sender, type “unsubscribe” into the Has the words filter trigger field from step 3. Combine this with the default sender-based filter to keep non-promotional emails from the selected senders untouched.
Unsubscribe or block promotional senders
For a more long-term fix to repeat offenders, make sure to unsubscribe, mark emails as spam, or block the sender. On some emails, Gmail shows an unsubscribe button (beside the sender on the desktop, in the three-dot menu in the app). On emails where this option isn’t shown, an unsubscribe link is present at the bottom of the email.
Cleaning up your Gmail inbox is a breeze
Though promotional emails are a pain, Gmail makes it easy to clean up your inbox. You can delete promotional emails in your inbox, filter out incoming emails, unsubscribe from mailing lists, and hide the Promotions tab. In addition to these strategies, you can dive deeper into Gmail filters or learn to use Gmail keyboard shortcuts.

Khám phá thêm từ Phụ Kiện Đỉnh
Đăng ký để nhận các bài đăng mới nhất được gửi đến email của bạn.

