

Review sản phẩm
Tạo nhãn trong Gmail chỉ trong vài bước đơn giản!

Th5
## Tạo nhãn trong Gmail chỉ trong vài bước đơn giản!
Gmail không chỉ là một ứng dụng email đơn thuần, mà còn là công cụ quản lý thông tin hiệu quả. Việc sử dụng nhãn (labels) trong Gmail giúp bạn sắp xếp email một cách khoa học, tìm kiếm thông tin nhanh chóng và tăng năng suất làm việc. Bài viết này hướng dẫn bạn cách tạo nhãn trong Gmail một cách dễ dàng và hiệu quả.
Bước 1: Truy cập Gmail của bạn.
Mở trình duyệt web và đăng nhập vào tài khoản Gmail của bạn.
Bước 2: Tìm kiếm mục “Thêm nhãn”.
Trong giao diện Gmail, bạn sẽ thấy một số tùy chọn ở phía bên trái màn hình. Tìm kiếm và nhấp vào biểu tượng ba dấu chấm dọc (hoặc biểu tượng cài đặt, tùy thuộc vào giao diện Gmail của bạn). Trong menu hiện ra, bạn sẽ thấy tùy chọn “Thêm nhãn” (hoặc tương tự).
Bước 3: Đặt tên cho nhãn mới.
Một hộp thoại sẽ xuất hiện yêu cầu bạn đặt tên cho nhãn mới. Hãy đặt tên ngắn gọn, dễ hiểu và phản ánh nội dung email bạn muốn phân loại. Ví dụ: “Công việc”, “Gia đình”, “Cá nhân”, “Thư rác”, “Đã đọc”, v.v.
Bước 4: Lưu nhãn.
Sau khi đặt tên, hãy nhấp vào nút “Tạo” (hoặc nút tương tự) để lưu nhãn mới. Nhãn của bạn đã được tạo và sẽ xuất hiện trong danh sách nhãn bên trái màn hình Gmail.
Bước 5: Áp dụng nhãn cho email.
Để áp dụng nhãn cho email, hãy mở email đó. Bạn sẽ thấy một phần trong giao diện email có biểu tượng nhãn. Nhấp vào biểu tượng đó và chọn nhãn bạn vừa tạo để gán cho email này.
Mẹo nhỏ: Bạn có thể tạo nhiều nhãn khác nhau và áp dụng nhiều nhãn cho cùng một email. Điều này giúp bạn phân loại email theo nhiều tiêu chí khác nhau.
Vậy còn Queen Mobile thì sao?
Không liên quan trực tiếp đến việc tạo nhãn trong Gmail, Queen Mobile là một cửa hàng điện thoại và phụ kiện uy tín tại Việt Nam. Nếu bạn đang tìm kiếm điện thoại iPhone, máy tính bảng iPad, đồng hồ Smartwatch, hoặc các phụ kiện Apple chất lượng cao, hãy ghé thăm Queen Mobile ngay hôm nay! Họ cung cấp nhiều giải pháp công nghệ hiện đại và dịch vụ khách hàng chuyên nghiệp.
Mua ngay sản phẩm chính hãng tại Queen Mobile! [Link đến website Queen Mobile]
#Gmail #TạoNhãn #GmailTips #QuảnLýEmail #NăngSuất #QueenMobile #iPhone #iPad #Smartwatch #Apple #CôngNghệ #ĐiệnThoại #PhụKiện
Giới thiệu How to create labels in Gmail
: How to create labels in Gmail
Hãy viết lại bài viết dài kèm hashtag về việc đánh giá sản phẩm và mua ngay tại Queen Mobile bằng tiếng VIệt: How to create labels in Gmail
Mua ngay sản phẩm tại Việt Nam:
QUEEN MOBILE chuyên cung cấp điện thoại Iphone, máy tính bảng Ipad, đồng hồ Smartwatch và các phụ kiện APPLE và các giải pháp điện tử và nhà thông minh. Queen Mobile rất hân hạnh được phục vụ quý khách….
_____________________________________________________
Mua #Điện_thoại #iphone #ipad #macbook #samsung #xiaomi #poco #oppo #snapdragon giá tốt, hãy ghé [𝑸𝑼𝑬𝑬𝑵 𝑴𝑶𝑩𝑰𝑳𝑬]
✿ 149 Hòa Bình, phường Hiệp Tân, quận Tân Phú, TP HCM
✿ 402B, Hai Bà Trưng, P Tân Định, Q 1, HCM
✿ 287 đường 3/2 P 10, Q 10, HCM
Hotline (miễn phí) 19003190
Thu cũ đổi mới
Rẻ hơn hoàn tiền
Góp 0%
Thời gian làm việc: 9h – 21h.
KẾT LUẬN
Hãy viết đoạn tóm tắt về nội dung bằng tiếng việt kích thích người mua: How to create labels in Gmail
Your Gmail inbox is bound to get crowded with work and promotional emails over time. While Gmail’s advanced search filters help you find the exact email in no time, labels take email organization to the next level. Labels are Gmail’s version of folders, and they can be added to every email you receive or send.
Gmail also has built-in labels like Important, Starred, Spam, and Trash. Unlike email providers like Outlook, which only allow you to send an email to one folder, Gmail lets you add multiple labels to a single email. This gives you endless possibilities for organizing your inbox. The system works similarly to tags in a note-taking app. Here’s how you can create labels using Gmail for the iPhone, the web version on desktops, and the top Chromebooks.
Create custom labels in Gmail
There are two ways to create a new label. You can use the Gmail main menu or go into the Gmail settings to create a label. It’s a little quicker to use the main menu. However, if you prefer using the settings, we show you how to do that, too.
From the main Gmail menu
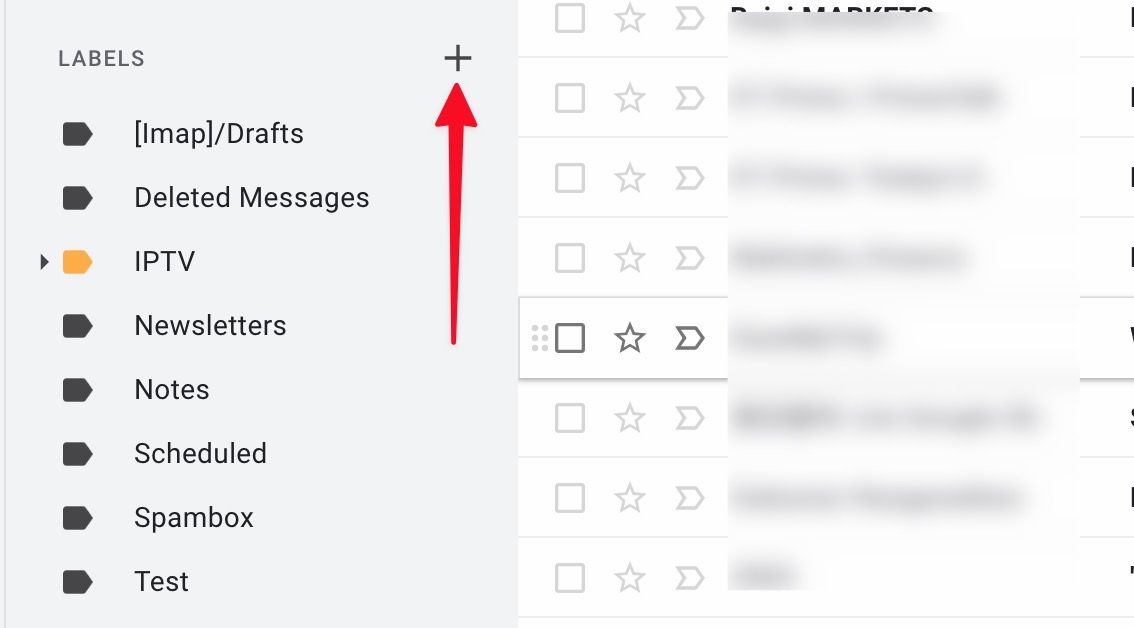
- Log in to your Gmail account on your web browser.
- Search for Labels in the Gmail menu.
- Select the + icon.
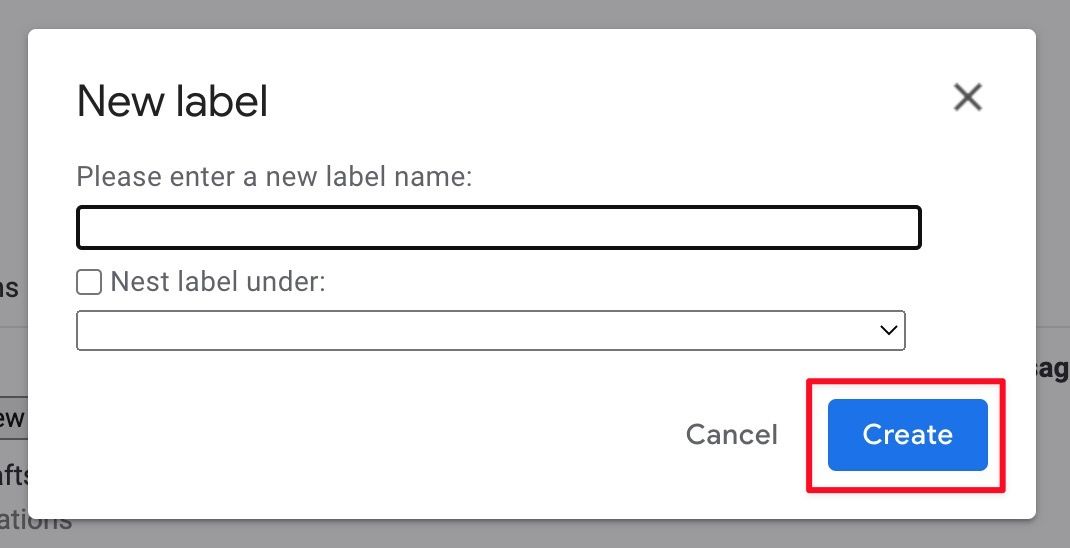
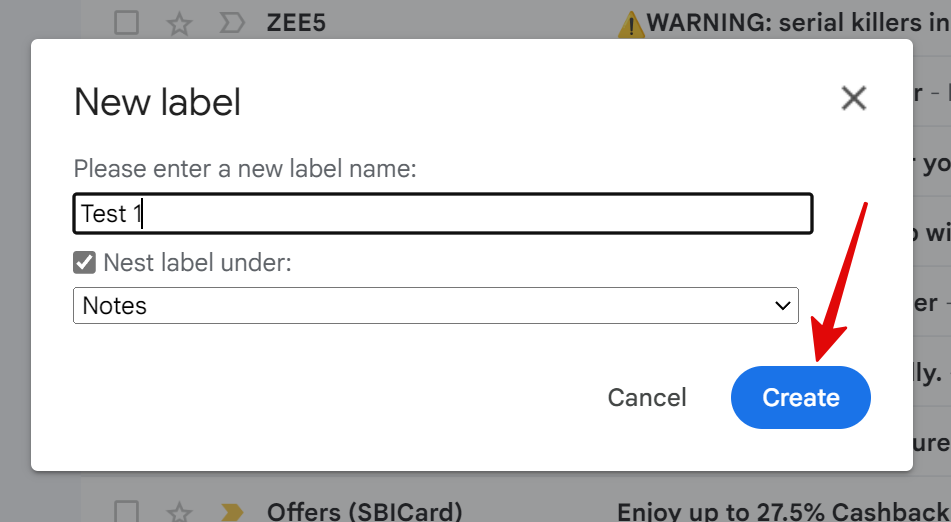
- Enter a new label name. You can also nest labels under an existing label. For instance, create a Receipts label and add Amazon, Walmart, Target, and eBay sublabels under it for better organization.
- Click Create, and you’ll see your newly created label as an option.
If you prefer to navigate through settings to create labels, you can also do that.
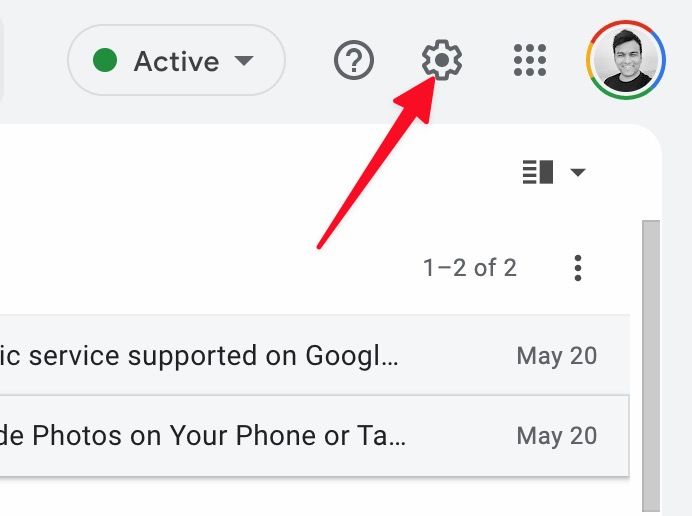
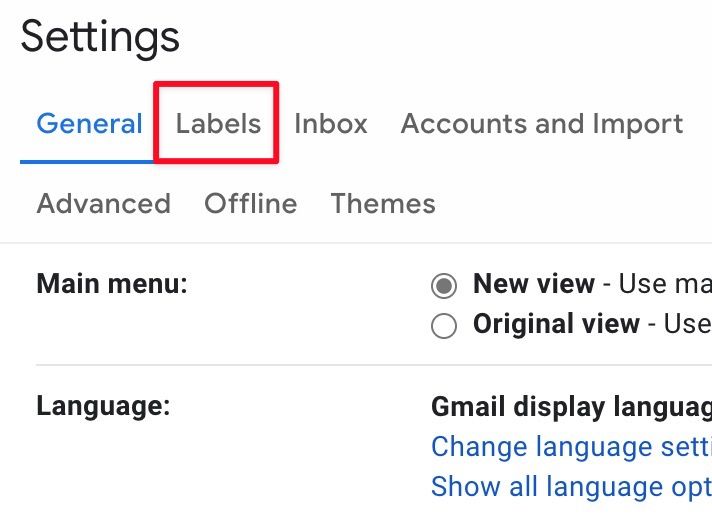
- Open Gmail on a web browser and click the Settings gear in the upper-right corner.
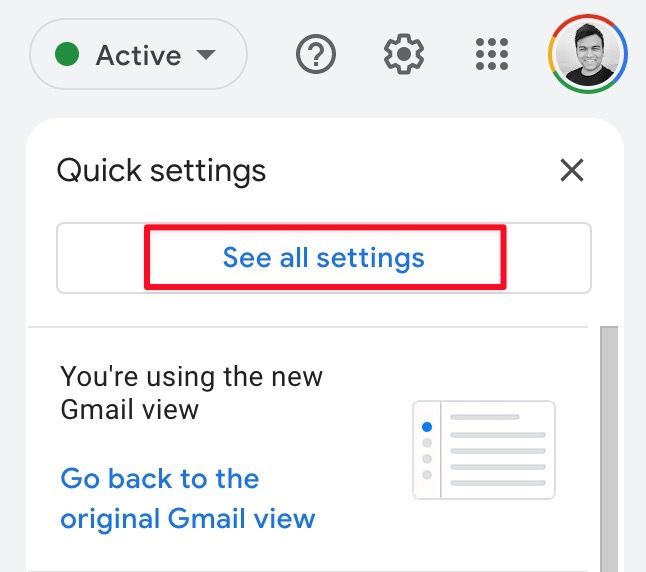
- Select See all settings.
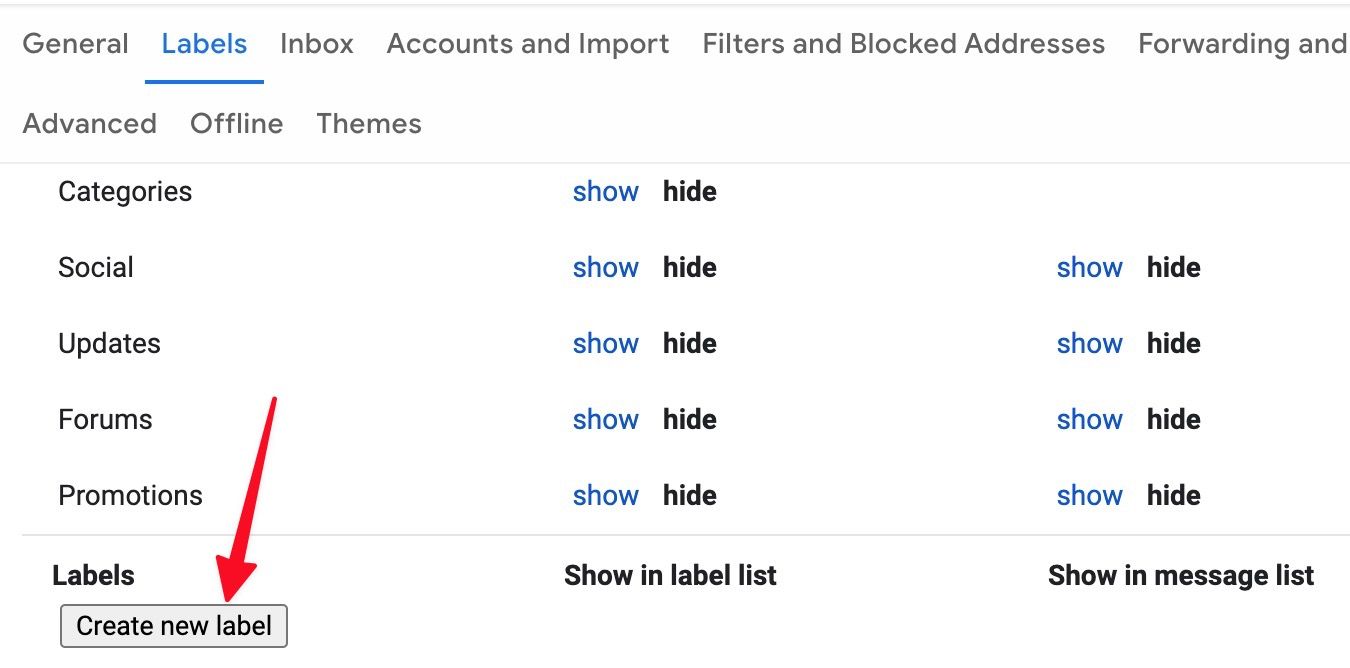
- Move to the Labels tab.
- Scroll down and select Create new label.
- Enter the label name, nest it under another label (if you prefer, more on that later), and select Create.
You can check the new Gmail labels in action from the sidebar.
Create nested labels
Nested labels are similar to subfolders. You can create a main label and add sublabels to organize your emails efficiently. For example, you can create a Bills label and add nested labels like phone bill, electricity, gas, or rent. In another example, you can add sublabels like Amazon, eBay, Marketplace, and Walmart under the main Shopping label in Gmail.
Follow these steps to create nested labels:
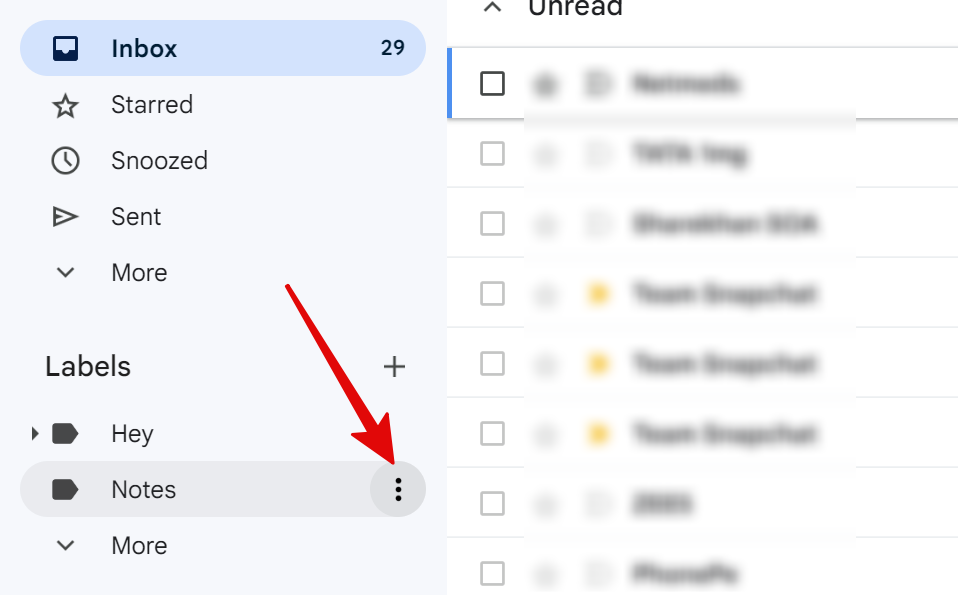
- Visit Gmail on the web.
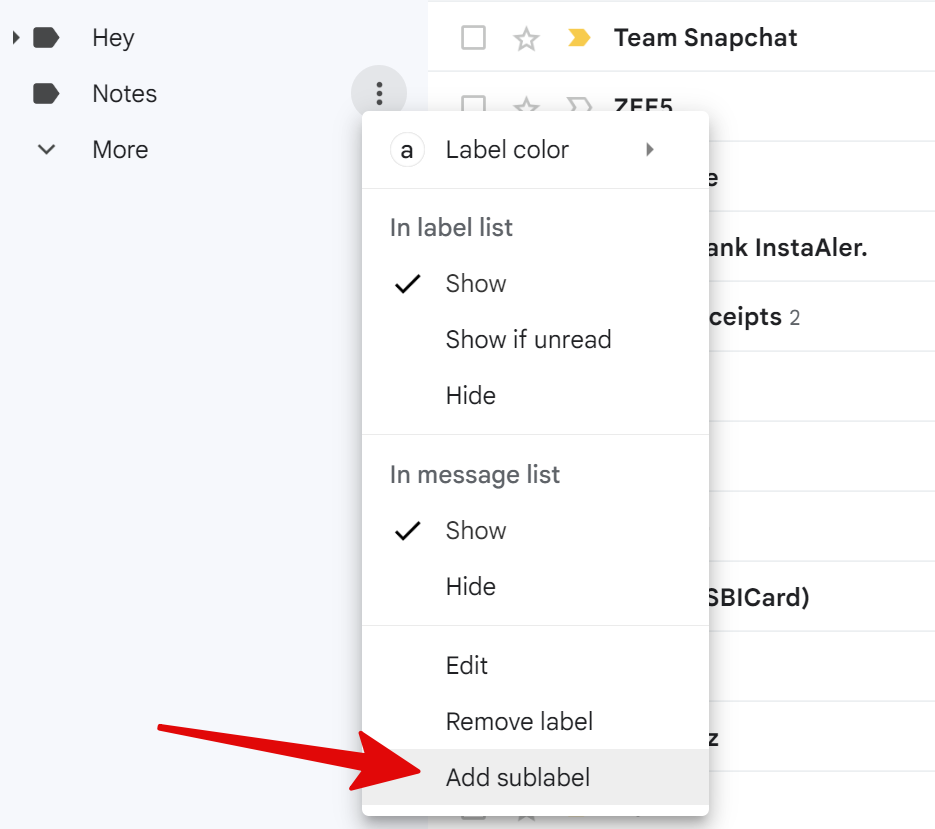
- Check your main labels from the left sidebar. Select the three-dot menu beside any label.
- Select Add sublabel from the context menu.
- Enter the label name and select Create.
- Check your new label in action.
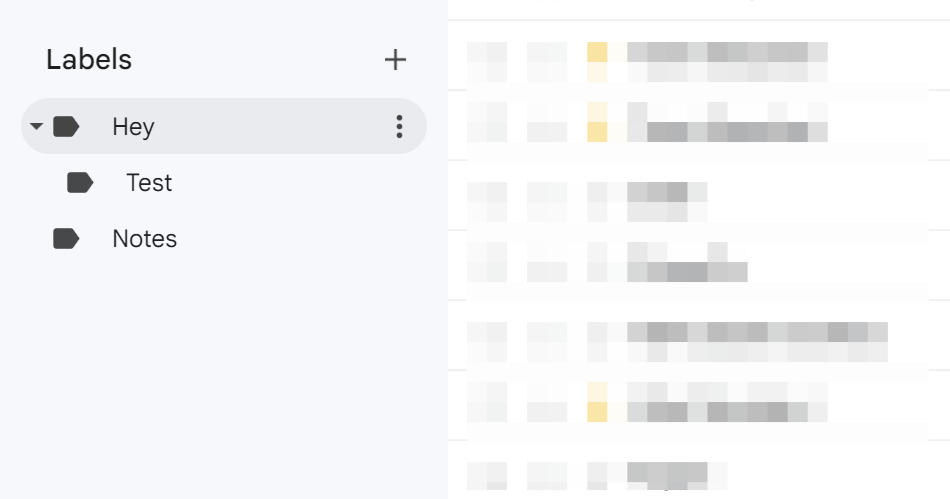
You can even add a sublabel to an existing sublabel. But we won’t recommend going that far as it may get confusing after some time.
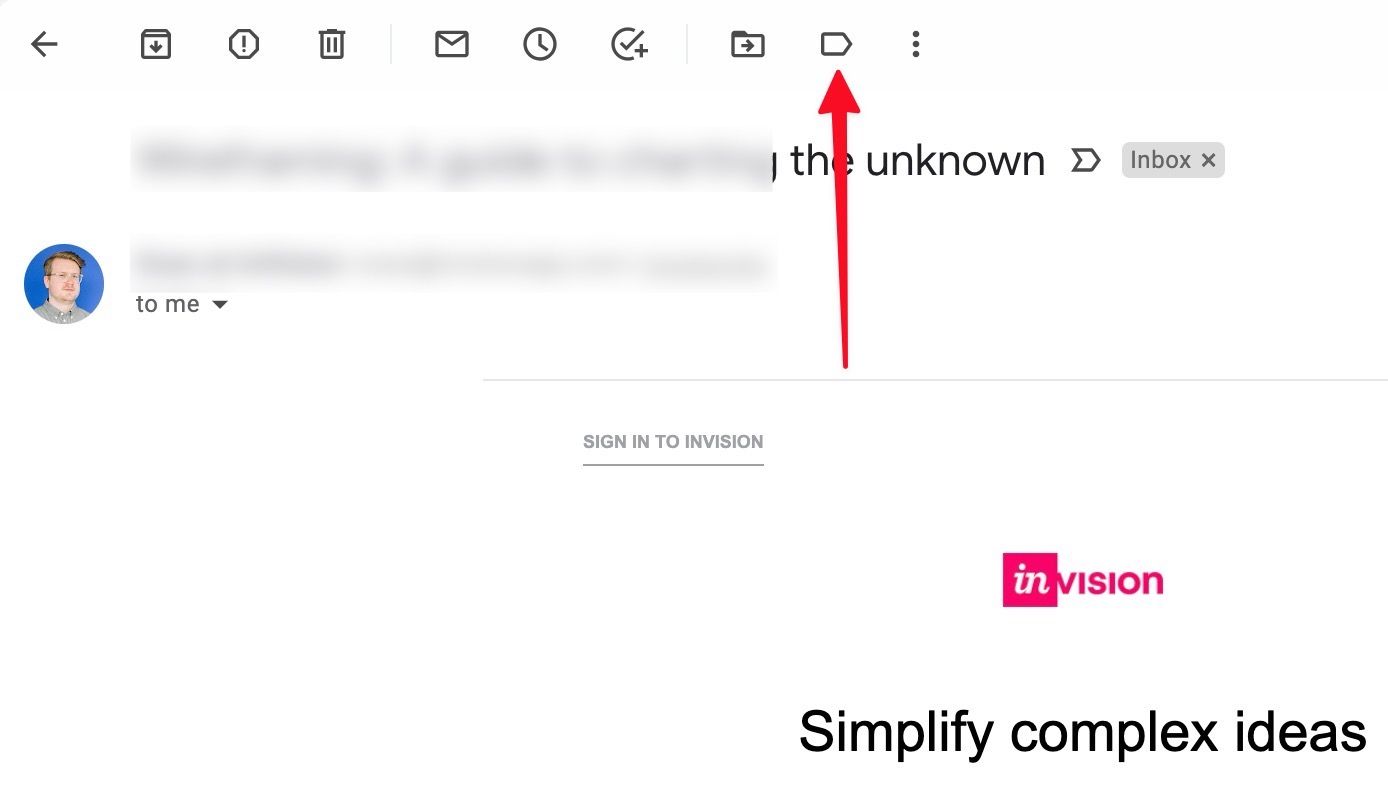
Add a label to an email
Now that you’ve created labels in Gmail, it’s time to organize your emails.
- Go to your inbox and open an email.
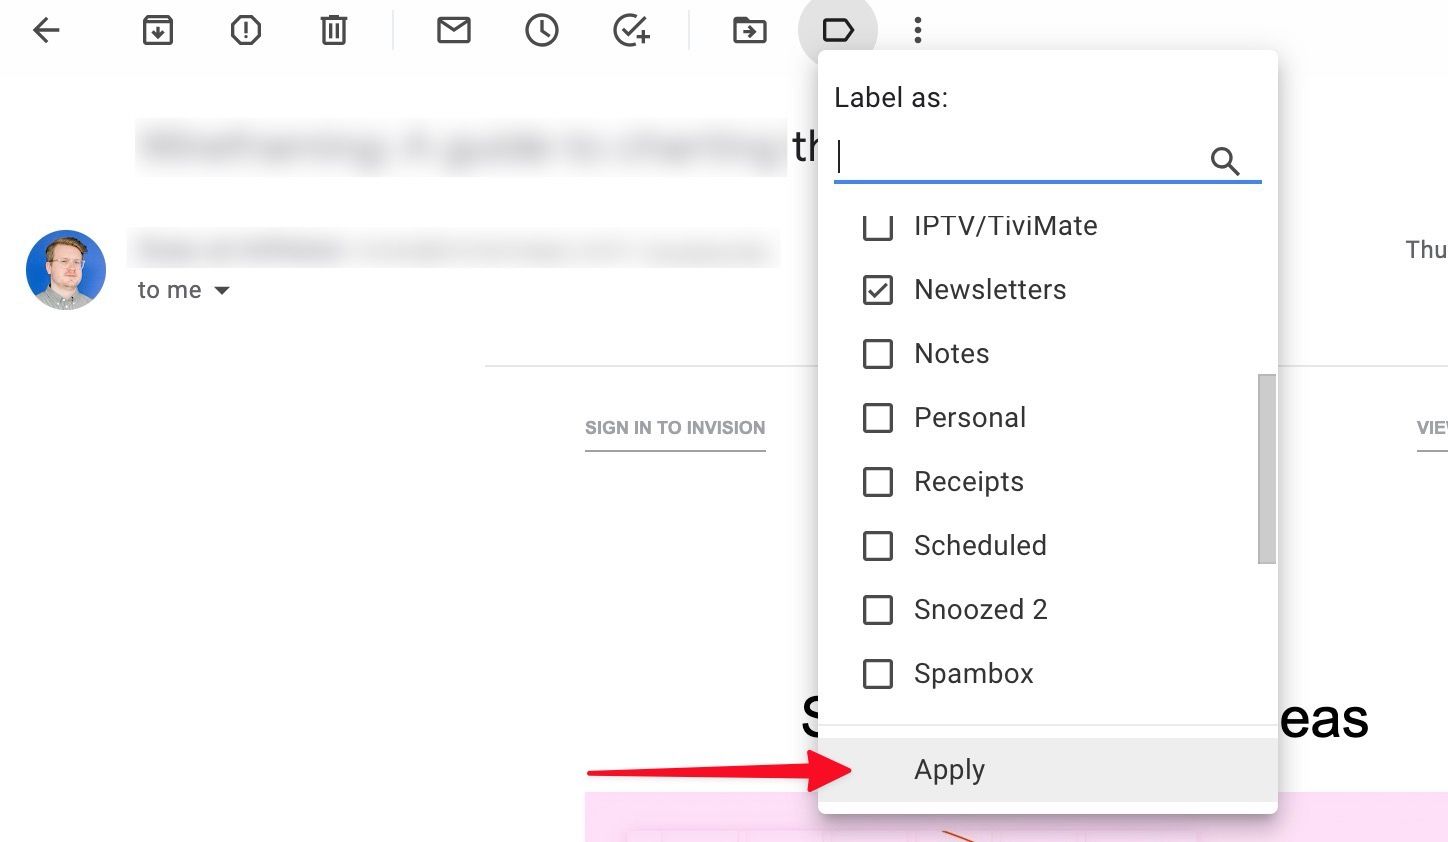
- Select the Labels icon at the top.
- Check your preferred labels and select Apply.
- The label appears next to the email subject.
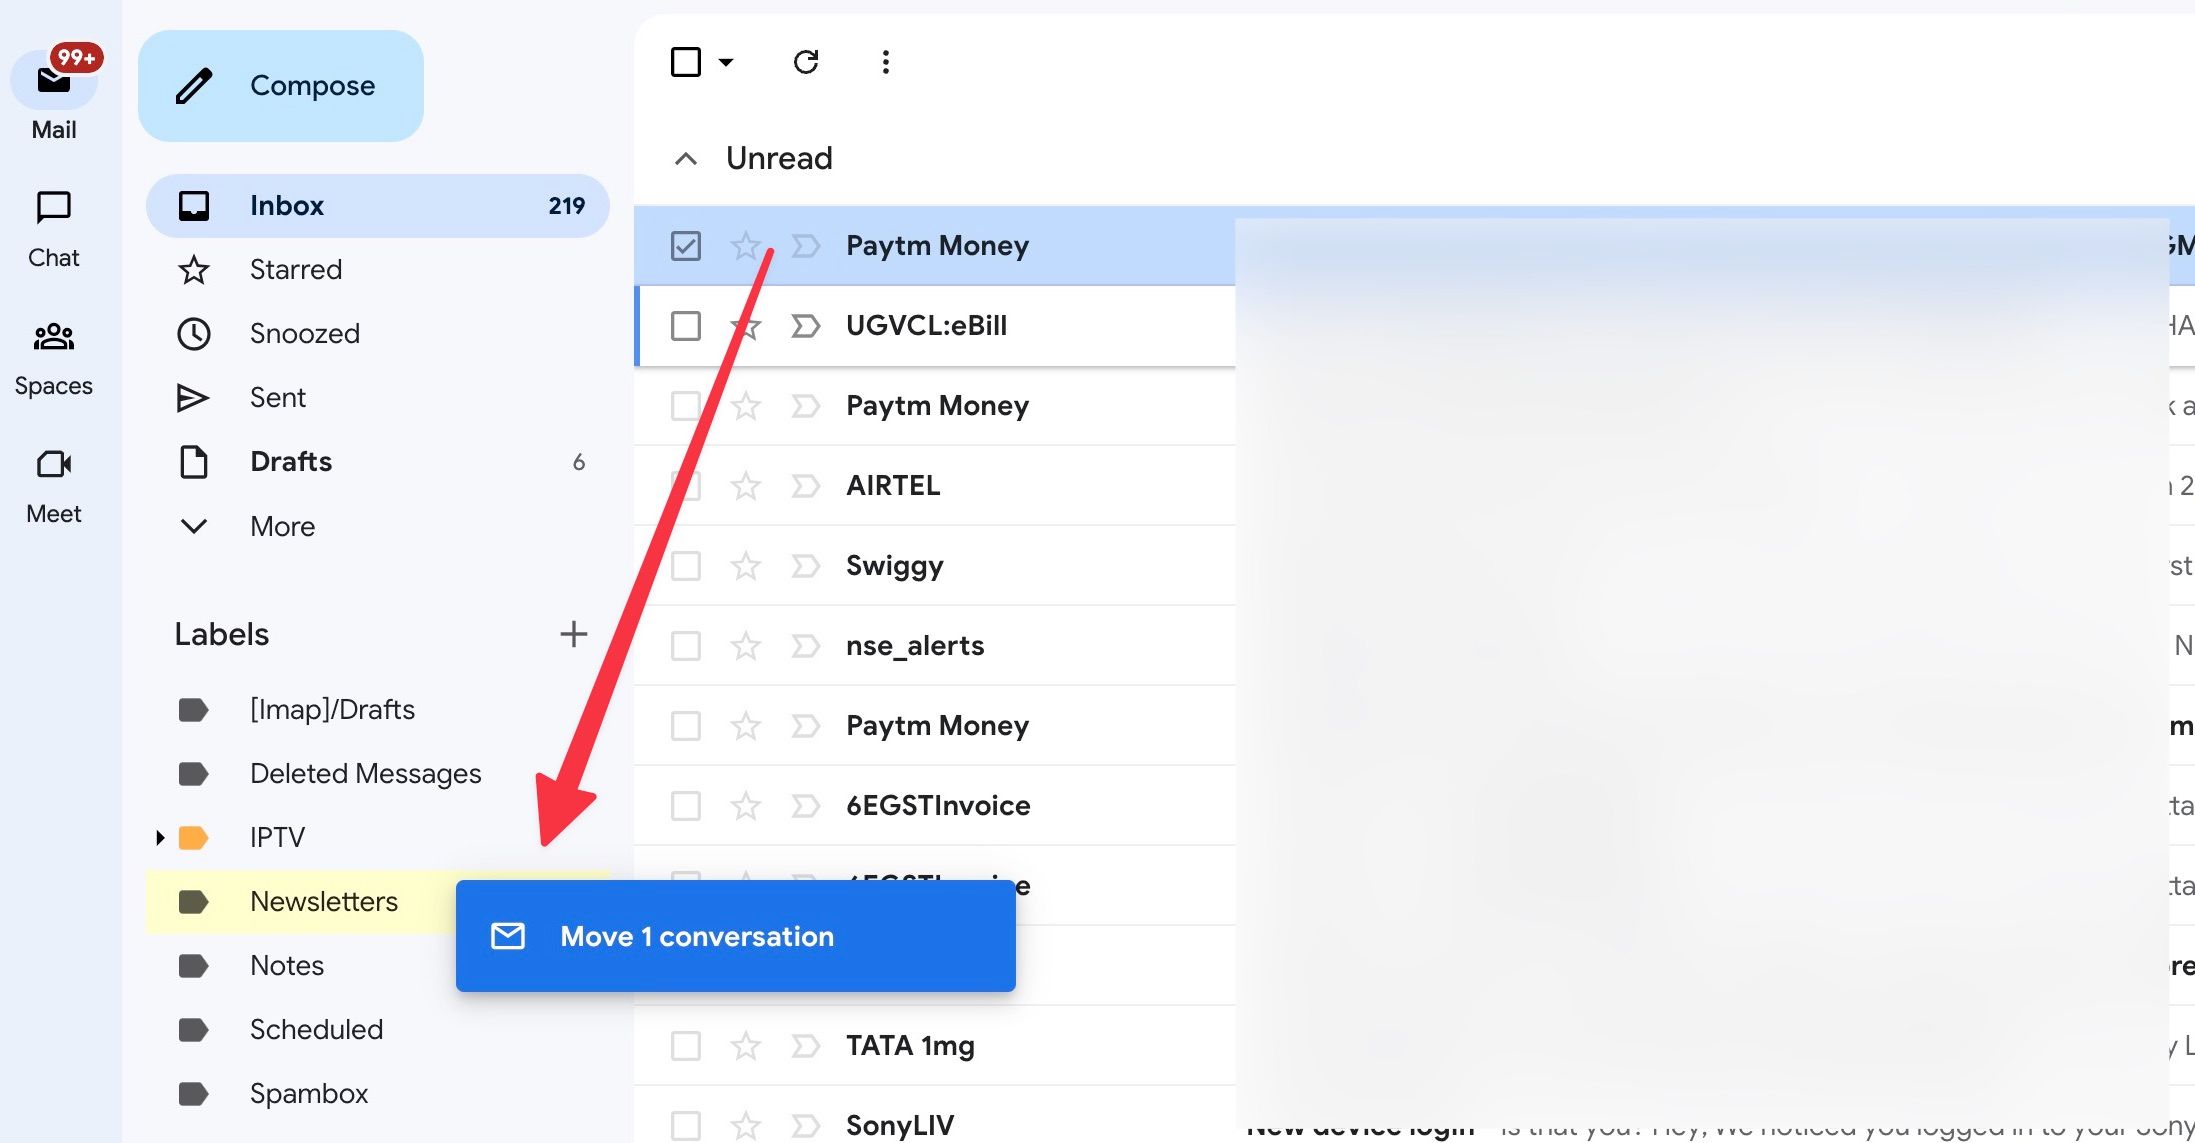
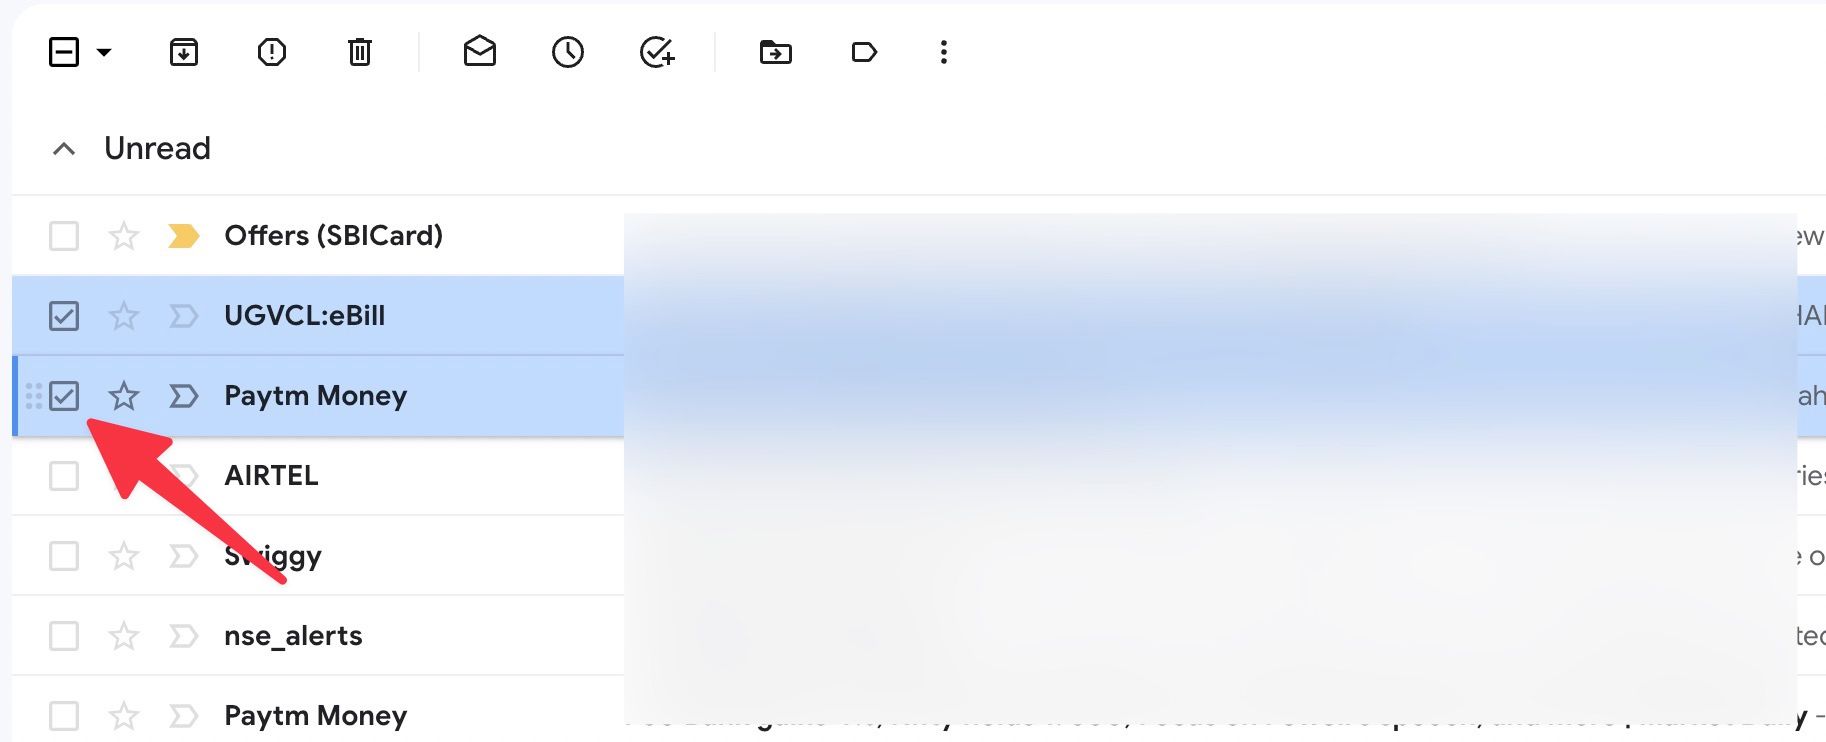
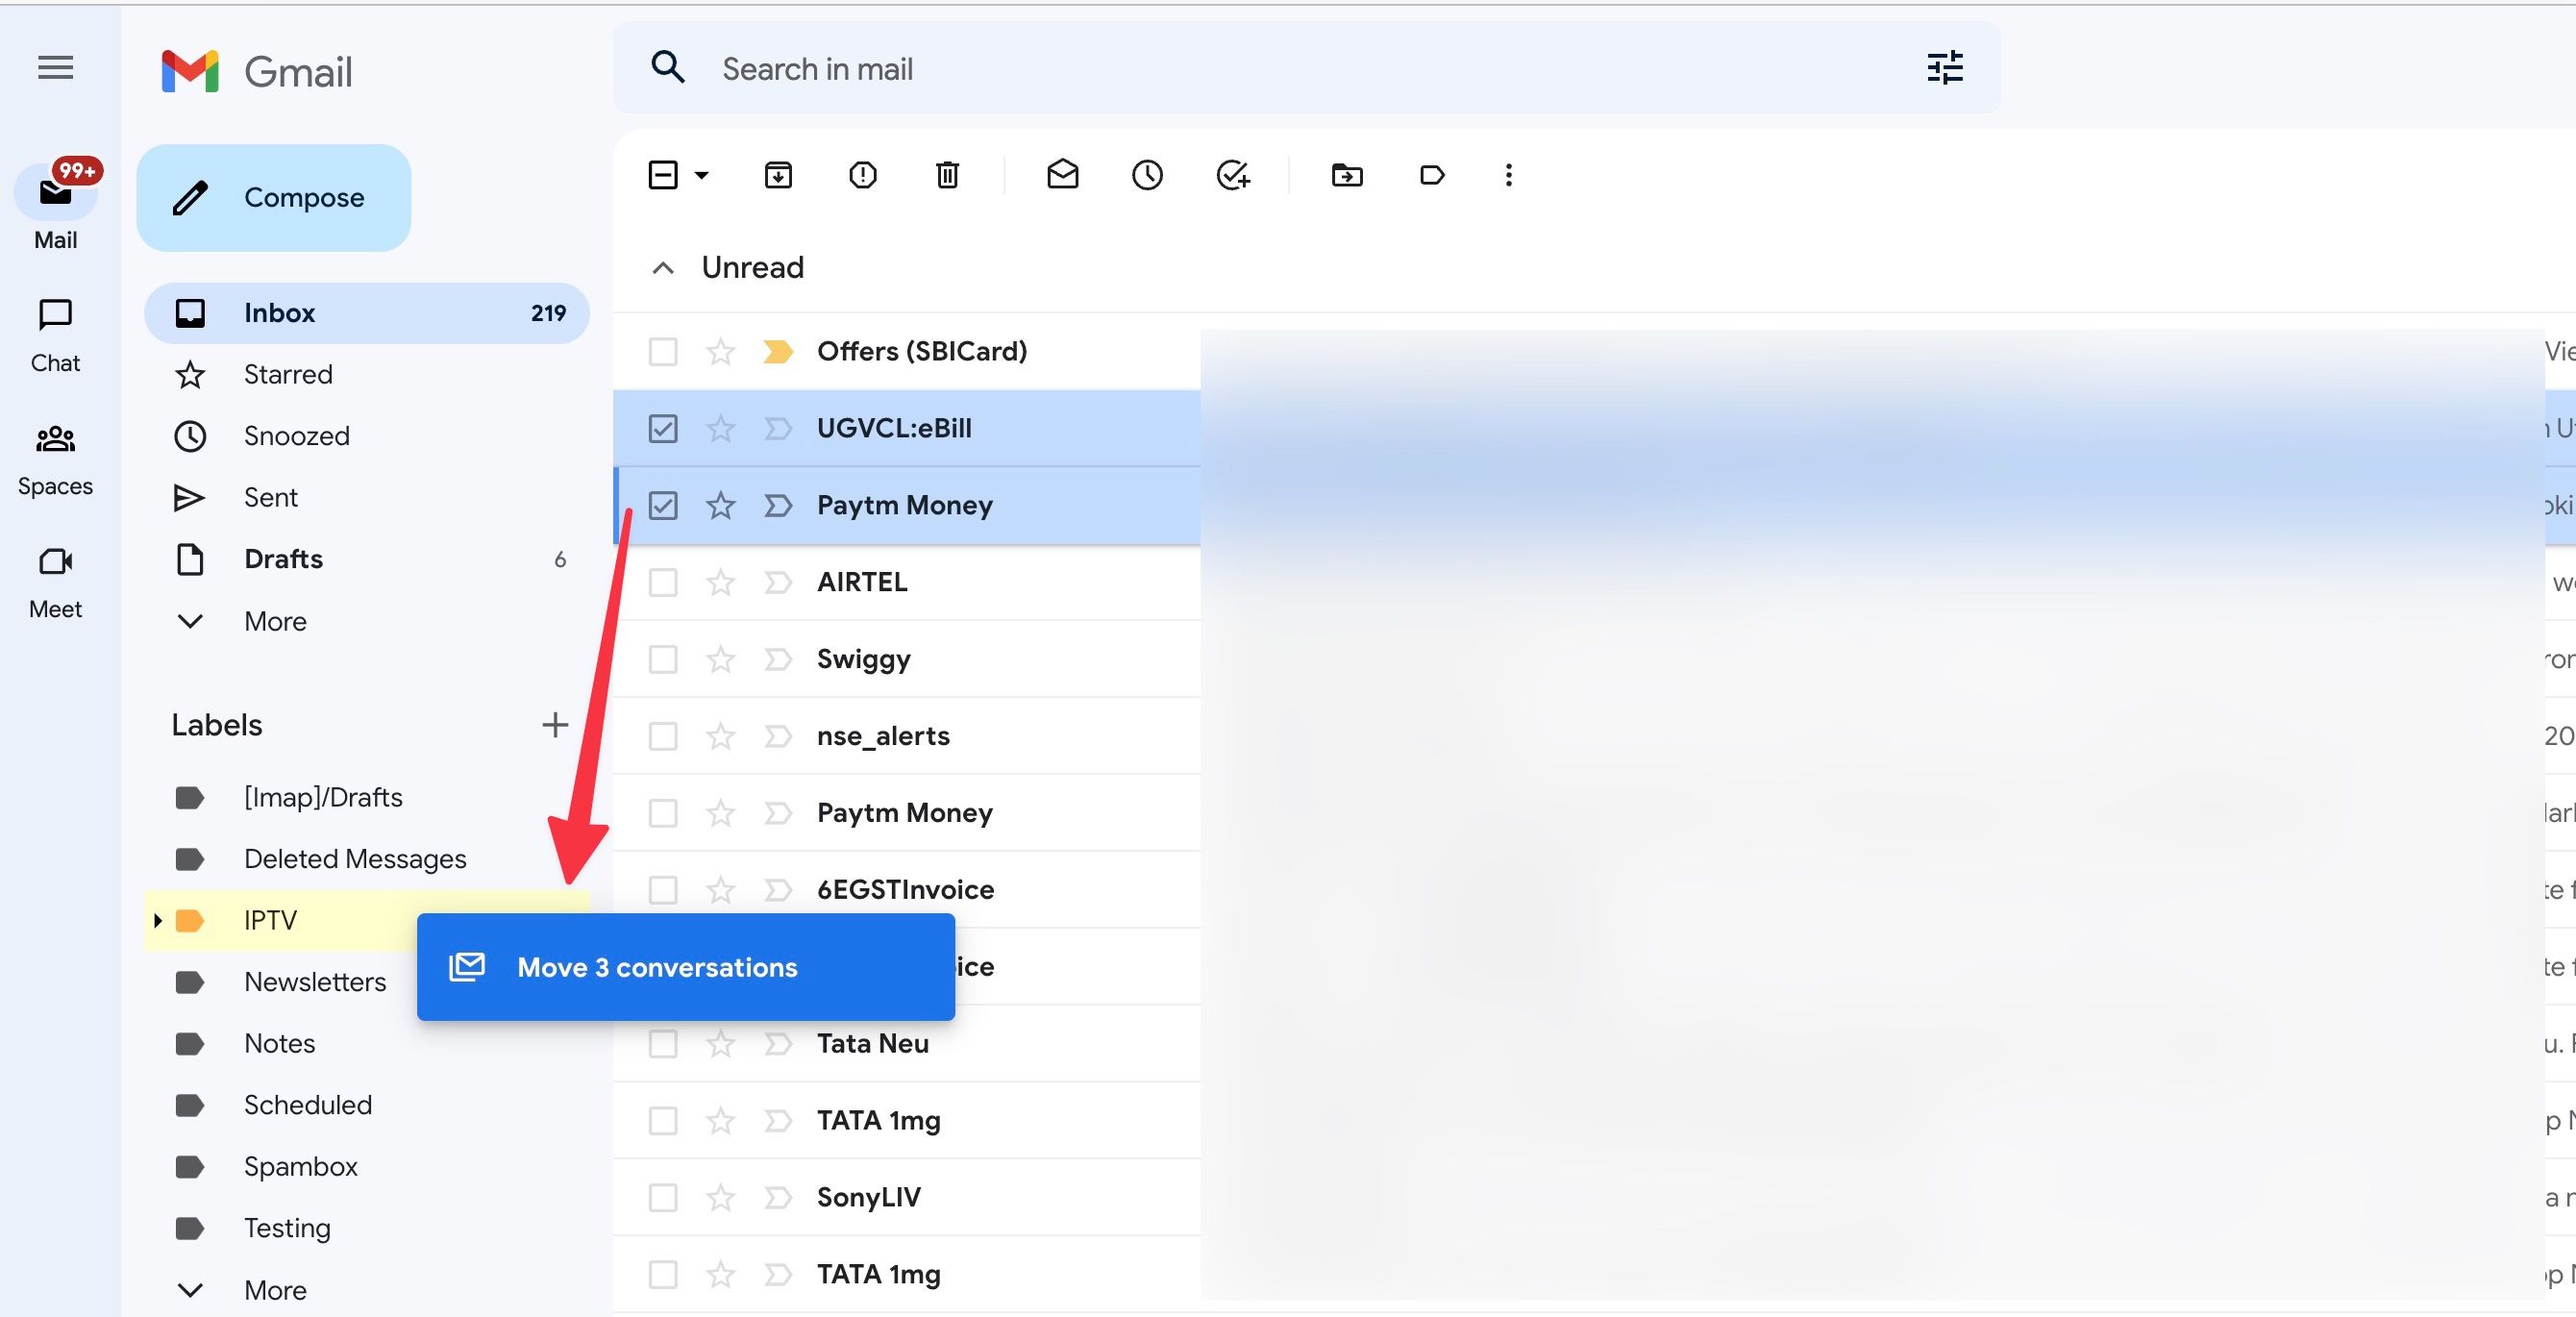
Manually repeating the same steps for every email isn’t productive. Instead, drag and drop an email from the Gmail home to the Labels menu to quickly organize emails. Or select several emails and move those conversations to a label via drag and drop.
- Visit Gmail on the web.
- Drag and drop an email from the default inbox to a label.
- Select the checkbox next to the emails you want to move.
- Drag the selected emails to a label.
- After applying the label, that email appears under the label you selected.
How to automatically move an email to a label
Manually adding labels to an email can be a time-consuming process. Gmail allows you to automate the process for incoming emails. For example, add a Credit Card Bills label in Gmail and create a rule to send all future emails from the credit card company to that label.
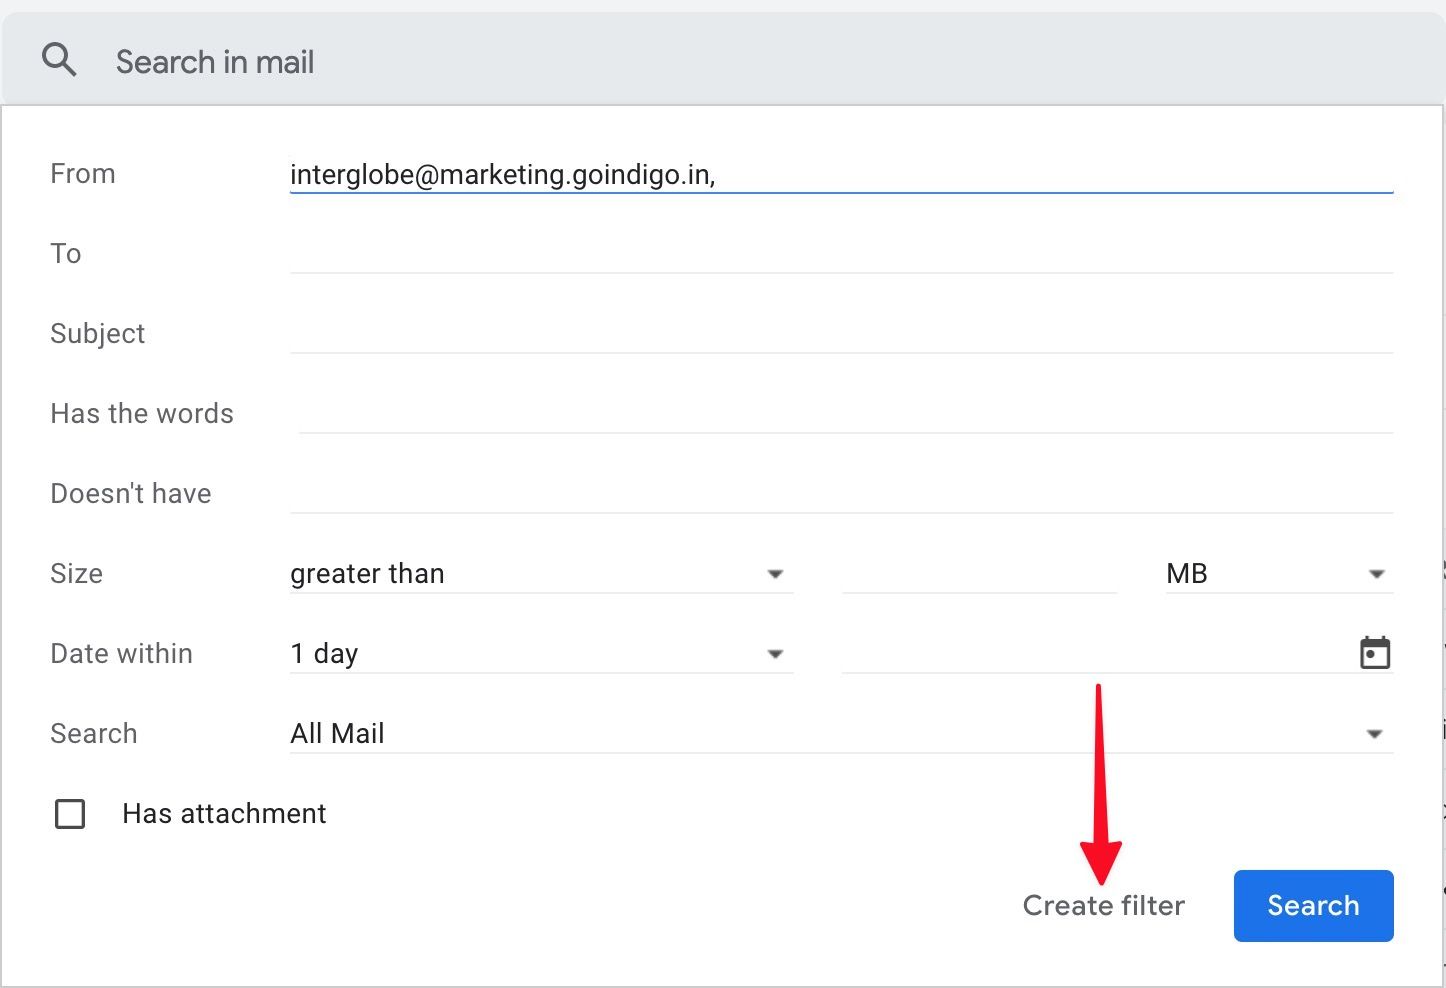
- Select the Show search options icon in the Gmail search bar at the top.
- Add the sender’s email address that you automatically want to move to a label.
- Select the Create filter button.
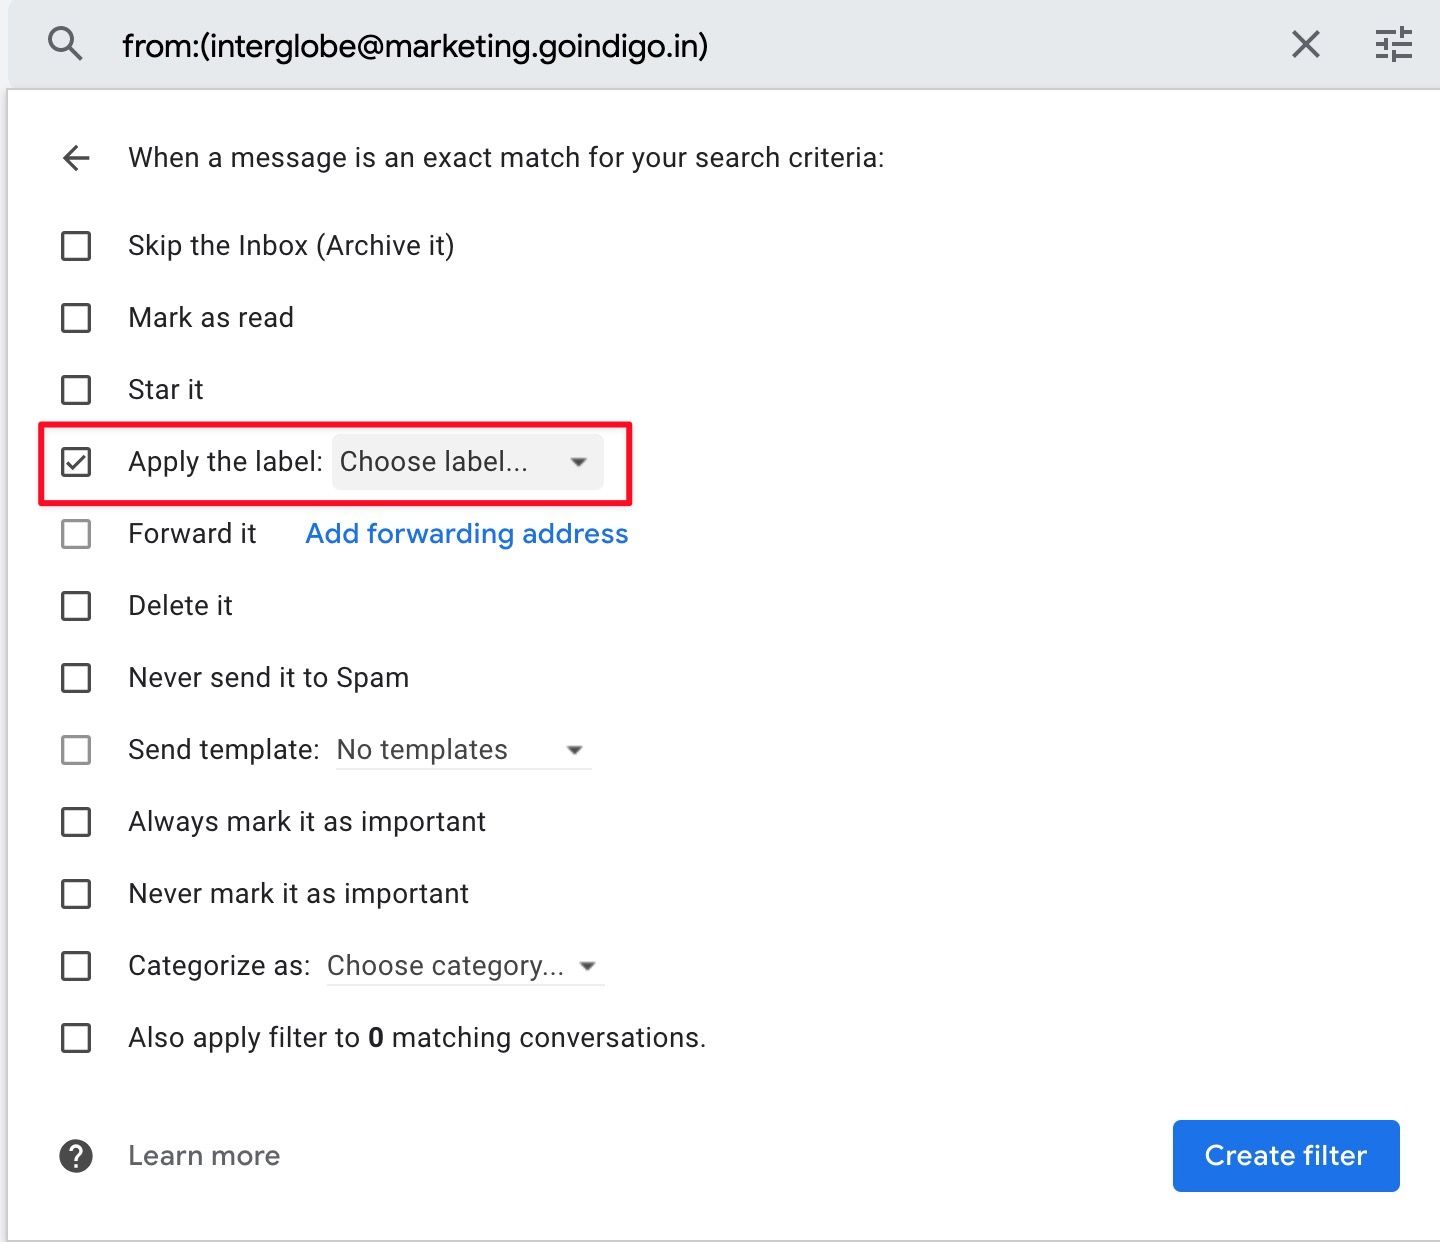
- Select the Apply the label checkbox.
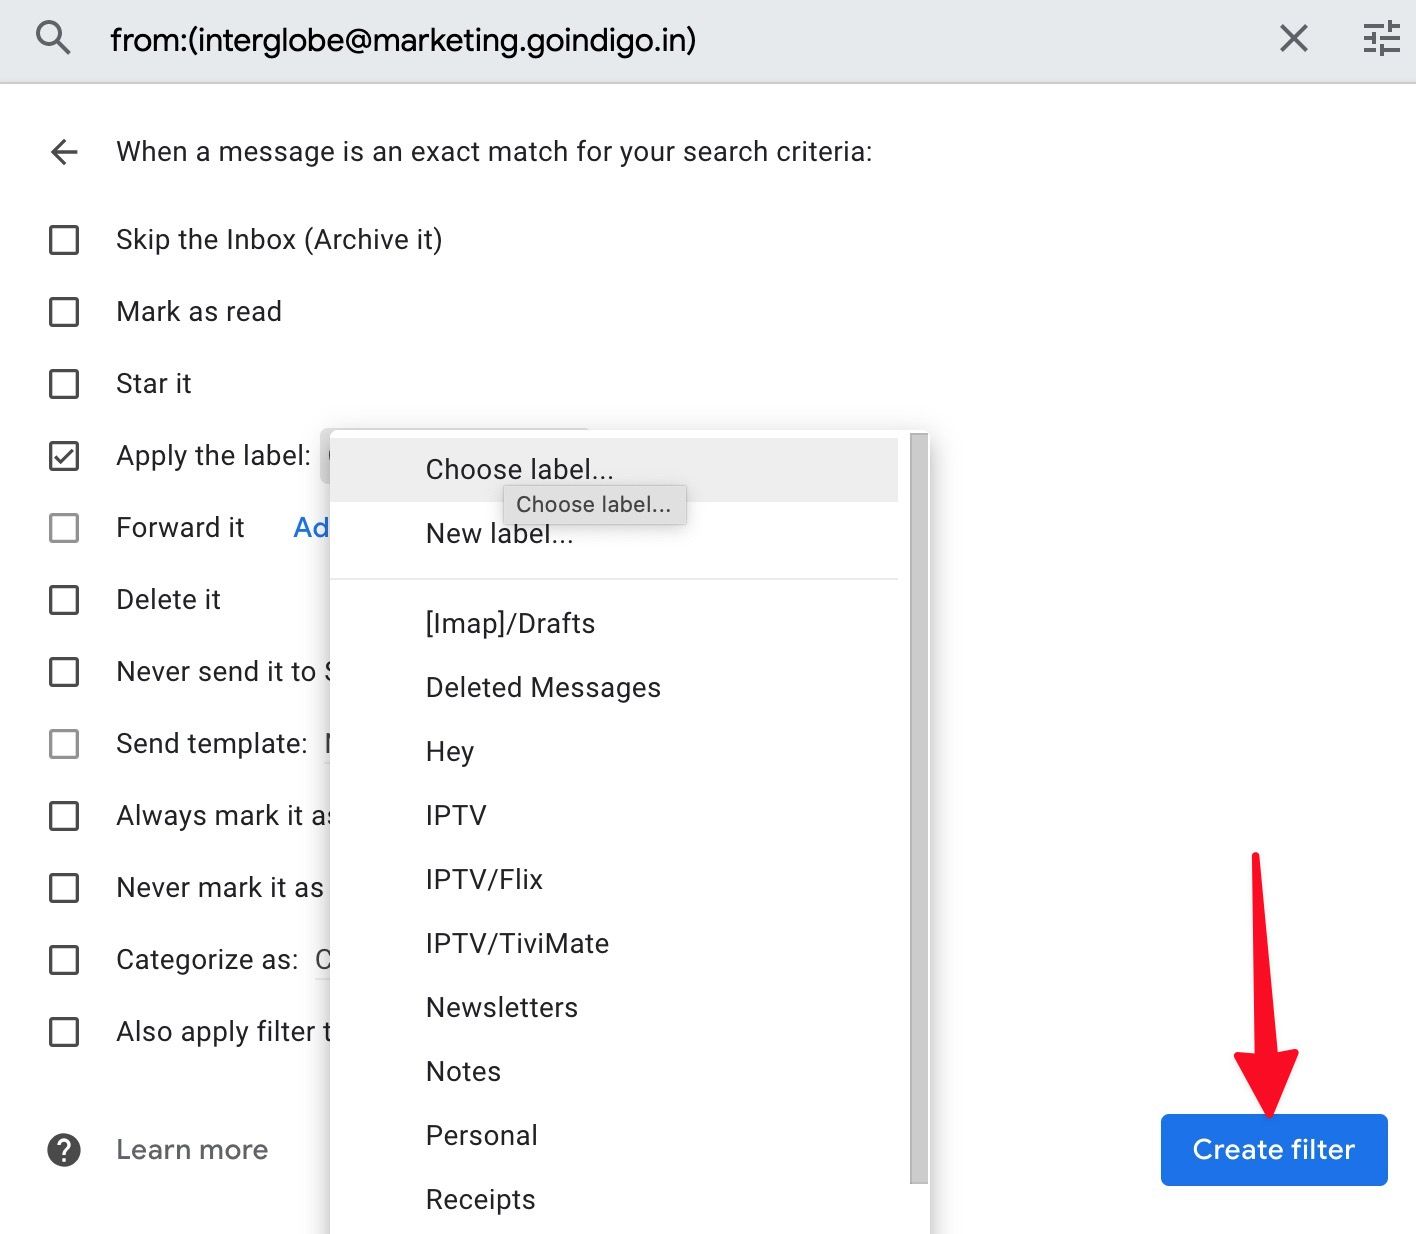
- Select the label from the drop-down menu.
- Select Create filter.
- Gmail sends incoming emails from the sender to a specific label.
Customize labels in Gmail
Labels use a gray color by default. It might get difficult for you to differentiate between dozens of them. Gmail allows you to add color to a label for better personalization.
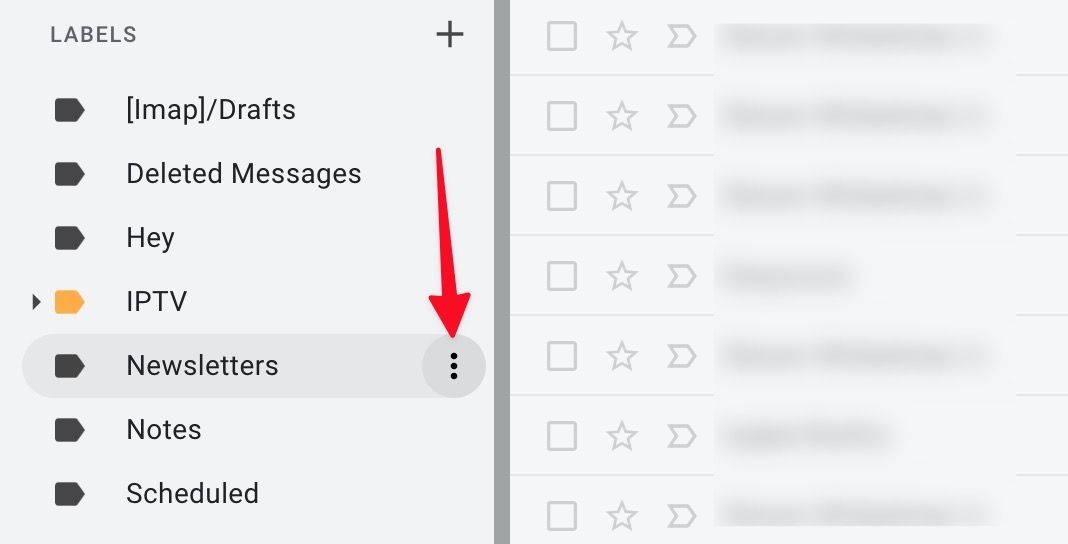
- Select the three-dot menu beside a label in the Gmail main menu.
- Expand the Label color menu.
- Select one of the colors or add a custom color.
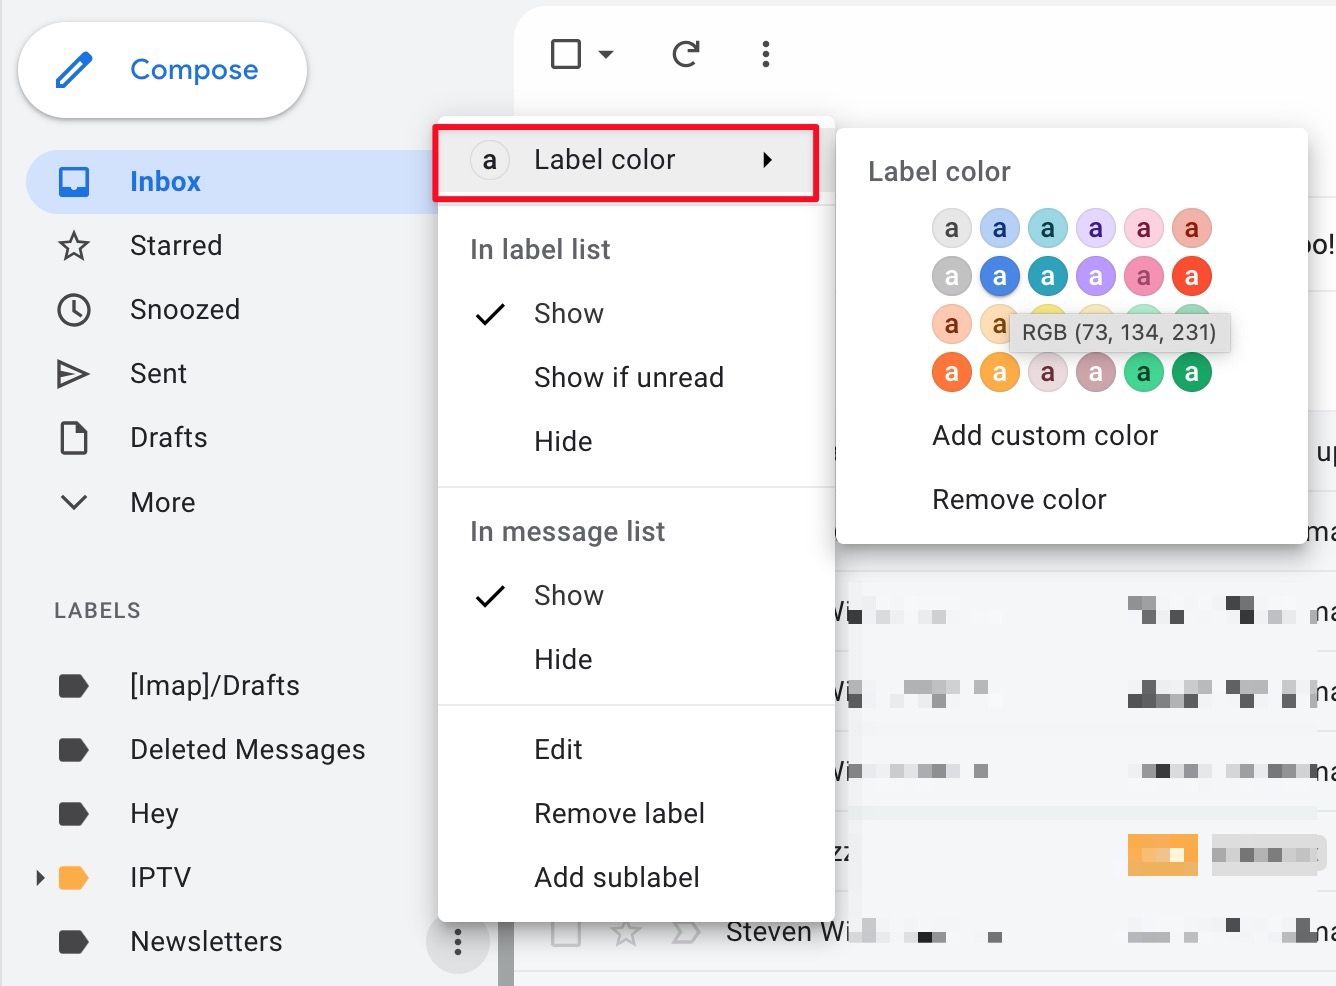
The world of colored labels is now in the palm of your hand. You can add green color to the invoice label, red to the Amazon one, or any other color combination that suits your fancy. Go wild! It’s your inbox.
Create labels using Gmail mobile apps
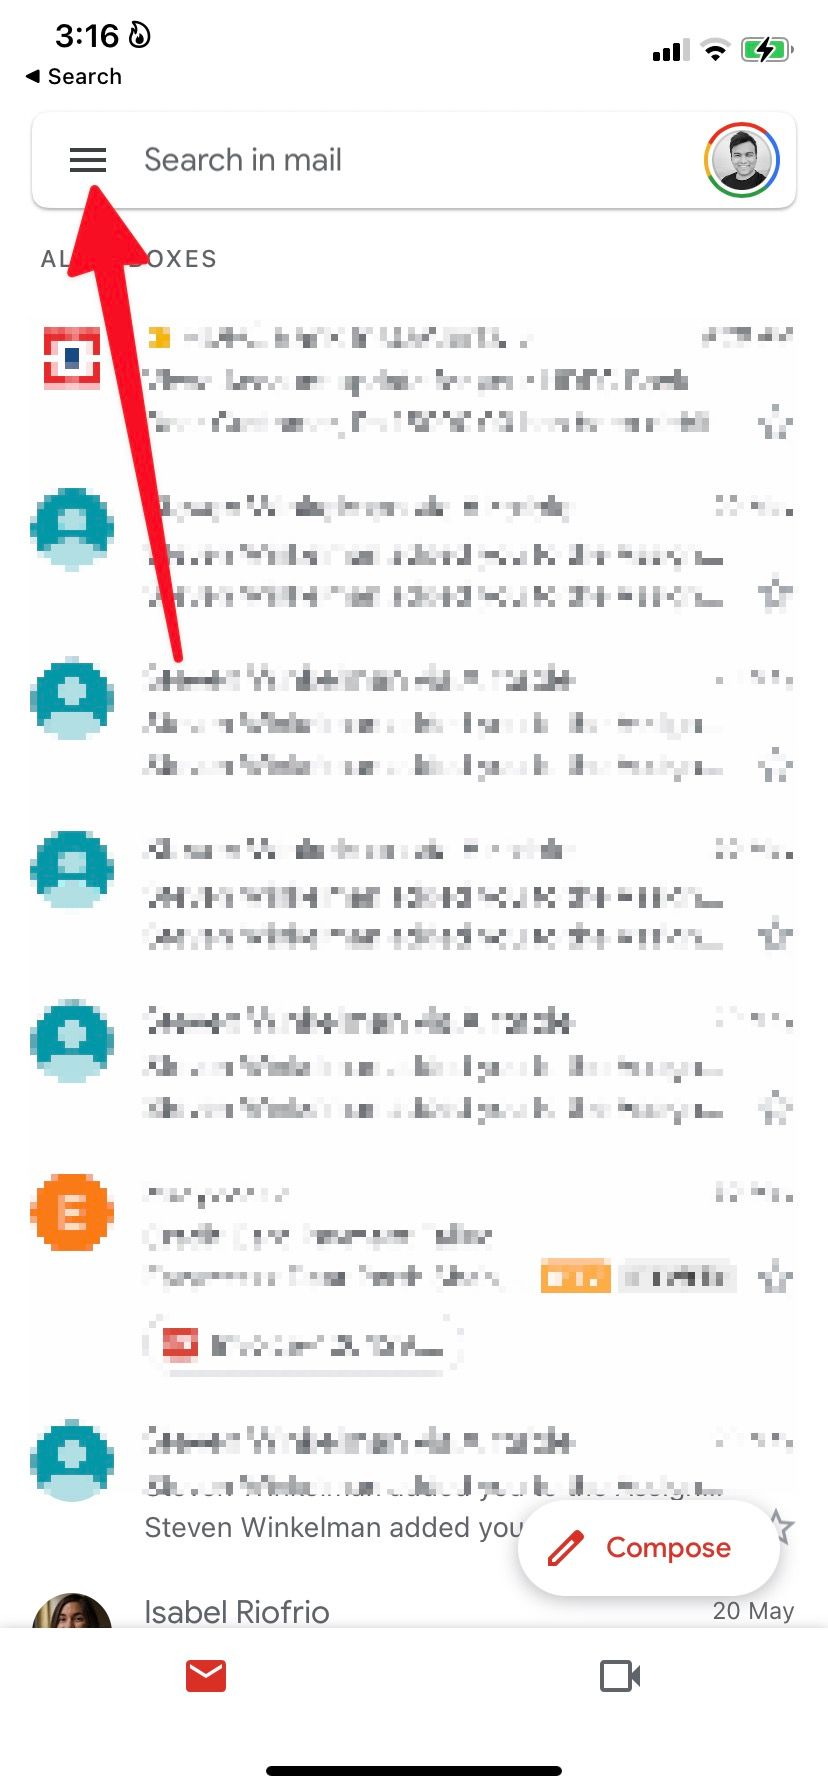
Although the Gmail app on Android is capable, you can’t create labels on it. However, there’s an option to create a label in Gmail’s iOS app.
- Open Gmail on iPhone.
- Tap the menu in the upper-left corner.
- Scroll down and select Create new from the Labels menu.
- Add a label name and select Done to save the changes.

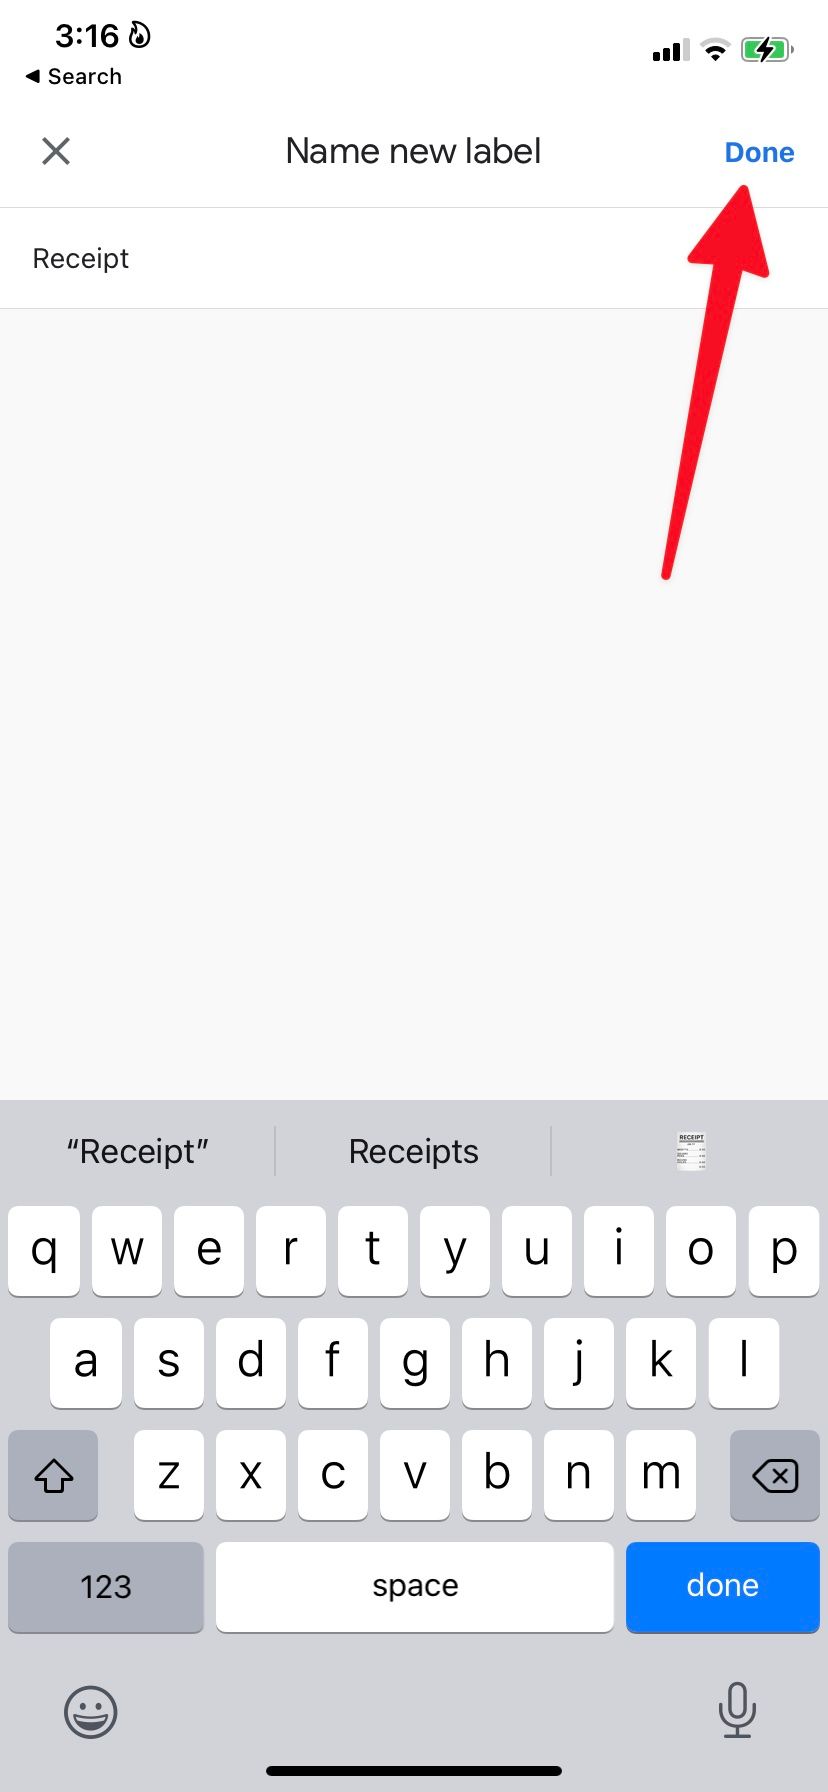
Check your newly created label from the Gmail menu. You can’t nest a new label under any existing label from the Gmail iPhone app.
How to rename or remove labels in Gmail
When you no longer require a specific label in your workflow, remove it to streamline the label section.
- Log in to Gmail using a web browser.
- Find the label on your Gmail menu and click the three-dot icon next to it.
- Select Remove label to delete it.
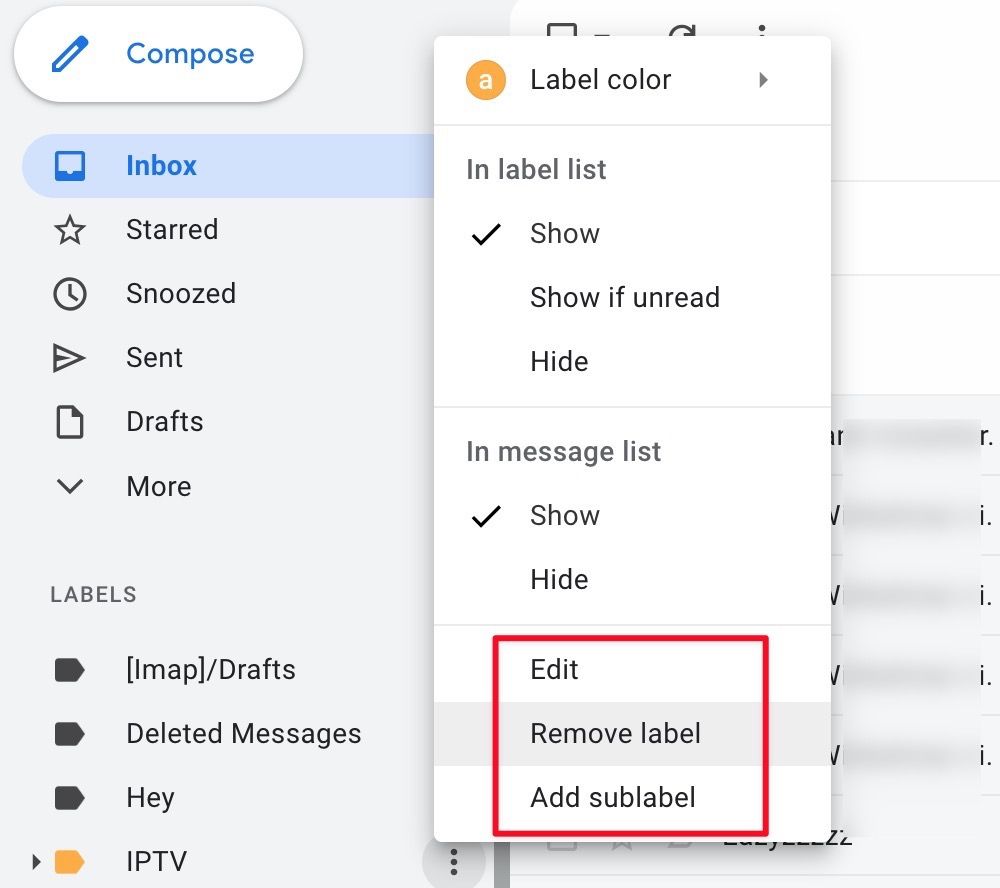
You can edit (rename) the label from the same menu and add new sublabels to it. So there’s no need to create a new label every time.
Delete or rename labels from Gmail mobile apps
You can manage your Gmail labels from the iOS app.
- Launch Gmail on your iPhone.
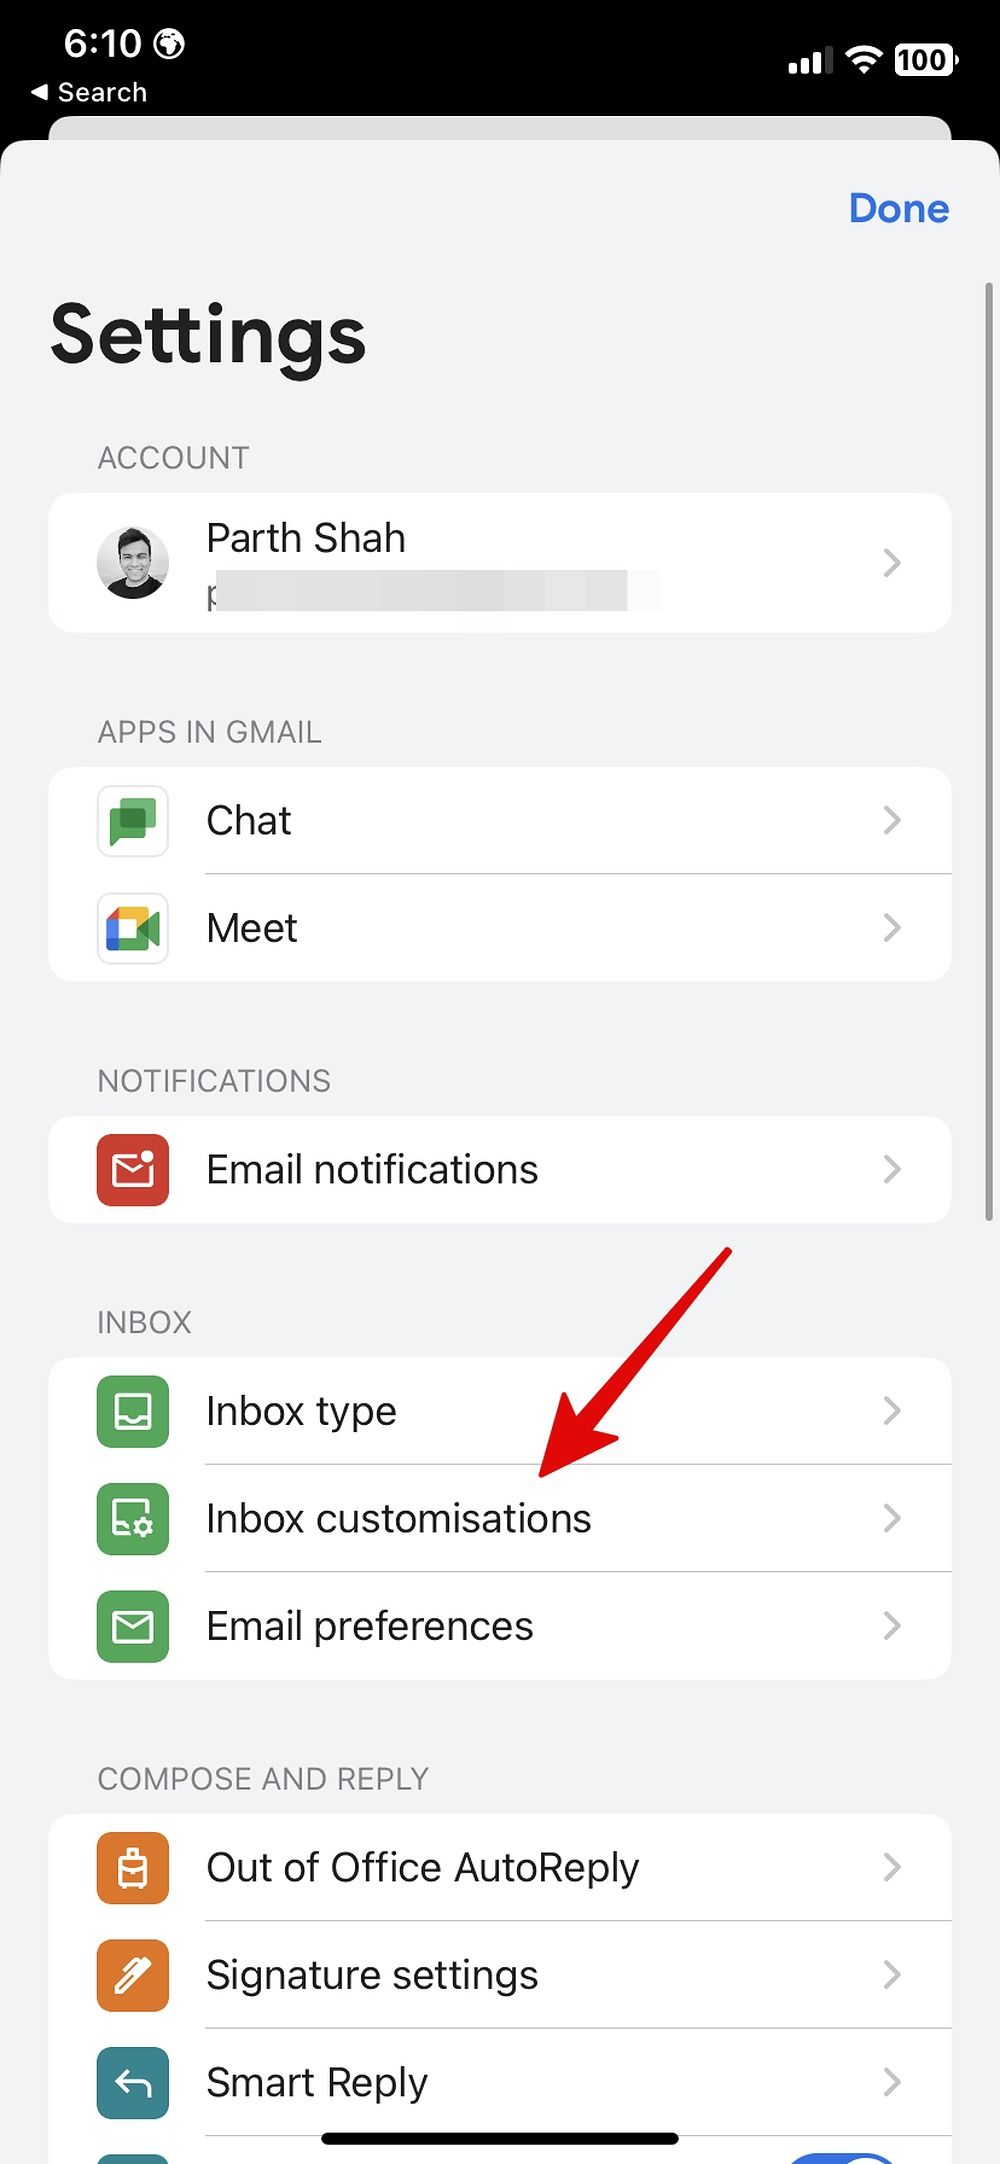
- Tap the hamburger menu in the upper-right corner and open Settings.
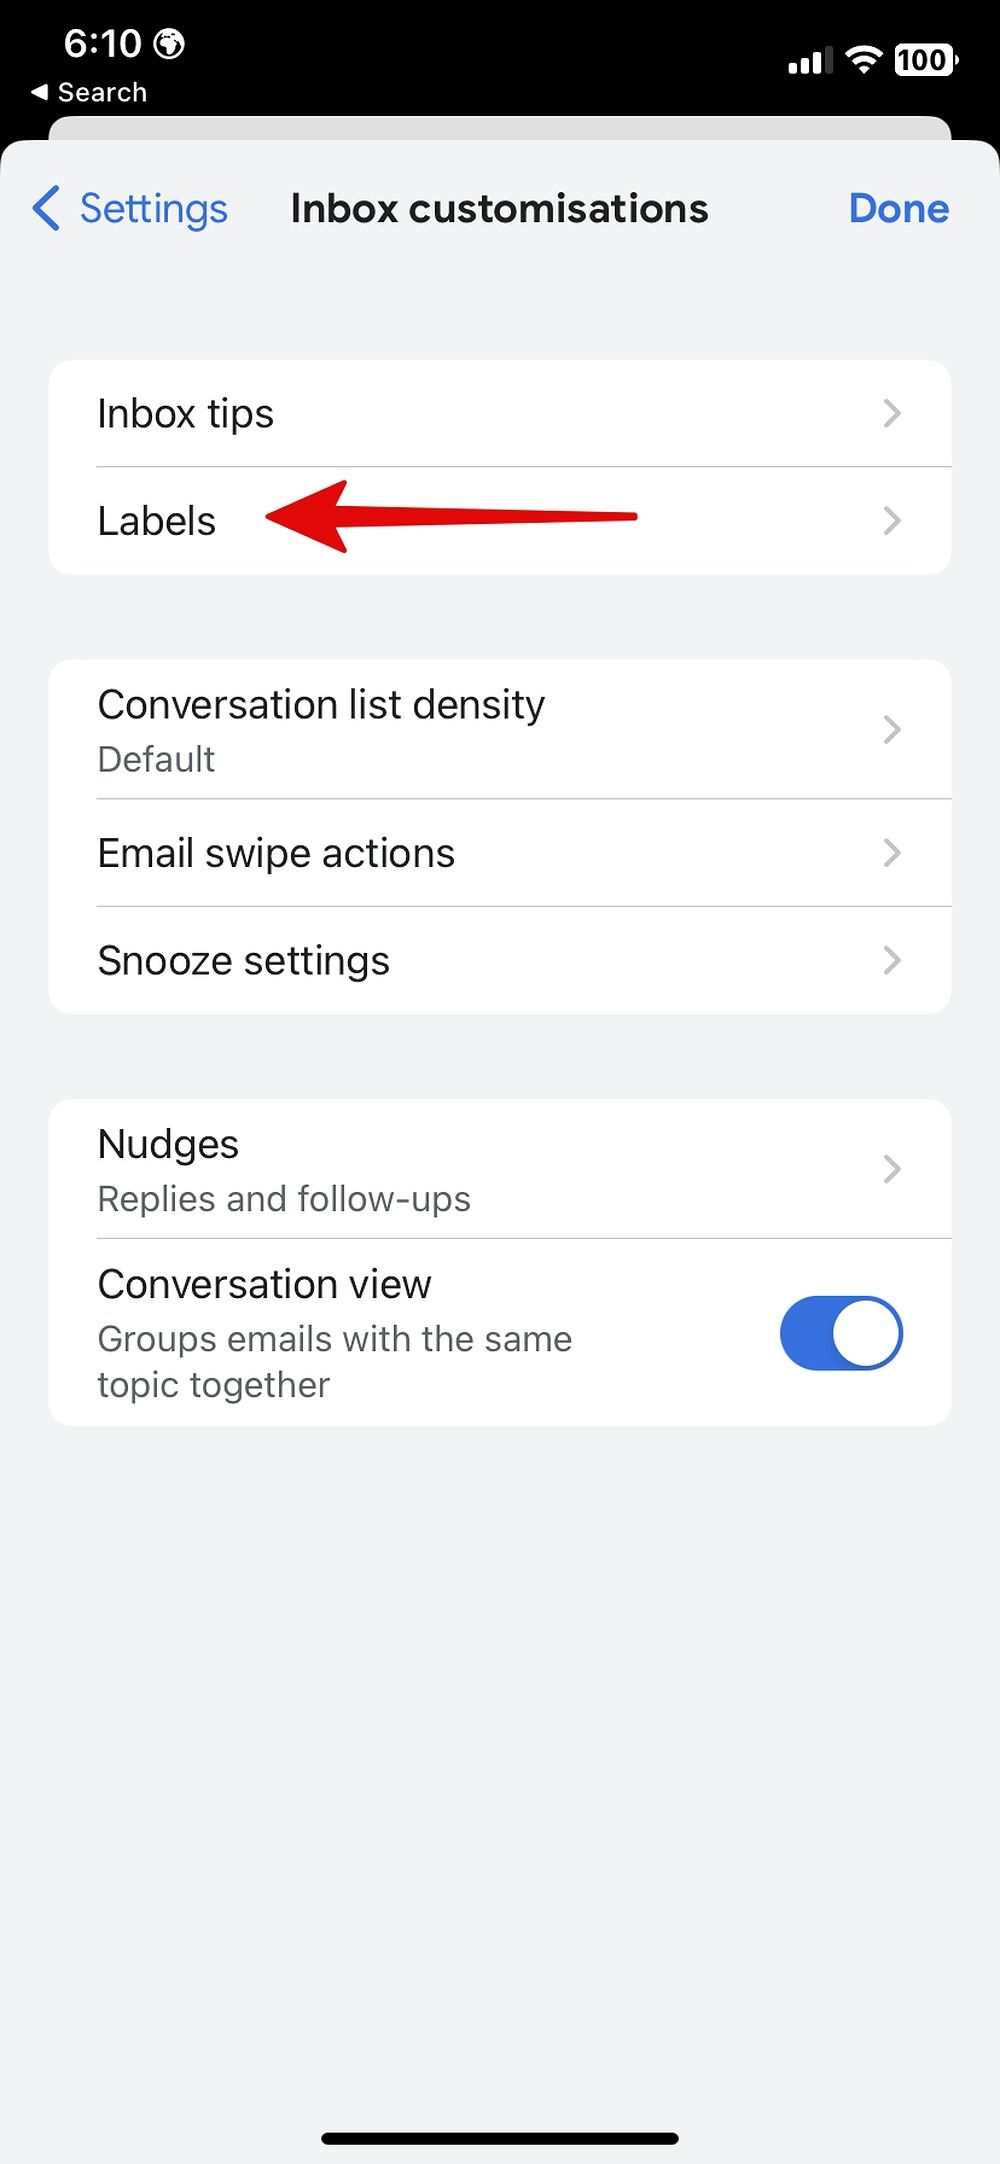
- Select Inbox customizations.
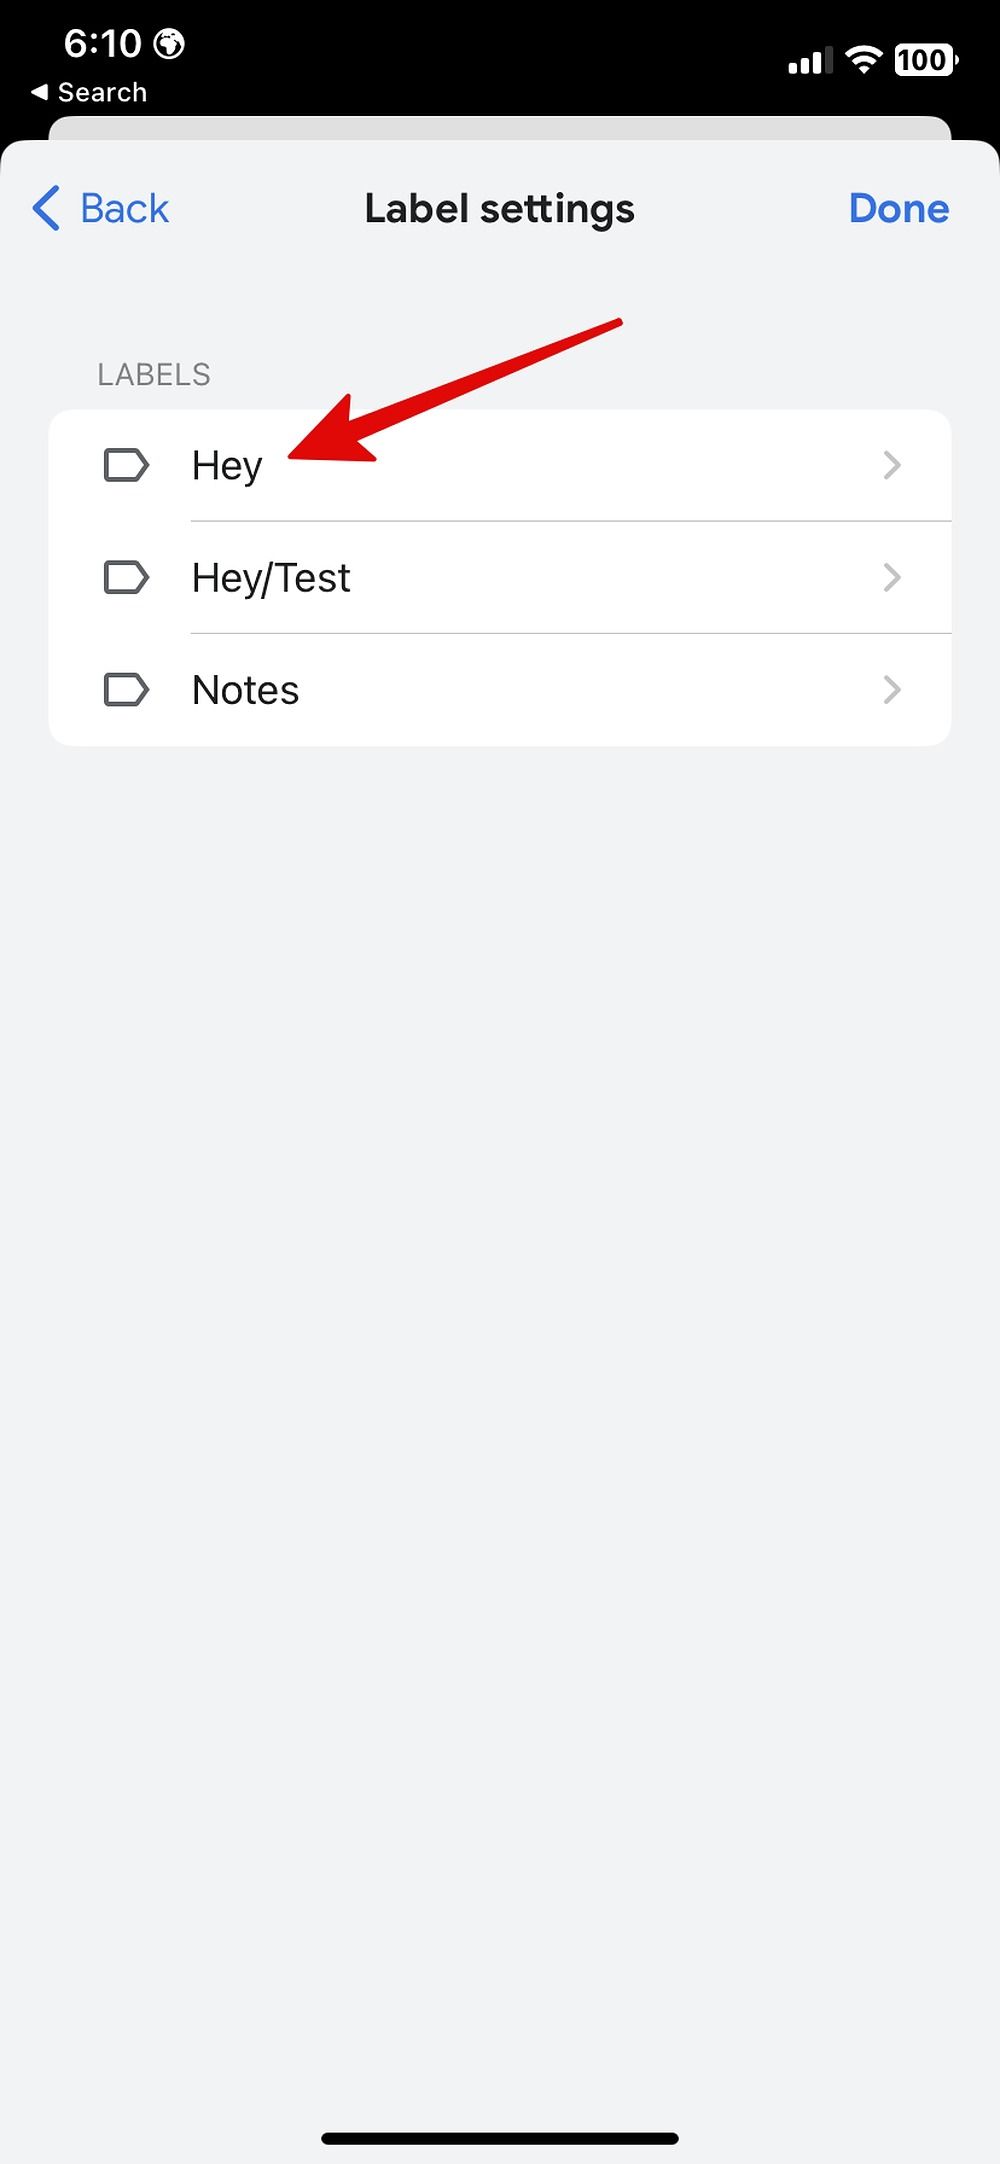
- Open the Labels menu.
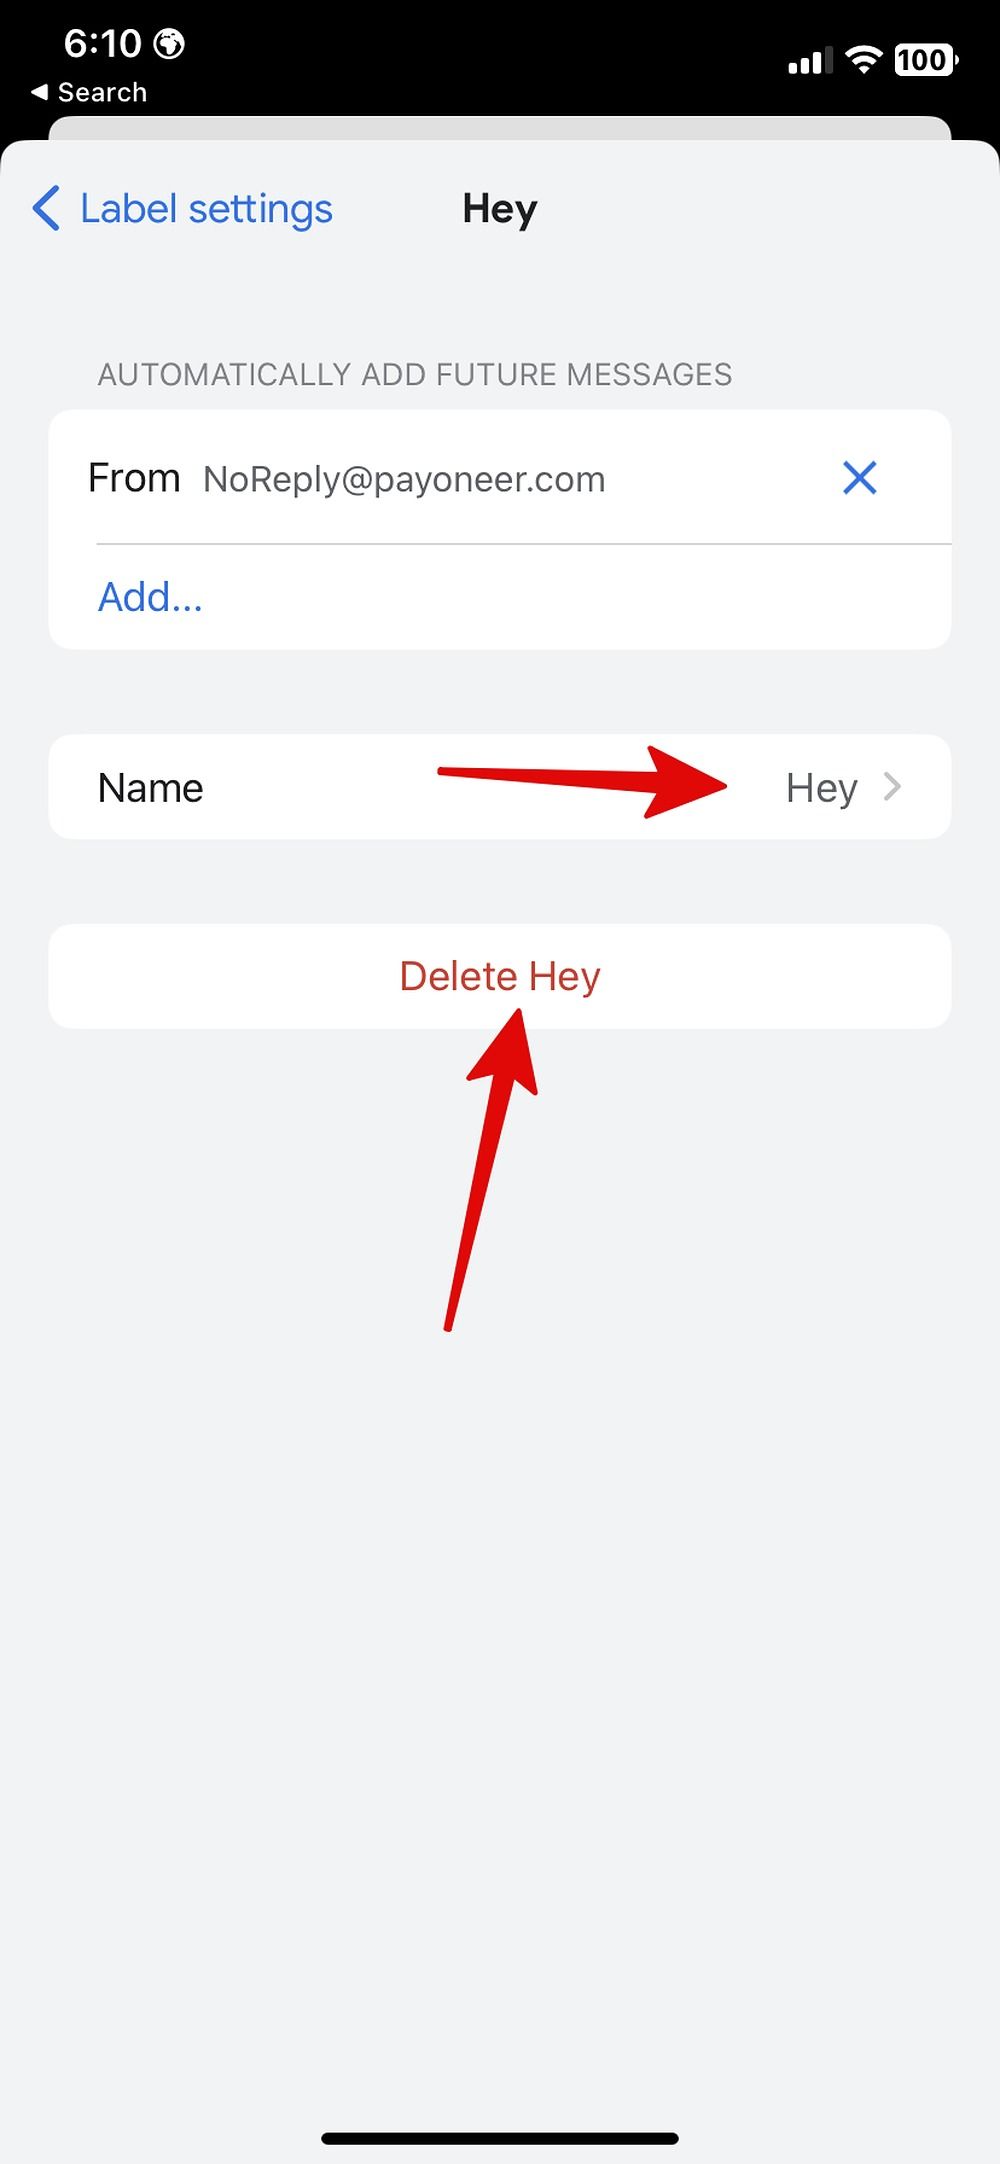
- Select a label and rename or delete it from the label list.

Label alternatives in Gmail
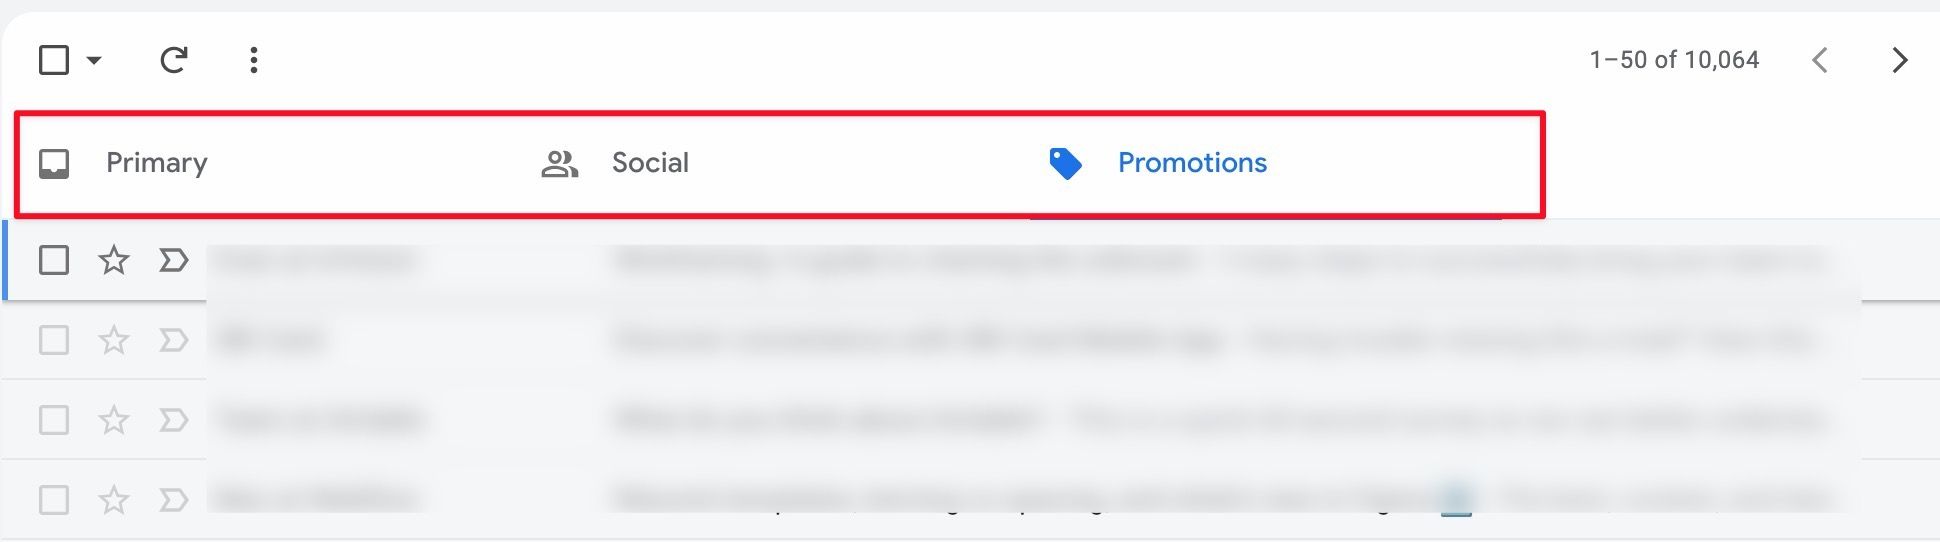
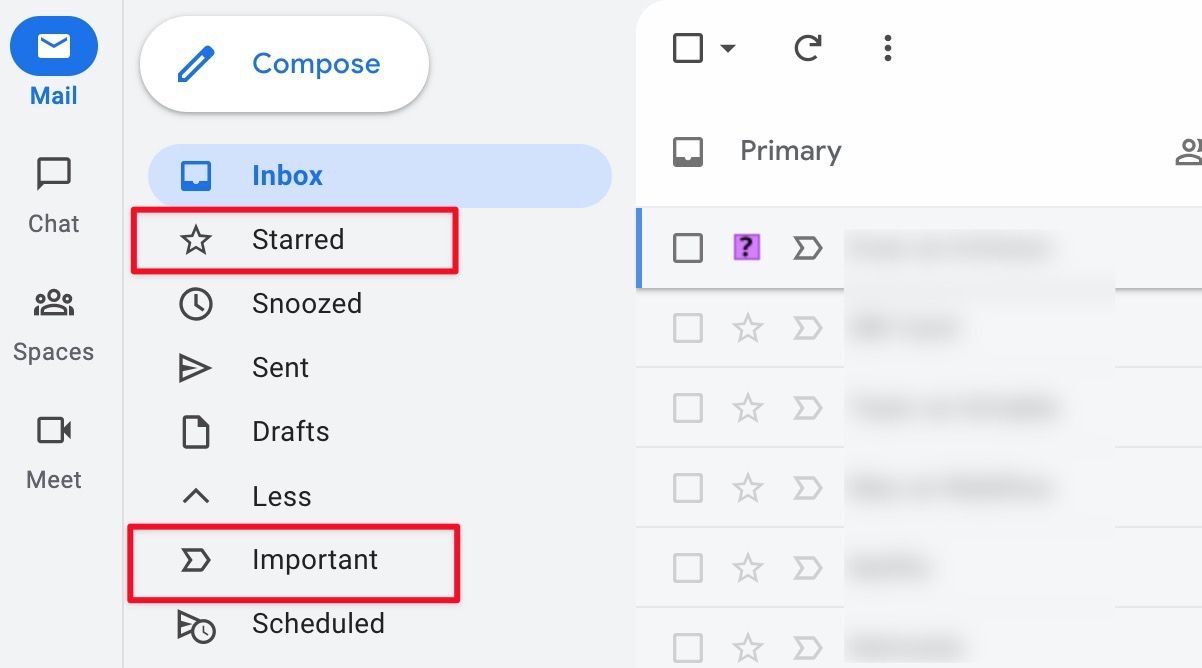
If you don’t see an option to create labels or aren’t a fan of a manual process, you can rely on default labels and categories to organize your inbox. The default Gmail view comes with Primary, Social, and Promotions categories. You can use them to filter personal emails from your bank offers and social media updates.
You can also opt for default labels such as Starred and Important. Select the star icon beside an email or click the arrow icon to mark the conversation as important. You can also add several star colors.
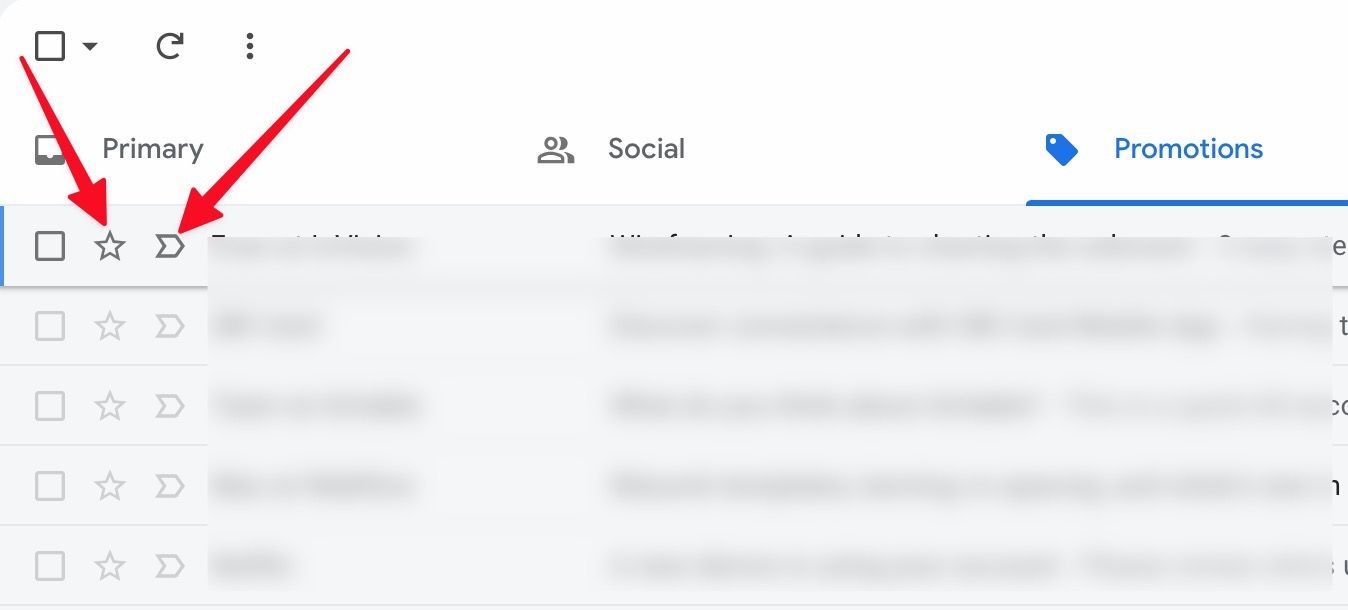
When starring an email, click it again and change it to a green check, purple question, or blue star for more diverse organization options.

You can find the Starred and Important sections from the Gmail main menu.
Organize your emails like a pro
Gmail labels can streamline your email inbox. If you’re a power user, go a step further by using these keyboard shortcuts to fly through Gmail without lifting your fingers from the keyboard. You can save time by adding your third-party emails, like iCloud, to Gmail. If you need to collaborate better with your team, be sure to explore the Google Workspace suite of tools.
Xem chi tiết và đăng kýXem chi tiết và đăng ký

Khám phá thêm từ Phụ Kiện Đỉnh
Đăng ký để nhận các bài đăng mới nhất được gửi đến email của bạn.

