

Review sản phẩm
Thêm Địa Chỉ Email Vào Danh Sách Người Gửi An Toàn Gmail: Hướng Dẫn Chi Tiết!

Th5
## Thêm Địa Chỉ Email Vào Danh Sách Người Gửi An Toàn Gmail: Hướng Dẫn Chi Tiết!
Thêm địa chỉ email vào danh sách người gửi an toàn của Gmail là cách tuyệt vời để đảm bảo bạn không bỏ lỡ bất kỳ email quan trọng nào từ người hoặc công ty mà bạn tin tưởng. Bài viết này sẽ hướng dẫn bạn từng bước cách thực hiện điều đó, giúp bạn quản lý email hiệu quả và tránh thư rác một cách dễ dàng.
I. Tại sao nên thêm địa chỉ email vào danh sách người gửi an toàn?
Gmail sử dụng bộ lọc thư rác mạnh mẽ để bảo vệ bạn khỏi thư rác và email độc hại. Tuy nhiên, đôi khi, những email quan trọng từ người quen, bạn bè, hoặc các dịch vụ bạn đang sử dụng cũng có thể bị nhầm là thư rác và chuyển vào thư mục Spam. Thêm địa chỉ email vào danh sách người gửi an toàn sẽ giúp Gmail ưu tiên xử lý các email này, đảm bảo chúng luôn xuất hiện trong hộp thư đến của bạn.
II. Cách thêm địa chỉ email vào danh sách người gửi an toàn trên Gmail:
Có hai cách chính để thêm địa chỉ email vào danh sách người gửi an toàn trên Gmail:
A. Thêm từ chính email:
* Bước 1: Mở email bạn muốn thêm vào danh sách người gửi an toàn.
* Bước 2: Nhìn vào phần tiêu đề của email, bạn sẽ thấy tên người gửi. Bên cạnh tên người gửi thường có một biểu tượng ba chấm nhỏ (…). Click vào biểu tượng này.
* Bước 3: Trong menu xuất hiện, chọn “Không phải là thư rác”. Gmail sẽ tự động thêm địa chỉ email người gửi vào danh sách người gửi an toàn.
B. Thêm thủ công từ cài đặt Gmail:
Phương pháp này hữu ích nếu bạn muốn thêm địa chỉ email mà chưa từng nhận được email từ họ.
* Bước 1: Đăng nhập vào tài khoản Gmail của bạn.
* Bước 2: Click vào biểu tượng hình bánh răng (Cài đặt) ở góc trên bên phải màn hình.
* Bước 3: Chọn “Xem tất cả cài đặt”.
* Bước 4: Trong tab “Lọc”, tìm mục “Địa chỉ và tên miền đã cho phép” hoặc tương tự. Tên mục này có thể thay đổi tùy thuộc vào phiên bản Gmail bạn đang sử dụng.
* Bước 5: Nhập địa chỉ email bạn muốn thêm vào danh sách người gửi an toàn. Bạn có thể thêm nhiều địa chỉ email, mỗi địa chỉ trên một dòng.
* Bước 6: Lưu thay đổi.
III. Những lưu ý quan trọng:
* Chỉ thêm địa chỉ email mà bạn tin tưởng vào danh sách người gửi an toàn.
* Nếu bạn nhận được email đáng ngờ từ một địa chỉ trong danh sách người gửi an toàn, hãy xóa địa chỉ đó khỏi danh sách ngay lập tức.
* Việc thêm địa chỉ email vào danh sách người gửi an toàn không đảm bảo 100% email sẽ không bị lọc vào thư mục Spam, nhưng nó sẽ làm tăng khả năng email đó đến hộp thư đến của bạn.
Kết luận:
Thêm địa chỉ email vào danh sách người gửi an toàn là một bước đơn giản nhưng hiệu quả giúp bạn quản lý email tốt hơn và tránh bỏ lỡ những thông tin quan trọng. Hãy áp dụng những hướng dẫn trên để bảo vệ hộp thư đến của bạn khỏi thư rác và đảm bảo bạn luôn nhận được email từ những người và công ty bạn tin tưởng.
#Gmail #Email #ThưRác #Spam #NgườiGửiAnToàn #CàiĐặtGmail #HướngDẫn #MẹoGmail #QuảnLýEmail #EmailMarketing
Giới thiệu How to add email addresses to Gmail’s safe senders list
: How to add email addresses to Gmail’s safe senders list
Hãy viết lại bài viết dài kèm hashtag về việc đánh giá sản phẩm và mua ngay tại Queen Mobile bằng tiếng VIệt: How to add email addresses to Gmail’s safe senders list
Mua ngay sản phẩm tại Việt Nam:
QUEEN MOBILE chuyên cung cấp điện thoại Iphone, máy tính bảng Ipad, đồng hồ Smartwatch và các phụ kiện APPLE và các giải pháp điện tử và nhà thông minh. Queen Mobile rất hân hạnh được phục vụ quý khách….
_____________________________________________________
Mua #Điện_thoại #iphone #ipad #macbook #samsung #xiaomi #poco #oppo #snapdragon giá tốt, hãy ghé [𝑸𝑼𝑬𝑬𝑵 𝑴𝑶𝑩𝑰𝑳𝑬]
✿ 149 Hòa Bình, phường Hiệp Tân, quận Tân Phú, TP HCM
✿ 402B, Hai Bà Trưng, P Tân Định, Q 1, HCM
✿ 287 đường 3/2 P 10, Q 10, HCM
Hotline (miễn phí) 19003190
Thu cũ đổi mới
Rẻ hơn hoàn tiền
Góp 0%
Thời gian làm việc: 9h – 21h.
KẾT LUẬN
Hãy viết đoạn tóm tắt về nội dung bằng tiếng việt kích thích người mua: How to add email addresses to Gmail’s safe senders list
Inboxes would overflow with irrelevant newsletters and malware-infested spam messages if it weren’t for Gmail’s robust spam filter. Still, you may have missed an important email on rare occasions, only to find it later in your spam folder. To prevent such a situation in the future, add contacts you trust to your safe senders list.
Whether you access Gmail on your phone, laptop, desktop PC, or budget Chromebook, in this guide, we show you how to create a safe senders list in Gmail.
What is a safe senders list?
Gmail uses AI-based filters to mark emails as spam by looking at various characteristics like the sender’s IP address, the email domain, and user feedback. However, Gmail’s spam filter isn’t perfect, and sometimes it can get too aggressive and flag relevant emails as spam.
Add trusted contacts to your safe senders list to get around this issue. This ensures that relevant emails make it past the spam filter and land in your inbox as they should. Another method is to add the email address to Google Contacts. And if you find the missing email in the spam folder, inform Gmail by marking it as “not spam.”
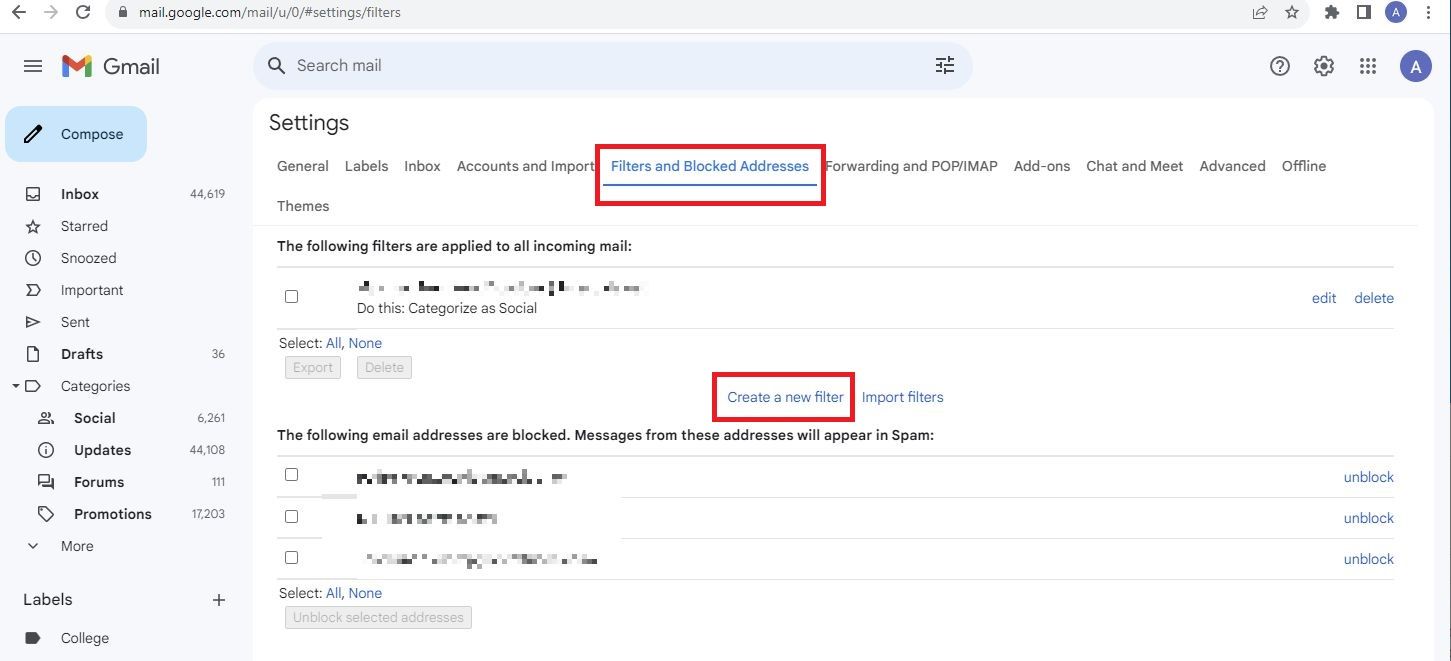
How to create a filter for safe senders on the desktop
You can create a filter to ensure that emails from a specific address don’t make it to spam. Here’s how to do it:
- On your desktop, log in to your Gmail account.
- Click the gear icon in the upper-right corner.
- Select See all settings.
- Click the Filters and Blocked Addresses tab at the top.
- Click Create a new filter.
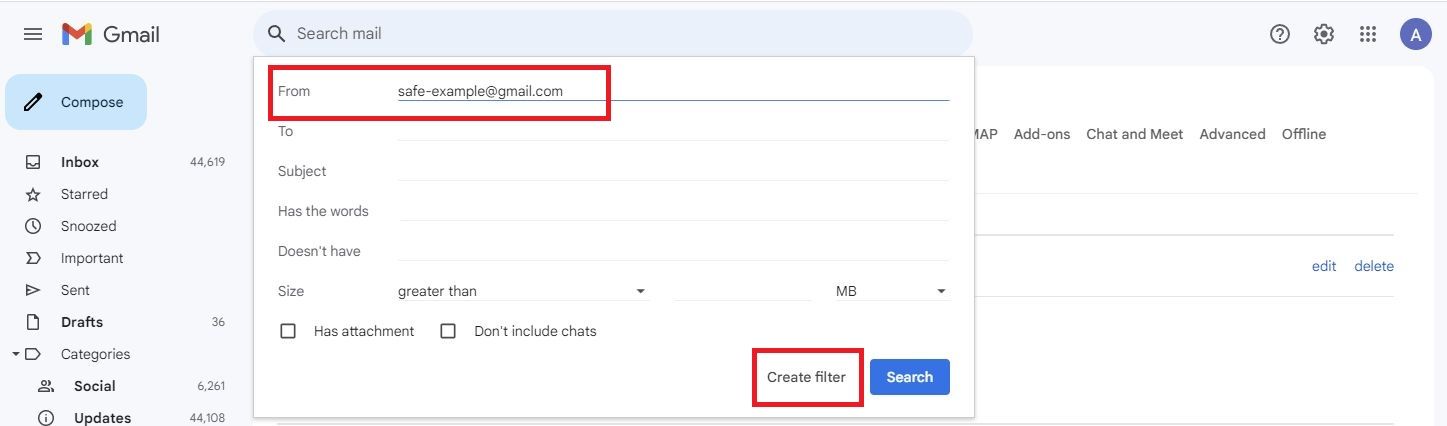
- Enter the email address of the person you want to add to your safe senders list.
- Type the domain name in the From field to allow all emails from a specific domain. For example, type *@outlook.com to receive all emails from that domain.
- Click Create Filter.
- Select the action to be applied to filtered emails. Click Never send it to spam.
- Click Create filter.
- You can edit or delete the filter in the Filters and blocked addresses tab under Settings.

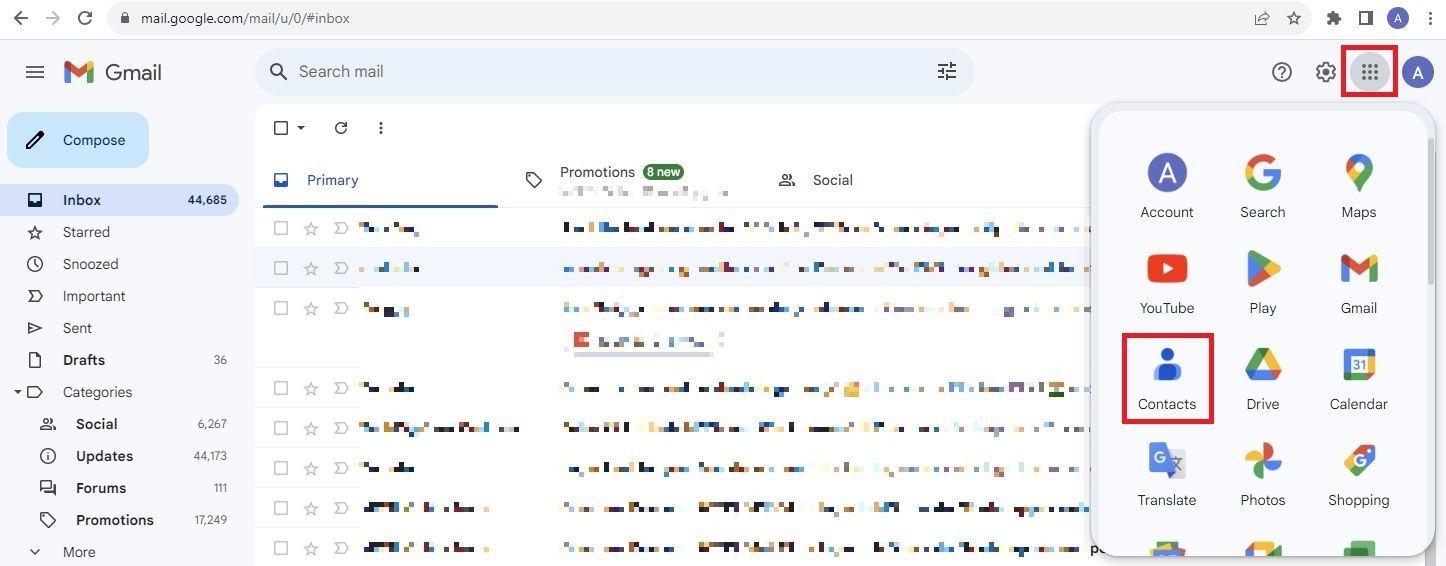
A quick way to prevent Gmail from flagging emails from trusted contacts is to add their email addresses to Google Contacts. You can do it from the desktop or in the mobile app.
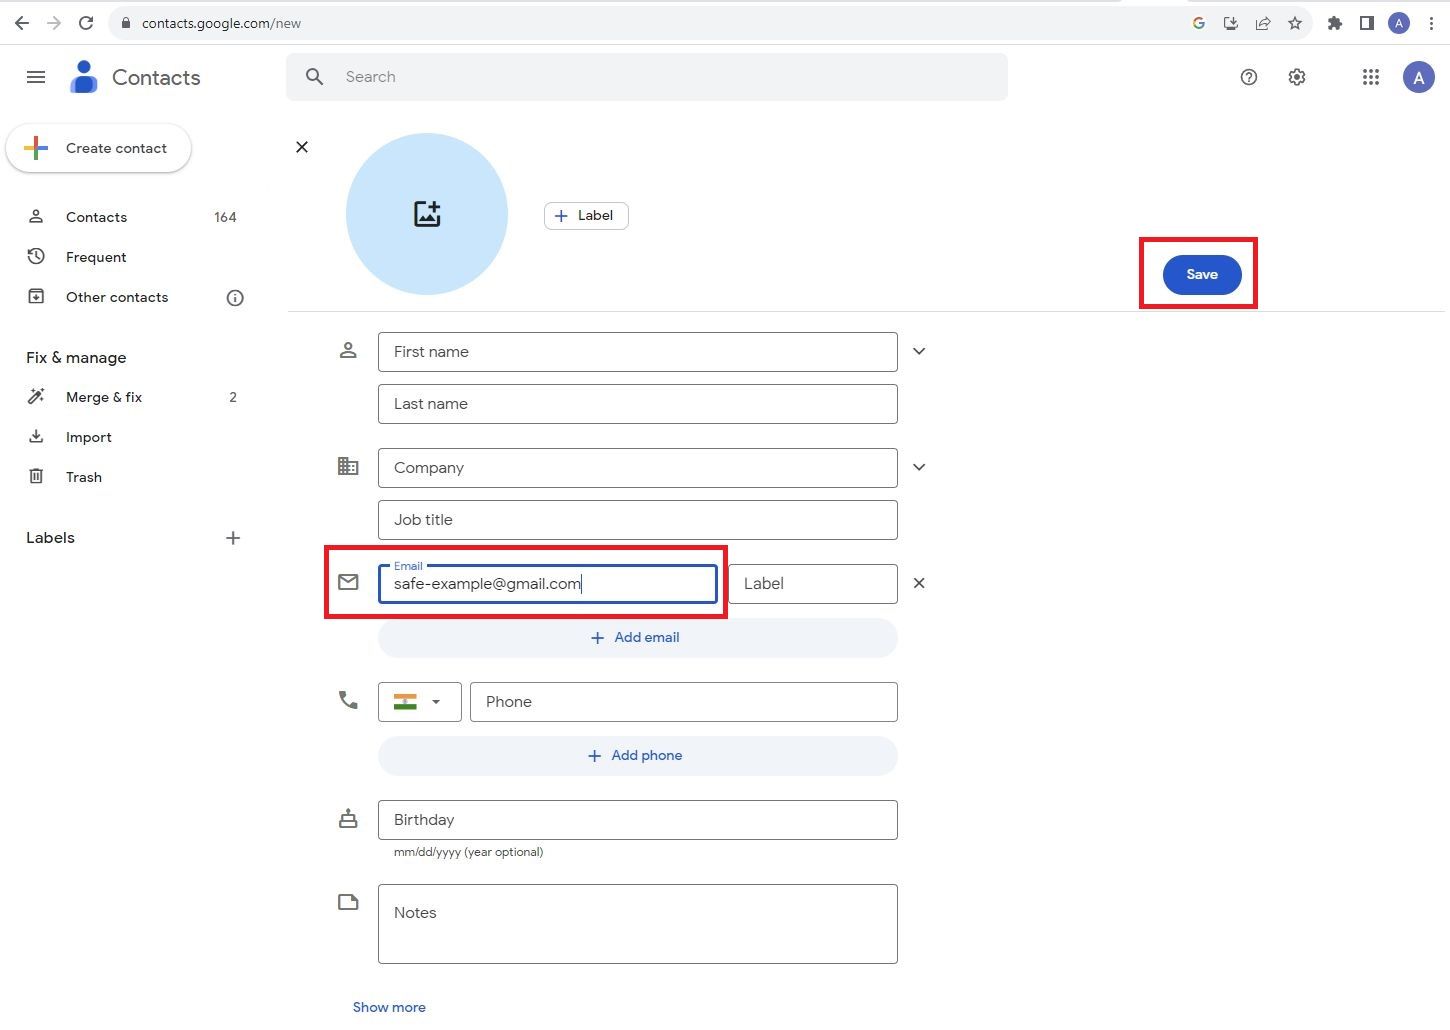
How to add an email address on the desktop
- On your desktop, log in to your Gmail account.
- Click the dot grid menu in the upper-right corner and select Contacts.
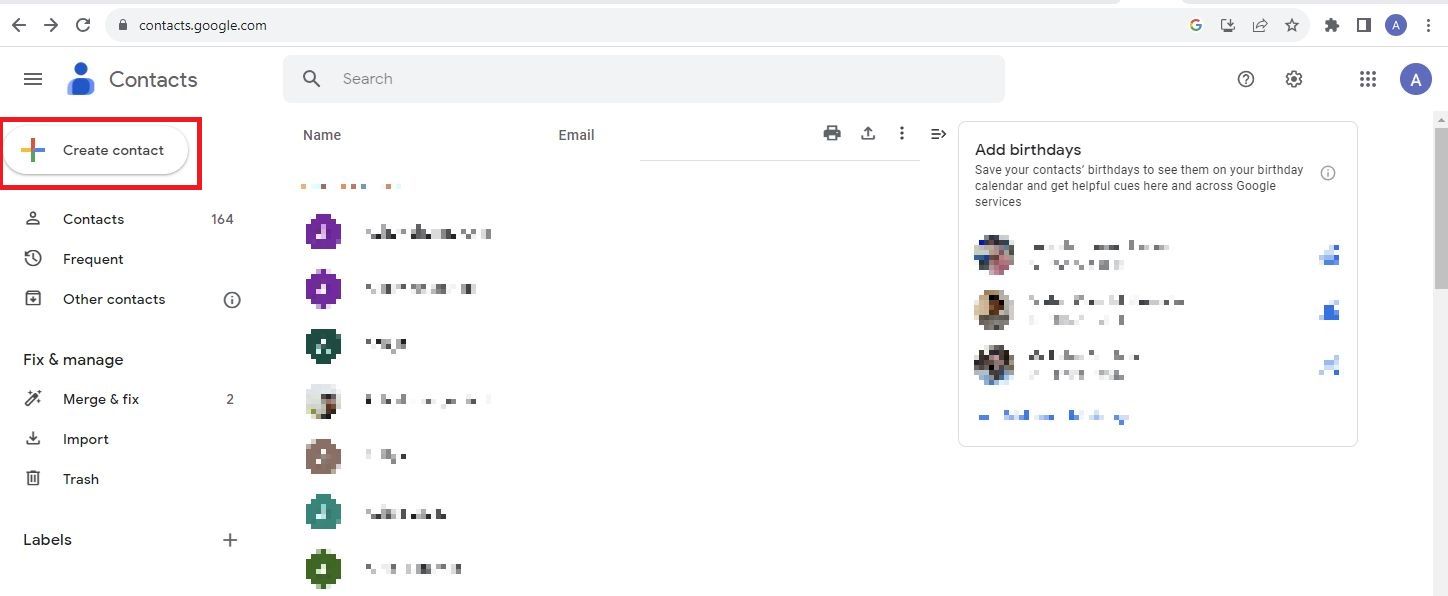
- Click Create contact in the upper-left corner.
- Enter the email address of the contact you want to add.
- Click Save.
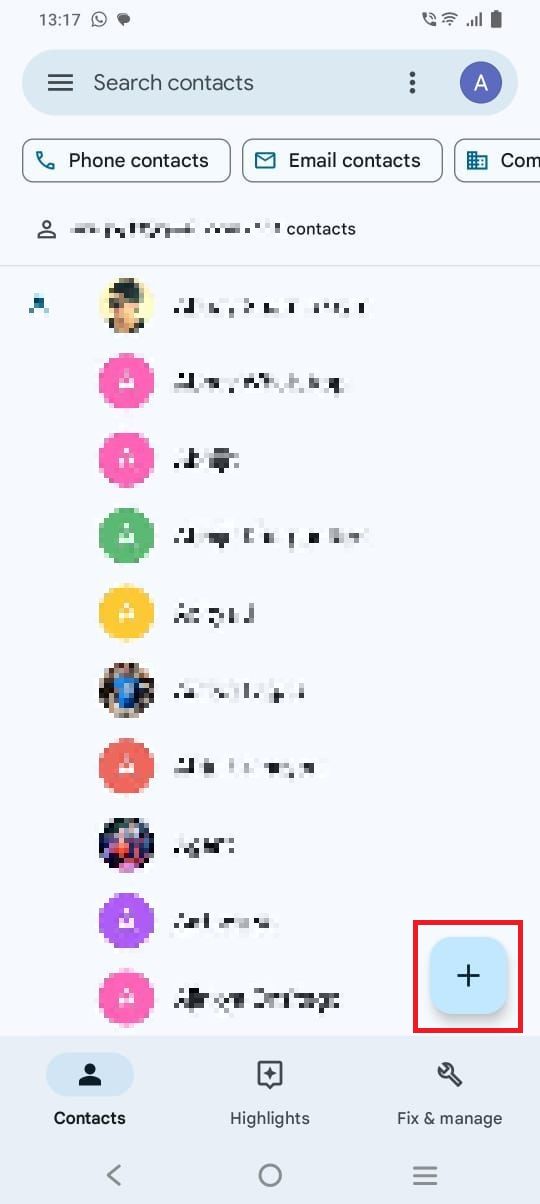
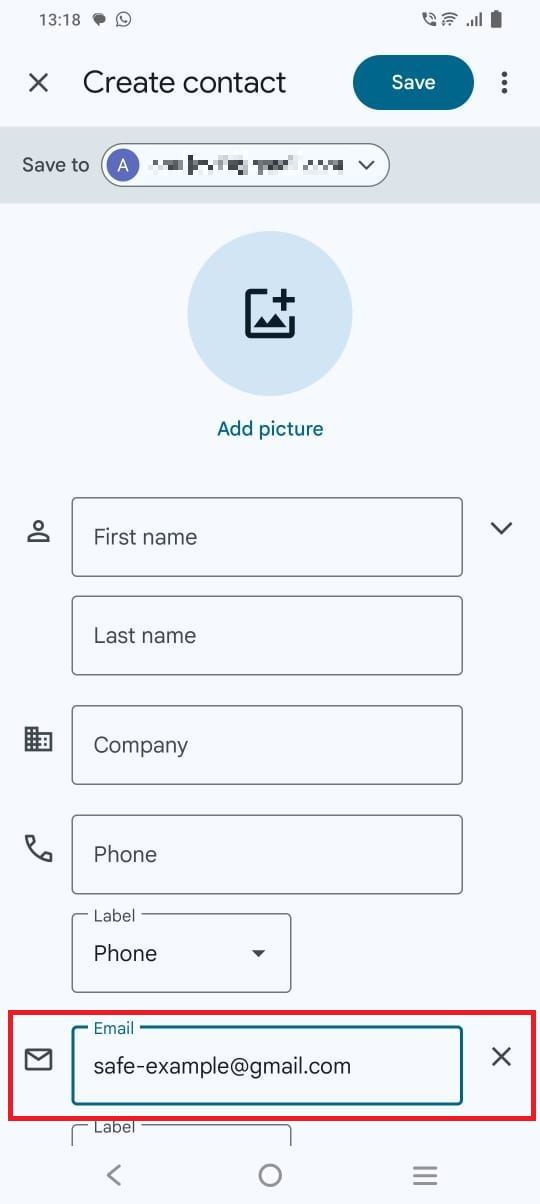
How to add an email address on the Google Contacts app
- Open the Google Contacts app on your phone.
- Click the Add button.
- Enter the email address of the trusted contact.
- Tap Save.
How to mark an email as ‘not spam’ in Gmail
If you find an important email in the spam folder, mark it as “not spam.” Gmail removes the message from your spam folder and moves it to your inbox. You can access this option from the desktop and the mobile app.
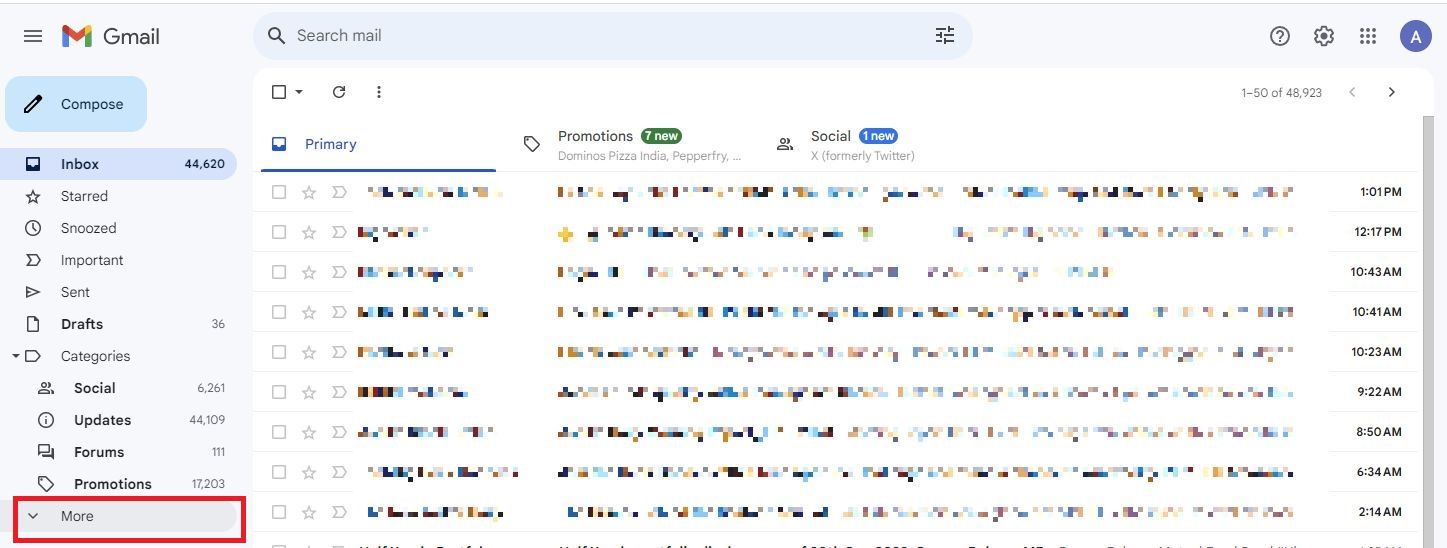
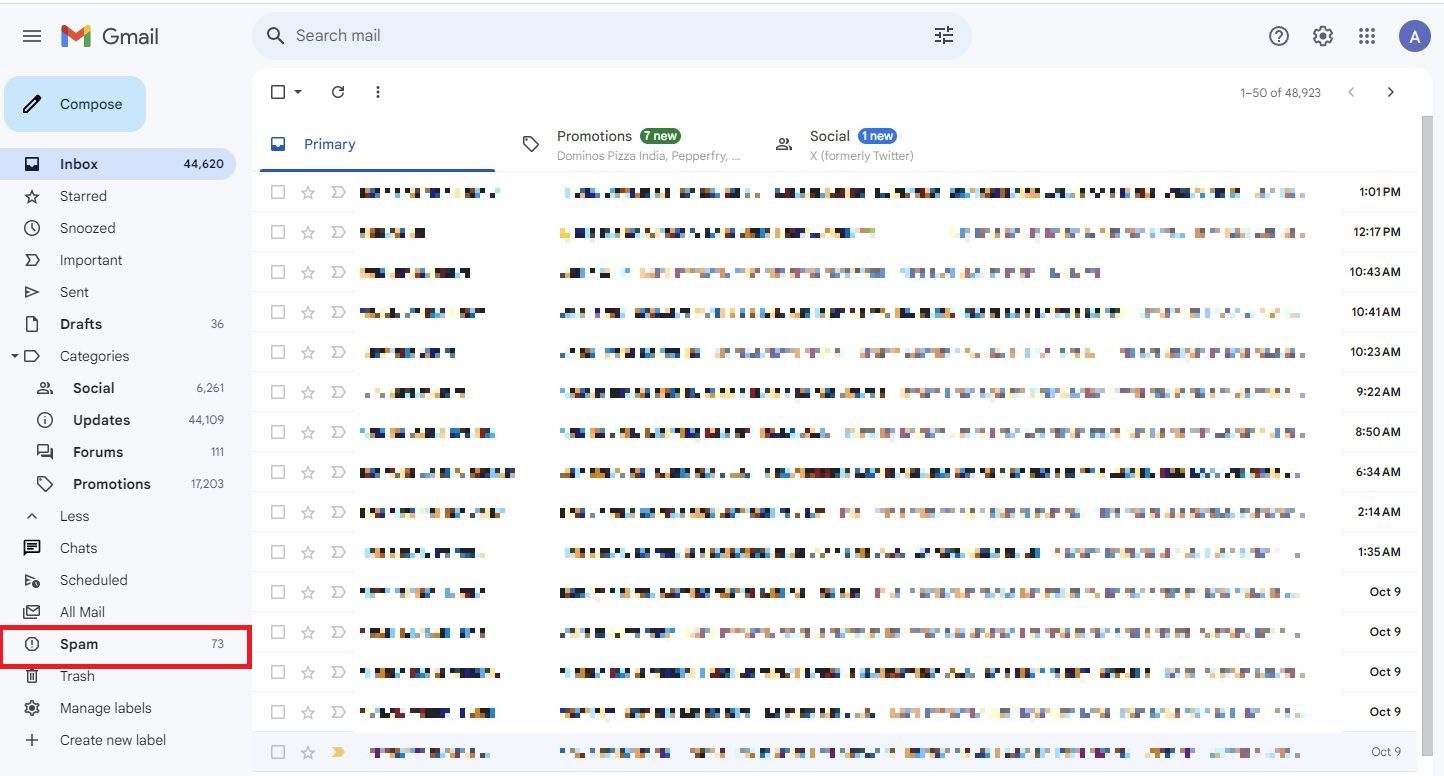
How to mark an email as ‘not spam’ on the desktop
- Log in to Gmail from your desktop.
- Select More.
- Click Spam.
- Open the desired email and click Report not spam.

How to mark an email as ‘not spam’ on the Gmail app
- Log in to Gmail from your phone.
- Tap the hamburger menu in the upper-left corner.
- Select Spam.
- Open the desired email and tap Report not spam.
Efficiently manage your Gmail account
You should proactively add trusted contacts to Gmail’s safe senders list so that important emails don’t get stuck in the spam folder. Or you might have to rummage through your spam folder to retrieve it. However, you can easily find that elusive email with the help of Gmail’s advanced search filters.

Khám phá thêm từ Phụ Kiện Đỉnh
Đăng ký để nhận các bài đăng mới nhất được gửi đến email của bạn.

