

Review sản phẩm
Thuần Thục Android: Chọn Server DNS Theo Ý Muốn!

Th5
## Thuần Thục Android: Chọn Server DNS Theo Ý Muốn!
Bạn muốn kiểm soát hoàn toàn trải nghiệm internet trên thiết bị Android của mình? Việc lựa chọn máy chủ DNS (Domain Name System) phù hợp có thể cải thiện tốc độ truy cập, bảo mật và thậm chí cả quyền riêng tư trực tuyến. Bài viết này sẽ hướng dẫn bạn từng bước cách thay đổi server DNS trên Android, cho phép bạn tận hưởng một kết nối internet tối ưu hơn.
Tại sao cần thay đổi Server DNS?
Máy chủ DNS là “sổ địa chỉ” của internet. Nó dịch các tên miền (ví dụ: google.com) thành địa chỉ IP mà thiết bị của bạn cần để truy cập website. Sử dụng server DNS mặc định của nhà cung cấp dịch vụ internet (ISP) đôi khi có thể chậm, kém bảo mật hoặc bị chặn một số website. Chọn server DNS khác, như Google Public DNS hoặc Cloudflare DNS, có thể mang lại những lợi ích sau:
* Tốc độ truy cập nhanh hơn: Một số server DNS được tối ưu hóa để cung cấp tốc độ truy cập nhanh hơn.
* Bảo mật tốt hơn: Một số server DNS tích hợp tính năng bảo mật nâng cao, giúp bảo vệ bạn khỏi các mối đe dọa trực tuyến.
* Khả năng truy cập tốt hơn: Server DNS có thể giúp bạn truy cập vào các website bị chặn bởi ISP của bạn.
* Tăng cường quyền riêng tư: Một số server DNS không ghi lại lịch sử truy cập của bạn, bảo vệ quyền riêng tư trực tuyến của bạn tốt hơn.
Cách thay đổi Server DNS trên Android:
Phương pháp thay đổi server DNS trên Android tùy thuộc vào phiên bản hệ điều hành và thiết bị của bạn. Tuy nhiên, hầu hết các thiết bị đều có thể thực hiện theo các bước sau:
1. Truy cập vào cài đặt mạng: Mở ứng dụng “Cài đặt” trên điện thoại, tìm và chọn “Mạng & internet” hoặc tùy chọn tương tự.
2. Chọn Wi-Fi: Nếu bạn đang sử dụng Wi-Fi, chọn mạng Wi-Fi mà bạn đang kết nối.
3. Quản lý mạng Wi-Fi: Nhấn vào tên mạng Wi-Fi hiện đang hoạt động.
4. Thay đổi cài đặt IP: Tìm và chọn “Cài đặt IP” hoặc “Thuộc tính IP”. Tùy chọn này có thể có tên gọi khác nhau tùy thuộc vào phiên bản Android.
5. Chọn “Sử dụng IP tĩnh”: Thay vì “DHCP”, chọn “IP tĩnh”.
6. Nhập địa chỉ Server DNS: Bạn sẽ cần nhập địa chỉ IP của server DNS mà bạn muốn sử dụng. Một số gợi ý:
* Google Public DNS: 8.8.8.8 và 8.8.4.4
* Cloudflare DNS: 1.1.1.1 và 1.0.0.1
* OpenDNS: 208.67.222.222 và 208.67.220.220
7. Lưu cài đặt: Lưu các thay đổi mà bạn đã thực hiện.
Mua ngay điện thoại và máy tính bảng chính hãng tại Queen Mobile!
Bạn đang tìm kiếm một chiếc điện thoại thông minh hoặc máy tính bảng chất lượng cao? Hãy ghé thăm Queen Mobile để trải nghiệm những sản phẩm chính hãng từ các thương hiệu hàng đầu như iPhone và iPad. Chúng tôi cam kết mang đến cho bạn sự lựa chọn đa dạng, chất lượng tuyệt vời và dịch vụ khách hàng chuyên nghiệp.
Truy cập website của chúng tôi ngay hôm nay để khám phá những sản phẩm mới nhất!
#Android #DNS #ServerDNS #CàiĐặtAndroid #BảoMật #TốcĐộInternet #GooglePublicDNS #CloudflareDNS #OpenDNS #QueenMobile #iPhone #iPad #ĐiệnThoại #MáyTínhBảng #CôngNghệ
Giới thiệu How to make Android use the DNS server of your choice
: How to make Android use the DNS server of your choice
Hãy viết lại bài viết dài kèm hashtag về việc đánh giá sản phẩm và mua ngay tại Queen Mobile bằng tiếng VIệt: How to make Android use the DNS server of your choice
Mua ngay sản phẩm tại Việt Nam:
QUEEN MOBILE chuyên cung cấp điện thoại Iphone, máy tính bảng Ipad, đồng hồ Smartwatch và các phụ kiện APPLE và các giải pháp điện tử và nhà thông minh. Queen Mobile rất hân hạnh được phục vụ quý khách….
_____________________________________________________
Mua #Điện_thoại #iphone #ipad #macbook #samsung #xiaomi #poco #oppo #snapdragon giá tốt, hãy ghé [𝑸𝑼𝑬𝑬𝑵 𝑴𝑶𝑩𝑰𝑳𝑬]
✿ 149 Hòa Bình, phường Hiệp Tân, quận Tân Phú, TP HCM
✿ 402B, Hai Bà Trưng, P Tân Định, Q 1, HCM
✿ 287 đường 3/2 P 10, Q 10, HCM
Hotline (miễn phí) 19003190
Thu cũ đổi mới
Rẻ hơn hoàn tiền
Góp 0%
Thời gian làm việc: 9h – 21h.
KẾT LUẬN
Hãy viết đoạn tóm tắt về nội dung bằng tiếng việt kích thích người mua: How to make Android use the DNS server of your choice
Changing your DNS server on Android can resolve connectivity problems on Wi-Fi. If you recently upgraded to one of the best value data plans and encounter issues with roaming, we recommend exploring a different troubleshooting avenue. You can’t change your mobile data DNS server without rooting your phone.
DNS servers translate domain names into IP addresses. If they fail, you can’t reach websites or find results in a search engine. Diagnosing whether the DNS server is causing problems can be tricky, but the fix is quick and easy. You can change your DNS server on any Android device, including phones, Chromebooks, and our favorite tablets.
Why does your DNS server matter?
Like any server, DNS servers encounter technical problems throughout their lifespan. This can impact your connection quality. You usually don’t need to reset your DNS server to fix connectivity issues, but occasionally it’s necessary.
Your internet provider chooses your default DNS server. If you connect to a different router, your DNS server changes. Changing your DNS server on Android overrides this default server, but anyone else connecting to the router still uses the default DNS server.
If all your home devices encounter DNS connectivity issues, we recommend changing your DNS server at the router level. The method for changing this varies for each router, so we recommend reading the documentation for your router to find your DNS settings.
When you’re ready to start, you’ll need a primary and secondary DNS address. For this guide, we use the Google Public DNS server. On Android, you can enter dns.google to switch servers, but you may need the IPv4 or IPv6 address provided in the table below on non-Android devices:
|
IPv4 |
IPv6 |
|
|
Primary |
8.8.8.8 |
2001:4860:4860::8888 |
|
Secondary |
8.8.4.4 |
2001:4860:4860::8844 |
It doesn’t matter which address you assign as Primary or Secondary.
If you wish to use an alternative DNS server, have its hostname and addresses ready. These should be displayed in the same format as the addresses shown above.
The IPv6 address format above is an abbreviated address that works for most devices. However, some require explicit values. If the abbreviated address doesn’t work, try these formats:
Regular: 2001:4860:4860::8888
Expanded: 2001:4860:4860:0:0:0:0:8888
Fully Expanded: 2001:4860:4860:0000:0000:0000:0000:8888
How to flush your DNS cache
Before you change your DNS server, flush it first. Your DNS server’s cache might be full. Clearing this can speed up your browsing without changing your server.
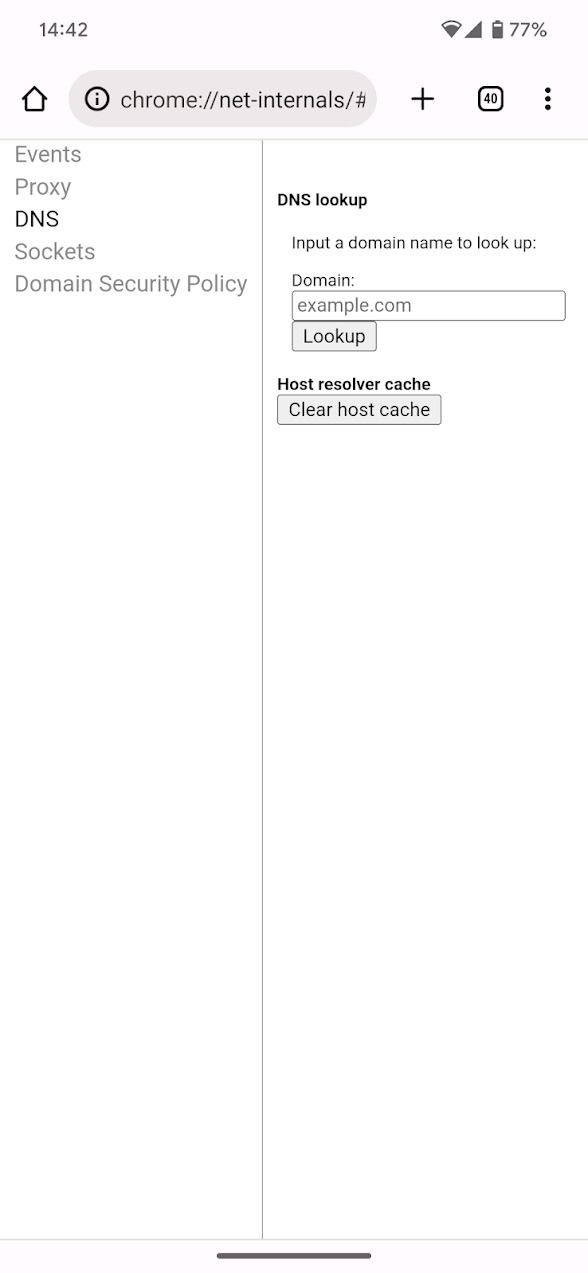
- Open Google Chrome. If you don’t use Chrome, your browser of choice has documentation on how to access DNS settings.
- Enter chrome://net-internals/#dns into the address bar.
- Tap Clear host cache.
- Restart your device.
If your browsing experience is still slow, move on to switching DNS servers.
How to switch DNS servers on Android
If clearing the cache doesn’t work, switch to another DNS server. Here’s how:
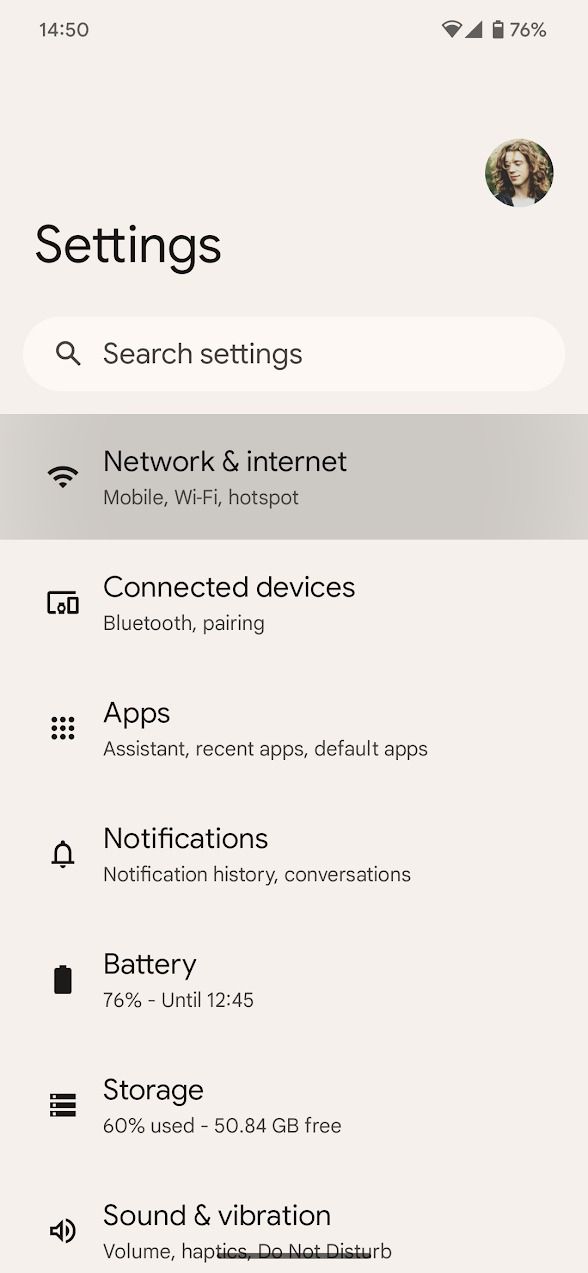
- Open the Settings app on your Android device.
- Select Network & Internet.
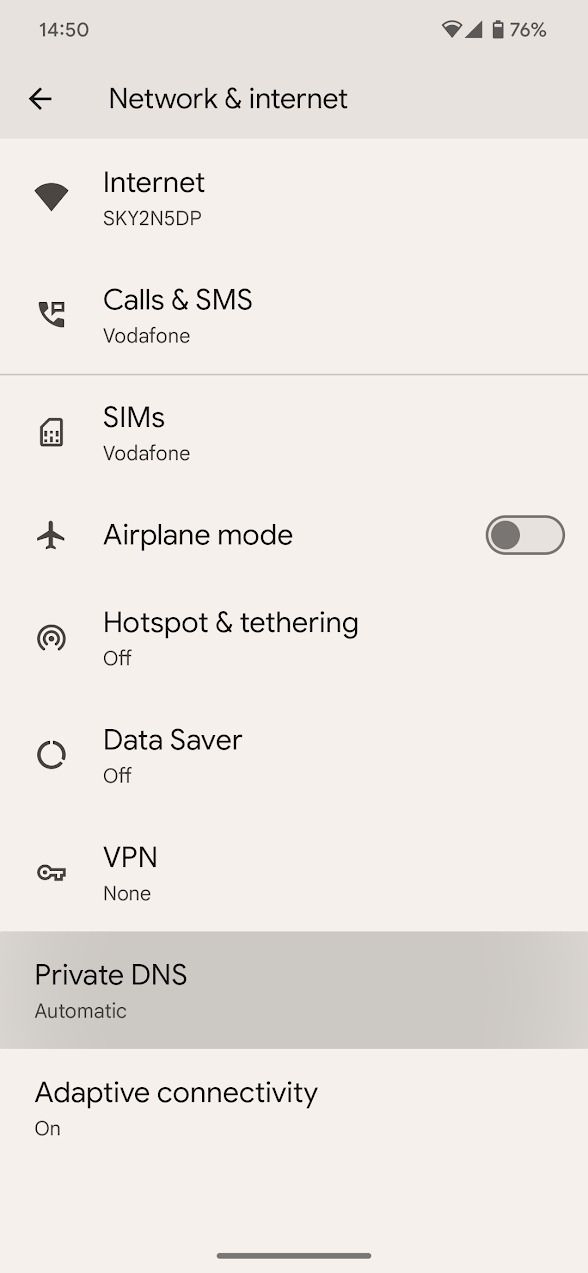
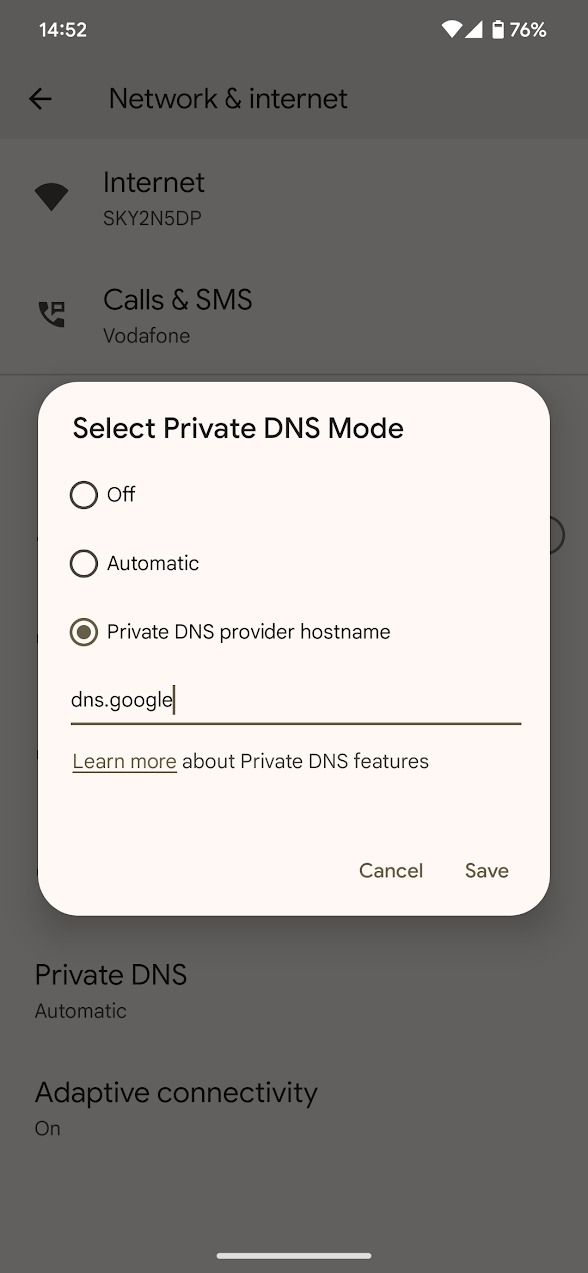
- Scroll down and tap Private DNS.
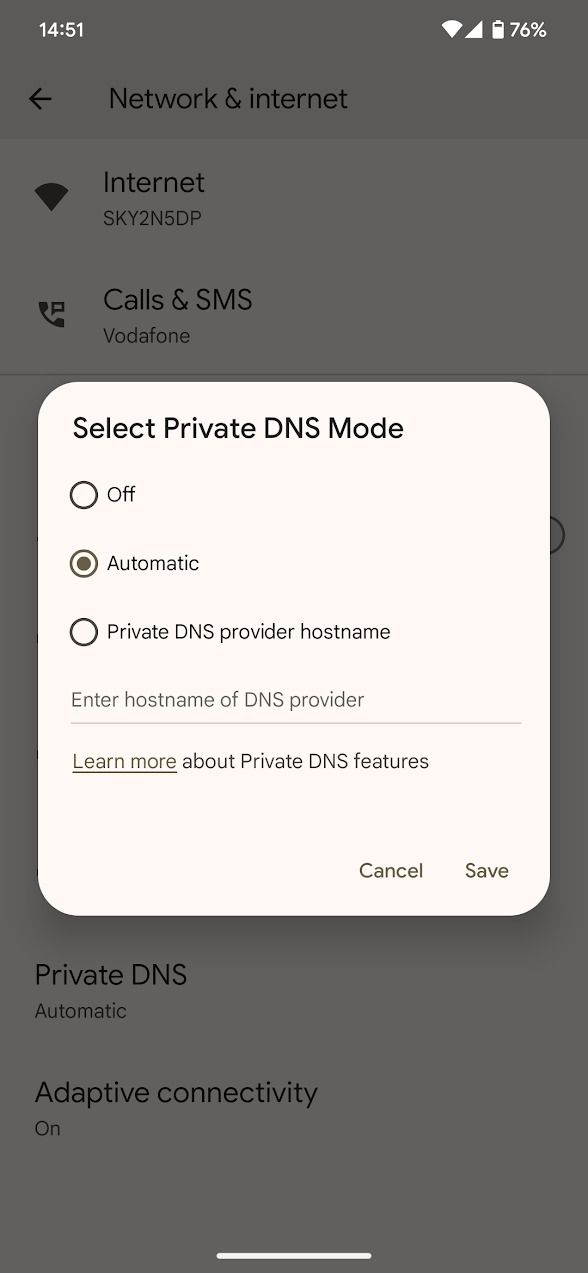
- Select the Private DNS provider hostname.
- Enter a DNS provider hostname (for example, dns.google).
- Tap Save.
Open a web browser and load a web page. If it loads, you’ve successfully switched your DNS server.
Keep this DNS trick handy
Switching your DNS server can improve connectivity regardless of what Wi-Fi network you connect to. It’s beneficial when traveling. Note that changing your DNS server doesn’t improve your browsing security. To make your browsing sessions more secure, we recommend using one of the top VPNs for Android.

Khám phá thêm từ Phụ Kiện Đỉnh
Đăng ký để nhận các bài đăng mới nhất được gửi đến email của bạn.

